As promised, I put the code of the climate_change app online. For that reason, I created an account on github trying to use Git for the first time. This is also the first time I am using a distributed version control system, i.e. you can create branches of the project, develop the forks separately on different computers, and merge them in any order. There is no main centralized repository. The code on github that I uploaded is just one initial copy.
I am still new to Git commands and workflows. You can share your knowledge with me. For example, maybe you know some good cheat sheet or writings about Git. Or you can try to fork the project I committed, change it somehow and then push for merging (not sure if I'm using correct jargon). I will share with you what I find interesting and useful about Git while learning it.
2009-10-20
2009-10-19
Weather App Tutorial. Part 5 of 5. Graph View
I had some problems with the internet, so I am posting this entry a little later that expected. But anyway, this is it - the final part of the tutorial about the weather app. You can read the first four parts here: 1, 2, 3, 4. Today I will show you how to display a chart with statistical data from the collected weather details.
I googled a little to find out what charting system to use for this small project. And I found Open Flash Chart as an interesting solution. It's a flash-based charting system which uses Ajax requests to get the data for the graphs. That means that we'll need a view which will show the graphs and another view, which will provide the data. Each location will have its own page displaying a chart, so it would be nice to have URLs where each location would be accessed by a slug. We already have a field
So I add this new field to the
Then I create and apply a migration for it:
Let's run the webserver once again. Go to
Next I need to define a view which will display the graphs. This looks as simple as this:
Whereas the template created at
Also let's not forget to download the Open Flash Chart flash file itself which is in the archive of this package. I placed the file
Originally, Open Flash Chart uses PHP on the server side to provide data to the flash-based client side. But fortunately there is a port to python which I will be using for forming the data to the charts. I don't want to get dirty fingers by creating all this manually forming JSON object using
Using the examples found at a tutorial, I created a view for providing chart data. The
If I run the webserver again and go to

We need some more data. There is Time Machine app in the Applications directory in my computer, so let's use it to move forward to year 2012 to check weather statistics. Damn it! It didn't function properly. Then I'll need to generate statistical data myself. Anyway, according to Mark Twain, there are three kinds of lies: lies, damned lies, and statistics.
I'll use python interactive development environment a.k.a. shell to prepopulate that data.
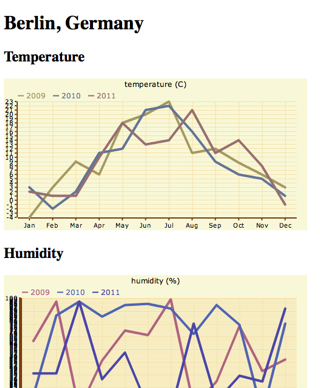
I defined minimal and maximal temperatures for each month in a tuple of tuples. Then I went through three years and for each month of that year I added random temperatures which would be in the range of minimal and maximal temperatures for that month. Humidity, wind speed and visibility are randomized without monthly ranges. The graph after data population looks like this:
That's it. Finally, I completed this tutorial. You had a chance to watch the process of Django app development. You saw, how virtualmin, migrations and third-party libraries can be used. Hopefully, you got some inspirations to create something cool by yourself just for fun.
I will publish the full code soon somewhere and you'll have a chance to download it and modify.
If something is too confusing, you don't understand some part of the tutorial, or you think that it could be improved somehow, don't hesitate to write comments.
I googled a little to find out what charting system to use for this small project. And I found Open Flash Chart as an interesting solution. It's a flash-based charting system which uses Ajax requests to get the data for the graphs. That means that we'll need a view which will show the graphs and another view, which will provide the data. Each location will have its own page displaying a chart, so it would be nice to have URLs where each location would be accessed by a slug. We already have a field
sysname which could be used here, but my best practice is to have separate fields for url slugs which might be changed at anytime and sysnames which should be defined once and not changed at all because the sysname binds an object with a template.So I add this new field to the
Location model in models.py:
class Location(models.Model):
    #...
    slug = models.SlugField(
        _("slug for urls"),
        max_length=200,
        unique=True,
        blank=True,
        default="",
        )
    #...
Then I create and apply a migration for it:
python manage.py startmigration add_slug --auto
python manage.py migrate climate_change
Let's run the webserver once again. Go to
http://127.0.0.1:8000/admin/climate_change/location/1/, add "berlin" as a slug and save the record.Next I need to define a view which will display the graphs. This looks as simple as this:
# -*- coding: UTF-8 -*-
from django.shortcuts import get_object_or_404, render_to_response

Location = models.get_model("climate_change", "Location")

def display_charts(request, slug):
    location = get_object_or_404(Location, slug=slug)
    return render_to_response(
        "climate_change/charts.html",
        {'location': location},
        context_instance=RequestContext(request),
        )
Whereas the template created at
templates/climate_change/charts.html includes this code:
{% extends "base.html" %}

{% load i18n %}

{% block title %}{{ location.name }}{% endblock %}

{% block header %}
    </code><h1>{{ location.name }}</h1>
{% endblock %}

{% block content %}
    <div class="chart-temperature">
        <h2>{% trans "Temperature" %}</h2>
        <object type="application/x-shockwave-flash" data="/media/flash/open-flash-chart.swf?data-file={% url climate_change_temperature slug=location.slug %}" height="250" width="500">
            <param name="movie" value="/media/flash/open-flash-chart.swf?data-file={% url climate_change_temperature slug=location.slug %}">
            <param name="allowScriptAccess" value="sameDomain">
            <param name="quality" value="high">
        </object>
    </div>
    <div class="chart-humidity">
        <h2>{% trans "Humidity" %}</h2>
        <object type="application/x-shockwave-flash" data="/media/flash/open-flash-chart.swf?data-file={% url climate_change_humidity slug=location.slug %}" height="250" width="500">
            <param name="movie" value="/media/flash/open-flash-chart.swf?data-file={% url climate_change_humidity slug=location.slug %}">
            <param name="allowScriptAccess" value="sameDomain">
            <param name="quality" value="high">
        </object>
    </div>
    <div class="chart-wind-speed">
        <h2>{% trans "Wind speed" %}</h2>
        <object type="application/x-shockwave-flash" data="/media/flash/open-flash-chart.swf?data-file={% url climate_change_wind_speed slug=location.slug %}" height="250" width="500">
            <param name="movie" value="/media/flash/open-flash-chart.swf?data-file={% url climate_change_wind_speed slug=location.slug %}">
            <param name="allowScriptAccess" value="sameDomain">
            <param name="quality" value="high">
        </object>
    </div>
    <div class="chart-visibility">
        <h2>{% trans "Visibility" %}</h2>
        <object type="application/x-shockwave-flash" data="/media/flash/open-flash-chart.swf?data-file={% url climate_change_visibility slug=location.slug %}" height="250" width="500">
            <param name="movie" value="/media/flash/open-flash-chart.swf?data-file={% url climate_change_visibility slug=location.slug %}">
            <param name="allowScriptAccess" value="sameDomain">
            <param name="quality" value="high">
        </object>
    </div>
{% endblock %}
Also let's not forget to download the Open Flash Chart flash file itself which is in the archive of this package. I placed the file
open-flash-chart.swf at media/flash.Originally, Open Flash Chart uses PHP on the server side to provide data to the flash-based client side. But fortunately there is a port to python which I will be using for forming the data to the charts. I don't want to get dirty fingers by creating all this manually forming JSON object using
simplejson, especially because there is not complete reference of Open-Flash-Chart API (just examples and tutorials). So I downloaded python port, extracted the content and copied OpenFlashChart.py to climate_change_env/lib/python2.5/site-packages/ which is the location of python libraries which will be installed a.k.a. under python path for the virtual environment "climate_change_env".Using the examples found at a tutorial, I created a view for providing chart data. The
views.py looks now like this:
# -*- coding: UTF-8 -*-
from datetime import datetime, timedelta
from random import random

# http://open-flash-chart-python.googlecode.com/files/Python%202.10.zip
from OpenFlashChart import Chart

from django.db import models
from django.http import HttpResponse
from django.template import RequestContext
from django.shortcuts import get_object_or_404, render_to_response
from django.utils.translation import ugettext as _
from django.utils.encoding import force_unicode

Location = models.get_model("climate_change", "Location")
WeatherLog = models.get_model("climate_change", "WeatherLog")

def display_charts(request, slug):
    location = get_object_or_404(Location, slug=slug)
    return render_to_response(
        "climate_change/charts.html",
        {'location': location},
        context_instance=RequestContext(request),
        )

def rgb_to_html_color(r, g, b):
    """ convert an R, G, B to #RRGGBB """
    return '#%02x%02x%02x' % (r, g, b)

def json_get_statistics(request, slug, field):
    location = get_object_or_404(Location, slug=slug)
    extreme_values = location.weatherlog_set.aggregate(
        models.Min(field),
        models.Max(field),
        models.Min("timestamp"),
        models.Max("timestamp"),
        )
    elements = []

    for year in range(
        extreme_values['timestamp__min'].year,
        extreme_values['timestamp__max'].year + 1,
        ):
        element = Chart()
        monthly_values = []
        for month in range (1, 13):
            monthly = location.weatherlog_set.filter(
                timestamp__year=year,
                timestamp__month=month,
                ).aggregate(models.Avg(field))
            monthly_values.append(monthly['%s__avg' % field])
        element.values = monthly_values
        element.type = "line"
        element.dot_style.type = "dot"
        element.dot_style.dot_size = 5
        random_html_color = rgb_to_html_color(
            r=63+int(random() * 128),
            g=63+int(random() * 128),
            b=63+int(random() * 128),
            )
        element.dot_style.colour = random_html_color
        element.width = 4
        element.colour = random_html_color
        element.text = str(year)
        element.font_size = 10
        elements.append(element)

    # Create chart
    chart = Chart()
    chart.y_axis.min = float(str(extreme_values['%s__min' % field]))
    chart.y_axis.max = float(str(extreme_values['%s__max' % field]))
    chart.y_axis.font_size = 10
    chart.title.text = force_unicode(WeatherLog._meta.get_field(field).verbose_name)
    chart.x_axis.labels.labels = [
        _("Jan"), _("Feb"), _("Mar"), _("Apr"),
        _("May"), _("Jun"), _("Jul"), _("Aug"),
        _("Sep"), _("Oct"), _("Nov"), _("Dec"),
        ]

    #
    # here we add our data sets to the chart:
    #
    chart.elements = elements

    return HttpResponse(chart.create())
If I run the webserver again and go to
http://127.0.0.1:8000/climate-change/berlin/, I see a single dot in each graph.
We need some more data. There is Time Machine app in the Applications directory in my computer, so let's use it to move forward to year 2012 to check weather statistics. Damn it! It didn't function properly. Then I'll need to generate statistical data myself. Anyway, according to Mark Twain, there are three kinds of lies: lies, damned lies, and statistics.
I'll use python interactive development environment a.k.a. shell to prepopulate that data.
python manage.py shell
>>> from django.db import models
>>> Location = models.get_model("climate_change", "Location")
>>> location = Location.objects.get(sysname="berlin")
>>> extremes = (
...     (-5, 4), (-4, 5), (-2, 10), (2, 15),
...     (6, 20), (9, 24), (11, 25), (10, 25),
...     (7, 20), (4, 15), (0, 9), (-2, 5),
...     )
>>> from random import random
>>> from datetime import datetime
>>> for year in range(2009, 2012):
...     for month in range(1, 13):
...         temp_range = extremes[month-1][1] - extremes[month-1][0]
...         t = extremes[month-1][0] + int(random() * temp_range)
...         location.weatherlog_set.create(
...             timestamp=datetime(year, month, 1),
...             temperature=t,
...             humidity=int(random()*100),
...             wind_speed="%.2f" % (random()*372),,
...             visibility="%.2f" % (random()*100),
...             )
I defined minimal and maximal temperatures for each month in a tuple of tuples. Then I went through three years and for each month of that year I added random temperatures which would be in the range of minimal and maximal temperatures for that month. Humidity, wind speed and visibility are randomized without monthly ranges. The graph after data population looks like this:

That's it. Finally, I completed this tutorial. You had a chance to watch the process of Django app development. You saw, how virtualmin, migrations and third-party libraries can be used. Hopefully, you got some inspirations to create something cool by yourself just for fun.
I will publish the full code soon somewhere and you'll have a chance to download it and modify.
If something is too confusing, you don't understand some part of the tutorial, or you think that it could be improved somehow, don't hesitate to write comments.
2009-10-17
Weather App Tutorial. Part 4 of 5. Template Tag
If you followed the first parts of the tutorial, you should have basic understanding how to create an app with models, set up administration, and retrieve data from third-party services. This part is about displaying collected data in any template using custom template tag.
At first, we need to create a directory
I will call the template library
But wait! It's such a pain to add new fields and modify database schema... Not, if you are using south! Let's quickly install it and then put it under INSTALLED_APPS.
Note that south was installed in the virtual environment not spoiling the global python namespace. Now we will syncronize the database to create
Now we can finally add the new
I had to set the default value to empty string because otherwise south throws exception when I use sqlite3. Anyway, after running those commands, I started the built in webserver again and added the
We can get back to
As you might see from the code, the template tag is using a template which can be redefined by the template designer. We still need the default template itself, so I will create a directory
How can I test the template tag? I will need a new page which will include it. So I will add a rule in
So the
The
And also we'll need an extension in the
When I run the development server and go to

It's time for the graphs! The end of this tutorial will be published here tomorrow.
At first, we need to create a directory
templatetags containing an empty __init__.py file in the climate_change directory.
mkdir -p climate_change/templatetags
touch climate_change/templatetags/__init__.py
I will call the template library
weather. So I have to create a file weather.py in climate_change/templatetags and define and register the template tag in that file. The template tag get_current_weather should display the current weather for a chosen location. To define what location you choose, you could refer to id, name or location_id, but none of them is appropriate for this reason. id and location_id are not remember-able and not informative enough, whereas the name might be changed to translate the city to another language or to add some more specifics and this change would detach the template tag from the location. For those reasons, it is best to create a new field sysname for the location model which would have a unique non-changeable value as a textual humanized identifier for templates.But wait! It's such a pain to add new fields and modify database schema... Not, if you are using south! Let's quickly install it and then put it under INSTALLED_APPS.
easy_install south
#...
INSTALLED_APPS = (
    # django core
    "django.contrib.auth",
    "django.contrib.contenttypes",
    "django.contrib.sessions",
    "django.contrib.sites",
    "django.contrib.admin",
    # third-party
    "south",
    # project-specific
    "climate_change",
    )
#...
Note that south was installed in the virtual environment not spoiling the global python namespace. Now we will syncronize the database to create
south_history table, create the initial migration for climate_change and apply it.
# create the missing database table from south app
python manage.py syncdb
# create initial migration for climate_change app which will be used by new projects
python manage.py startmigration climate_change --initial
# fake this migration for this project
python manage.py migrate climate_change --fake
Now we can finally add the new
sysname field, create migration for it and apply it.
#...
class Location(models.Model):
    sysname = models.SlugField(
        _("system name"),
        max_length=200,
        unique=True,
        blank=True,
        default="",
        help_text=_("Do not change this value"),
        )
    name = models.CharField(_("name"), max_length=200)
    location_id = models.CharField(
        _("location ID"),
        max_length=20,
        help_text=_("Location IDs can be retrieved from URLs of weather "
            "at specific cities at Yahoo! Weather, e.g. GMXX0008 from "
            "http://weather.yahoo.com/forecast/GMXX0008.html"),
        )
#...
# create a new migration called "add_sysname"
python manage.py startmigration climate_change add_sysname --auto
# apply it to the database
python manage.py migrate climate_change
I had to set the default value to empty string because otherwise south throws exception when I use sqlite3. Anyway, after running those commands, I started the built in webserver again and added the
sysname "berlin" to the record of Berlin's location.We can get back to
weather.py and add the template tag there
# -*- coding: UTF-8 -*-
from django.db import models
from django import template
from django.template import loader

register = template.Library()

### TAGS ###

def do_get_current_weather(parser, token):
    """
    Returns the latest known weather information.

    Usage::

        {% get_current_weather in <location_sysname> [using <template_path>] [as <var_name>] %}

    Examples::

        {% get_current_weather in "berlin" using "climate_change/custom_weather.html" %}

        {% get_current_weather in "london" as current_weather %}
        var sCurrentWeather = "{{ current_weather|escapejs }}";

    """
    bits = token.split_contents()
    tag_name = bits.pop(0)
    template_path = ""
    var_name = ""
    location_sysname = ""
    try:
        while bits:
            first_word = bits.pop(0)
            second_word = bits.pop(0)
            if first_word == "in":
                location_sysname = second_word
            elif first_word == "using":
                template_path = second_word
            elif first_word == "as":
                var_name = second_word

    except ValueError:
        raise template.TemplateSyntaxError, "get_current_weather tag requires a following syntax: {% get_current_weather [using <template_path>] [as <var_name>] %}"
    return CurrentWeatherNode(tag_name, location_sysname, template_path, var_name)

class CurrentWeatherNode(template.Node):
    def __init__(self, tag_name, location_sysname, template_path, var_name):
        self.tag_name = tag_name
        self.location_sysname = location_sysname
        self.template_path = template_path
        self.var_name = var_name
    def render(self, context):
        location_sysname = template.resolve_variable(
            self.location_sysname,
            context,
            )
        template_path = ""
        if self.template_path:
            template_path = template.resolve_variable(
                self.template_path,
                context,
                )
        context.push()
        WeatherLog = models.get_model("climate_change", "WeatherLog")
        logs = WeatherLog.objects.filter(
            location__sysname=location_sysname,
            ).order_by("-timestamp")
        if logs:
            context['weather'] = logs[0]
        output = loader.render_to_string(
            [template_path, "climate_change/current_weather.html"],
            context,
            )
        context.pop()
        if self.var_name:
            context[self.var_name] = output
            return ""
        else:
            return output


register.tag("get_current_weather", do_get_current_weather)

### FILTERS ###

# none at the moment
As you might see from the code, the template tag is using a template which can be redefined by the template designer. We still need the default template itself, so I will create a directory
templates/climate_change and a file current_weather.html with this content:
{% load i18n %}
<div class="current-wheather">
    <h3>{{ weather.location.name }}</h3>
    <dl>
        <dt>{% trans "Temperature" %}:</dt>
        <dd>{{ weather.temperature }}° C</dd>
        <dt>{% trans "Humidity" %}:</dt>
        <dd>{{ weather.humidity }} %</dd>
        <dt>{% trans "Wind speed" %}:</dt>
        <dd>{{ weather.wind_speed }} km/h</dd>
        <dt>{% trans "Visibility" %}:</dt>
        <dd>{{ weather.visibility }} km</dd>
    </dl>
</div>
How can I test the template tag? I will need a new page which will include it. So I will add a rule in
urls.py to redirect root url to index.html which will extend from base.html.So the
base.html looks like this:
{% block doctype %}>!DOCTYPE html PUBLIC "-//W3C//DTD XHTML 1.0 Strict//EN""http://www.w3.org/TR/xhtml1/DTD/xhtml1-strict.dtd">{% endblock %}

{% load i18n %}

<html>
<head>
    <meta http-equiv="Content-type" content="text/html; charset=utf-8" />
    <title>{% block title %}simple document{% endblock %}</title>
    {% block extra_head %}{% endblock %}
</head>
<body>
    <div id="header">{% block header %}{% endblock %}</div>
    <div id="content">{% block content %}{% endblock %}</div>
    <div id="footer">{% block footer %}{% endblock %}</div>
</body>
</html>
The
index.html looks like this:
{% extends "base.html" %}
{% load i18n weather %}
{% block content %}
    {% get_current_weather in "berlin" %}
{% endblock %}
And also we'll need an extension in the
urls.py:
from django.conf.urls.defaults import *
from django.contrib import admin

admin.autodiscover()

urlpatterns = patterns("",
    (
        r"^$",
        "django.views.generic.simple.direct_to_template",
        {'template': "index.html"},
        ),
    (r"^admin/", include(admin.site.urls)),
    )
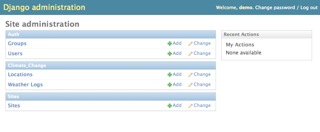
When I run the development server and go to
http://127.0.0.1:8000/, I see this:
It's time for the graphs! The end of this tutorial will be published here tomorrow.
2009-10-16
Weather App Tutorial. Part 3 of 5. Management Command
As you might have noticed, this is a continuous tutorial about an app which regularly checks weather and reports how it changes throughout years. Previously I wrote how to start a project and define the models. The interestingness of the app starts now. I will show you how to import weather details from Yahoo! Weather using a management command.
Management commands in Django are those which are recognized by
To create a management command, you have to create directories
Now I'll create a file
Now we can try running the command from the project directory using the following:
I get this result:
To define this task as a cron job running hourly, you can either type
OK. Cool. The next thing to do is the template tag which displays the details of recent weather.
Management commands in Django are those which are recognized by
manage.py and django-admin.py, e.g. syncdb, shell, runserver, etc. It's not difficult to inject your own custom commands for your app. We'll need one that will be set as a scheduled task to check the current weather.To create a management command, you have to create directories
management/commands/ inside of your climate_change directory and create empty files __init__.py in each of them.
mkdir -p climate_change/management/commands
touch climate_change/management/__init__.py
touch climate_change/management/commands/__init__.py
Now I'll create a file
climate_change/management/commands/check_weather.py which will aggregate the data from the feed. Just looking at the examples of Django core commands, you can find, that management-command modules should have a class Command with an overridden method handle_norargs which will have all the logic of the command. I found an example of importing weather from Yahoo! and will be using it here.
# -*- coding: UTF-8 -*-
import urllib
from xml.dom import minidom
from pprint import pprint
from datetime import datetime

from django.db import models
from django.core.management.base import NoArgsCommand

Location = models.get_model("climate_change", "Location")
WeatherLog = models.get_model("climate_change", "WeatherLog")

SILENT, NORMAL, VERBOSE = 0, 1, 2

WEATHER_URL = 'http://xml.weather.yahoo.com/forecastrss?p=%s&u=c'
WEATHER_NS = 'http://xml.weather.yahoo.com/ns/rss/1.0'

def weather_for_location(location_id):
    # taken from http://developer.yahoo.com/python/python-xml.html
    # and modified a little
    url = WEATHER_URL % location_id
    dom = minidom.parse(urllib.urlopen(url))
    forecasts = []
    for node in dom.getElementsByTagNameNS(WEATHER_NS, 'forecast'):
        forecasts.append({
            'date': node.getAttribute('date'),
            'low': node.getAttribute('low'),
            'high': node.getAttribute('high'),
            'condition': node.getAttribute('text')
        })
    ycondition = dom.getElementsByTagNameNS(WEATHER_NS, 'condition')[0]
    ywind = dom.getElementsByTagNameNS(WEATHER_NS, 'wind')[0]
    yatmosphere = dom.getElementsByTagNameNS(WEATHER_NS, 'atmosphere')[0]
    return {
        'current_condition': ycondition.getAttribute('text'),
        'current_temp': ycondition.getAttribute('temp'),
        'current_humidity': yatmosphere.getAttribute('humidity'),
        'current_visibility': yatmosphere.getAttribute('visibility'),
        'current_wind_speed': ywind.getAttribute('speed'),
        'forecasts': forecasts,
        'title': dom.getElementsByTagName('title')[0].firstChild.data,
        'guid': dom.getElementsByTagName('guid')[0].firstChild.data,
    }

class Command(NoArgsCommand):
    help = "Aggregates data from weather feed"
    def handle_noargs(self, **options):
        verbosity = int(options.get('verbosity', NORMAL))

        created_count = 0
        for l in Location.objects.all():
            weather = weather_for_location(l.location_id)
            if verbosity > NORMAL:
                pprint(weather)
            timestamp_parts = map(int, weather['guid'].split("_")[1:-1])
            timestamp = datetime(*timestamp_parts)
            log, created = WeatherLog.objects.get_or_create(
                 location=l,
                 timestamp=timestamp,
                 defaults={
                    'temperature': weather['current_temp'],
                    'humidity': weather['current_humidity'],
                    'wind_speed': weather['current_wind_speed'],
                    'visibility': weather['current_visibility'],
                    }
                 )
            if created:
                created_count += 1
        if verbosity > NORMAL:
            print "New weather logs: %d" % created_count
Now we can try running the command from the project directory using the following:
python manage.py check_weather --verbosity=2
I get this result:
{'current_condition': u'Mostly Cloudy',
 'current_humidity': u'94',
 'current_temp': u'10',
 'current_visibility': u'9.99',
 'current_wind_speed': u'16.09',
 'forecasts': [{'condition': u'Partly Cloudy',
                'date': u'6 Oct 2009',
                'high': u'19',
                'low': u'14'},
               {'condition': u'PM Light Rain',
                'date': u'7 Oct 2009',
                'high': u'23',
                'low': u'14'}],
 'guid': u'GMXX0008_2009_10_06_10_20_CEST',
 'title': u'Yahoo! Weather - Berlin/Schonefeld, GM'}
New weather logs: 1
To define this task as a cron job running hourly, you can either type
echo 0 * * * * cd /path/to/climate_change_env/ && source bin/activate && cd blog_action_day_2009 && python manage.py check_weather && deactivate > crontab.txt
crontab crontab.txt
del crontab.txt
check_weather command there.OK. Cool. The next thing to do is the template tag which displays the details of recent weather.
2009-10-15
Weather App Tutorial. Part 2 of 5. Models
This is the second part of my tutorial how to make a weather app. This time I will show you how to create the models and set up the admin.
Open the
The models are created. Now let's create the database schema for them.
Also in this step when asked, I created a superuser called "demo" to be able to access django-contributed administration. Let's try it out. We'll need to add a file
Then uncomment admin related lines in
Finally, run the development server and check if the models really work.
Yes! Everything works as expected for now. I will add my current location and its ID in Yahoo! Weather to the database. For me it's Berlin, Germany and the ID is
Tomorrow I will show you how to import weather details from Yahoo!
Open the
models.py file in the climate_change directory and enter the following:
# -*- coding: UTF-8 -*-
from django.db import models
from django.utils.translation import ugettext_lazy as _
from django.conf import settings

class Location(models.Model):
    name = models.CharField(_("name"), max_length=200)
    location_id = models.CharField(
        _("location ID"),
        max_length=20,
        help_text=_("Location IDs can be retrieved from URLs of weather "
            "at specific cities at Yahoo! Weather, e.g. GMXX0008 from "
            "http://weather.yahoo.com/forecast/GMXX0008.html"),
        )

    class Meta:
        verbose_name=_("location")
        verbose_name_plural=_("locations")

    def __unicode__(self):
        return self.name

class WeatherLog(models.Model):
    location = models.ForeignKey(Location, verbose_name=_("location"))
    timestamp = models.DateTimeField(_("timestamp"))
    temperature = models.IntegerField(_("temperature (C°)"))
    humidity = models.IntegerField(_("humidity (%)"))
    wind_speed = models.DecimalField(
         _("wind speed (km/h)"),
         max_digits=5,
         decimal_places=2,
         )
    visibility = models.DecimalField(
         _("visibility (km)"),
         max_digits=5,
         decimal_places=2,
         )

    class Meta:
        verbose_name=_("weather log")
        verbose_name_plural=_("weather logs")
        ordering = ("-timestamp",)

    def __unicode__(self):
        return "%s @ %s" % (
            self.location.name,
            self.timestamp.strftime("%Y-%m-%dT%H:%M"),
            )
The models are created. Now let's create the database schema for them.
python manage.py syncdb
Also in this step when asked, I created a superuser called "demo" to be able to access django-contributed administration. Let's try it out. We'll need to add a file
admin.py to climate_change with this content:
# -*- coding: utf-8 -*-
from django.db import models
from django.contrib import admin

Location = models.get_model("climate_change", "Location")
WeatherLog = models.get_model("climate_change", "WeatherLog")

admin.site.register(Location)
admin.site.register(WeatherLog)
Then uncomment admin related lines in
urls.py of the project:
# -*- coding: utf-8 -*-
from django.conf.urls.defaults import *
from django.contrib import admin
admin.autodiscover()

urlpatterns = patterns("",
    (r"^admin/", include(admin.site.urls)),
    )
Finally, run the development server and check if the models really work.
python shell runserver
# now you can go to http://127.0.0.1:8000/admin/ in a browser

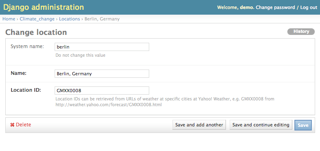
Yes! Everything works as expected for now. I will add my current location and its ID in Yahoo! Weather to the database. For me it's Berlin, Germany and the ID is
GMXX0008. I found the ID in the URL of the page showing the weather for Berlin.
Tomorrow I will show you how to import weather details from Yahoo!
2009-10-14
Weather App Tutorial. Part 1 of 5. Preparation
It is Blog Action Day tomorrow so I decided to participate in it as a blogger again. The theme for this year is "Climate Change". After a little brainstorm, I came up with an idea to write a tutorial how to build an app which regularly checks local weather and lets you compare different weather features for months of different years.
I'll use Yahoo! Weather to check the current weather. From all information that it provides, we'll be mostly interested in temperature, humidity, wind speed, and visibility in the current location. The app will check the weather regularly, will allow you to show the current weather, and also provide a graph comparing average monthly weathers throughout years.
So let's start with the new project. I have quite a clean computer and want to do the app the nice way. So first of all, I will install
I created a directory
Let's create a virtual environment and start the new project and app.
Since now I see
To get started quickly, I will use sqlite3 database now. As I am using python 2.5, I don't need to install sqlite3 module, because it's already there. So I open the
Now we'll need those parts:
But I'll continue about that tomorrow.
To end today's post, let's watch a video about a regular guy who talks about weather when he has nothing to say:
I'll use Yahoo! Weather to check the current weather. From all information that it provides, we'll be mostly interested in temperature, humidity, wind speed, and visibility in the current location. The app will check the weather regularly, will allow you to show the current weather, and also provide a graph comparing average monthly weathers throughout years.
So let's start with the new project. I have quite a clean computer and want to do the app the nice way. So first of all, I will install
virtualenv to be able to install third-party python libraries in a closed environment which will only be used for this project (I have already installed setuptools and django).
# install virtualenv
sudo easy_install virtualenv
I created a directory
Projects in my home directory and cd to it.Let's create a virtual environment and start the new project and app.
# create virtual environment "climate_change_env"
virtualenv climate_change_env
cd climate_change_env/
# activate the environment
source bin/activate
Since now I see
(climate_change_env) as a prefix to each command line. I'll type deactivate at some point later to get out of this virtual environment.
# create django project "blog_action_day_2009"
django-admin.py startproject blog_action_day_2009
cd blog_action_day_2009/
# create django app "climate_change"
django-admin.py startapp climate_change
# create folders for templates and media
mkdir templates media
To get started quickly, I will use sqlite3 database now. As I am using python 2.5, I don't need to install sqlite3 module, because it's already there. So I open the
settings.py and define those settings:import os
PROJECT_DIR = os.path.dirname(__file__)
# ...
DATABASE_ENGINE = "sqlite3"
DATABASE_NAME = "blog_action_day_2009.sqlite3"
# ...
MEDIA_ROOT = os.path.join(PROJECT_DIR, "media")
MEDIA_URL = "/media/"
ADMIN_MEDIA_PREFIX = "/admin/media/"
# ...
TEMPLATE_DIRS = [
os.path.join(PROJECT_DIR, "templates"),
]
# ...
INSTALLED_APPS = (
"django.contrib.auth",
"django.contrib.contenttypes",
"django.contrib.sessions",
"django.contrib.sites",
"django.contrib.admin",
"climate_change",
)
Now we'll need those parts:
- Models for locations and imported weather information.
- Management command for importing data from Yahoo! Weather.
- Template tag for displaying latest weather.
- View for displaying a graph.
But I'll continue about that tomorrow.
To end today's post, let's watch a video about a regular guy who talks about weather when he has nothing to say:
Subscribe to:
Posts (Atom)