Showing posts with label Architecture. Show all posts

2022-04-09

Generic Functionality without Generic Relations

When you have some generic functionality like anything commentable, likable, or upvotable, it’s common to use Generic Relations in Django. The problem with Generic Relations is that they create the relationships at the application level instead of the database level, and that requires a lot of database queries if you want to aggregate content that shares the generic functionality. There is another way that I will show you in this article.

I learned this technique at my first job in 2002 and then rediscovered it again with Django a few years ago. The trick is to have a generic Item model where every other autonomous model has a one-to-one relation to the Item. Moreover, the Item model has an item_type field, allowing you to recognize the backward one-to-one relationship.

Then whenever you need to have some generic categories, you link them to the Item. Whenever you create generic functionality like media gallery, comments, likes, or upvotes, you attach them to the Item. Whenever you need to work with permissions, publishing status, or workflows, you deal with the Item. Whenever you need to create a global search or trash bin, you work with the Item instances.

Let’s have a look at some code.

Items

First, I'll create the items app with two models: the previously mentioned Item and the abstract model ItemBase with the one-to-one relation for various models to inherit:

# items/models.py
import sys

from django.db import models
from django.apps import apps

if "makemigrations" in sys.argv:
    from django.utils.translation import gettext_noop as _
else:
    from django.utils.translation import gettext_lazy as _


class Item(models.Model):
    """
    A generic model for all autonomous models to link to.
    
    Currently these autonomous models are available:
    - content.Post
    - companies.Company
    - accounts.User
    """
    ITEM_TYPE_CHOICES = (
        ("content.Post", _("Post")),
        ("companies.Company", _("Company")),
        ("accounts.User", _("User")),
    )
    item_type = models.CharField(
        max_length=200, choices=ITEM_TYPE_CHOICES, editable=False, db_index=True
    )

    class Meta:
        verbose_name = _("Item")
        verbose_name_plural = _("Items")

    def __str__(self):
        content_object_title = (
            str(self.content_object) if self.content_object else "BROKEN REFERENCE"
        )
        return (
            f"{content_object_title} ({self.get_item_type_display()})"
        )

    @property
    def content_object(self):
        app_label, model_name = self.item_type.split(".")
        model = apps.get_model(app_label, model_name)
        return model.objects.filter(item=self).first()


class ItemBase(models.Model):
    """
    An abstract model for the autonomous models that will link to the Item.
    """
    item = models.OneToOneField(
        Item,
        verbose_name=_("Item"),
        editable=False,
        blank=True,
        null=True,
        on_delete=models.CASCADE,
        related_name="%(app_label)s_%(class)s",
    )

    class Meta:
        abstract = True

    def save(self, *args, **kwargs):
        if not self.item:
            model = type(self)
            item = Item.objects.create(
                item_type=f"{model._meta.app_label}.{model.__name__}"
            )
            self.item = item
        super().save()

    def delete(self, *args, **kwargs):
        if self.item:
            self.item.delete()
        super().delete(*args, **kwargs)

Then let's create some autonomous models that will have one-to-one relations with the Item. By "autonomous models," I mean those which are enough by themselves, such as posts, companies, or accounts. Models like types, categories, tags, or likes, wouldn't be autonomous.

Posts

Second, I create the content app with the Post model. This model extends ItemBase which will create the one-to-one relation on save, and will define the item_type as content.Post:

# content/models.py
import sys

from django.contrib.auth.base_user import BaseUserManager
from django.db import models
from django.contrib.auth.models import AbstractUser

if "makemigrations" in sys.argv:
    from django.utils.translation import gettext_noop as _
else:
    from django.utils.translation import gettext_lazy as _

from items.models import ItemBase


class Post(ItemBase):
    title = models.CharField(_("Title"), max_length=255)
    slug = models.SlugField(_("Slug"), max_length=255)
    content = models.TextField(_("Content"))

    class Meta:
        verbose_name = _("Post")
        verbose_name_plural = _("Posts")

Companies

Third, I create the companies app with the Company model. This model also extends ItemBase which will create the one-to-one relation on save, and will define the item_type as companies.Company:

# companies/models.py
import sys

from django.contrib.auth.base_user import BaseUserManager
from django.db import models
from django.contrib.auth.models import AbstractUser

if "makemigrations" in sys.argv:
    from django.utils.translation import gettext_noop as _
else:
    from django.utils.translation import gettext_lazy as _

from items.models import ItemBase


class Company(ItemBase):
    name = models.CharField(_("Name"), max_length=255)
    slug = models.SlugField(_("Slug"), max_length=255)
    description = models.TextField(_("Description"))

    class Meta:
        verbose_name = _("Company")
        verbose_name_plural = _("Companies")

Accounts

Fourth, I'll have a more extensive example with the accounts app containing the User model. This model extends AbstractUser from django.contrib.auth as well as ItemBase for the one-to-one relation. The item_type set at the Item model will be accounts.User:

# accounts/models.py
import sys

from django.db import models
from django.contrib.auth.base_user import BaseUserManager
from django.contrib.auth.models import AbstractUser

if "makemigrations" in sys.argv:
    from django.utils.translation import gettext_noop as _
else:
    from django.utils.translation import gettext_lazy as _

from items.models import ItemBase


class UserManager(BaseUserManager):
    def create_user(self, username="", email="", password="", **extra_fields):
        if not email:
            raise ValueError("Enter an email address")
        email = self.normalize_email(email)
        user = self.model(username=username, email=email, **extra_fields)
        user.set_password(password)
        user.save(using=self._db)
        return user

    def create_superuser(self, username="", email="", password=""):
        user = self.create_user(email=email, password=password, username=username)
        user.is_superuser = True
        user.is_staff = True
        user.save(using=self._db)
        return user


class User(AbstractUser, ItemBase):
    # change username to non-editable non-required field
    username = models.CharField(
        _("Username"), max_length=150, editable=False, blank=True
    )
    # change email to unique and required field
    email = models.EmailField(_("Email address"), unique=True)
    bio = models.TextField(_("Bio"))

    USERNAME_FIELD = "email"
    REQUIRED_FIELDS = []

    objects = UserManager()

Creating new items

I will use the Django shell to create several autonomous model instances and the related Items too:

>>> from content.models import Post
>>> from companies.models import Company
>>> from accounts.models import User
>>> from items.models import Item
>>> post = Post.objects.create(
...     title="Hello, World!",
...     slug="hello-world",
...     content="Lorem ipsum…",
... )
>>> company = Company.objects.create(
...     name="Aidas & Co",
...     slug="aidas-co",
...     description="Lorem ipsum…",
... )
>>> user = User.objects.create_user(
...     username="aidas",
...     email="aidas@example.com",
...     password="jdf234oha&6sfhasdfh",
... )
>>> Item.objects.count()
3

Aggregating content from all those relations

Lastly, here is an example of having posts, companies, and users in a single view. For that, we will use the Item queryset with annotations:

from django import forms
from django.db import models
from django.shortcuts import render
from django.utils.translation import gettext, gettext_lazy as _

from .models import Item


class SearchForm(forms.Form):
    q = forms.CharField(label=_("Search"), required=False)
    

def all_items(request):
    qs = Item.objects.annotate(
        title=models.Case(
            models.When(
                item_type="content.Post", 
                then="content_post__title",
            ),
            models.When(
                item_type="companies.Company", 
                then="companies_company__name",
            ),
            models.When(
                item_type="accounts.User",
                then="accounts_user__email",
            ),
            default=models.Value(gettext("<Untitled>")),
        ),
        description=models.Case(
            models.When(
                item_type="content.Post",
                then="content_post__content",
            ),
            models.When(
                item_type="companies.Company",
                then="companies_company__description",
            ),
            models.When(
                item_type="accounts.User", 
                then="accounts_user__bio",
                ),
            default=models.Value(""),
        ),
    )
    
    form = SearchForm(data=request.GET, prefix="search")
    if form.is_valid():
        query = form.cleaned_data["q"]
        if query:
            qs = qs.annotate(
                search=SearchVector(
                    "title",
                    "description",
                )
            ).filter(search=query)

    context = {
        "queryset": qs,
        "search_form": form,
    }
    return render(request, "items/all_items.html", context)

Final words

You can have generic functionality and still avoid multiple hits to the database by using the Item one-to-one approach instead of generic relations.

The name of the Item model can be different, and you can even have multiple such models for various purposes, for example, TaggedItem for tags only.

Do you use anything similar in your projects?

Do you see how this approach could be improved?

Let me know in the comments!


Cover picture by Pixabay
2020-03-22

How to Upload a File Using Django REST Framework

How to Upload a File Using Django REST Framework

When you develop a web app or a mobile app with Django, it is common to use the Django REST Framework for communication with the server-side. The client-side makes GET, POST, PUT, and DELETE requests to the REST API to read, create, update, or delete data there. The communication by Ajax is pretty uncomplicated, but how would you upload an image or another file to the server? I will show you that in this article by creating user avatar upload via REST API. Find the full code for this feature on Github.

Extend Django User model

We will start by installing Pillow for image handling to the virtual environment using the standard pip command:

(venv)$ pip install Pillow

Create accounts app with a custom User model:

# myproject/apps/accounts/models.py
import os
import sys
from django.db import models
from django.contrib.auth.models import AbstractUser
from django.utils import timezone
from django.utils.translation import gettext_lazy as _

def upload_to(instance, filename):
    now = timezone.now()
    base, extension = os.path.splitext(filename.lower())
    milliseconds = now.microsecond // 1000
    return f"users/{instance.pk}/{now:%Y%m%d%H%M%S}{milliseconds}{extension}"

class User(AbstractUser):
    # …
    avatar = models.ImageField(_("Avatar"), upload_to=upload_to, blank=True)

You can add there as many fields as you need, but the noteworthy part there is the avatar field.

Update the settings and add the accounts app to INSTALLED_APPS, set the AUTH_USER_MODEL, and the configuration for the static and media directories:

# myproject/settings.py
INSTALLED_APPS = [
    # …
    "myproject.apps.accounts",
]

AUTH_USER_MODEL = "accounts.User"

STATICFILES_DIRS = [os.path.join(BASE_DIR, "myproject", "site_static")]
STATIC_ROOT = os.path.join(BASE_DIR, "myproject", "static")
STATIC_URL = "/static/"
MEDIA_ROOT = os.path.join(BASE_DIR, "myproject", "media")
MEDIA_URL = "/media/"

Next small steps:

  • Create and run migrations with the makemigrations and migrate management commands.
  • Set up the custom model administration for the new User model.
  • Create the superuser with the createsuperuser management command.

Install and configure Django REST Framework

Install Django REST Framework for the REST APIs to your virtual environment, as always, using pip:

(venv)$ pip install djangorestframework

We'll be using authentication by tokens in this example. So add Django REST Framework to INSTALLED_APPS in the settings and set TokenAuthentication as the default authentication in the REST_FRAMEWORK configuration:

# myproject/settings.py
INSTALLED_APPS = [
    # …
    "rest_framework",
    "rest_framework.authtoken",
    # …
]

REST_FRAMEWORK = {
    'DEFAULT_AUTHENTICATION_CLASSES': [
        'rest_framework.authentication.TokenAuthentication',
    ]
}

Prepare the serializer and the view

In Django REST Framework, serializers are used for data validation, rendering, and saving. They are similar to Django forms. Prepare UserAvatarSerializer for avatar uploads:

# myproject/apps/accounts/serializers.py
from django.contrib.auth import get_user_model
from rest_framework.serializers import ModelSerializer
User = get_user_model()

class UserAvatarSerializer(ModelSerializer):
    class Meta:
        model = User
        fields = ["avatar"]

    def save(self, *args, **kwargs):
        if self.instance.avatar:
            self.instance.avatar.delete()
        return super().save(*args, **kwargs)

Now create an API view UserAvatarUpload for avatar uploads.

# myproject/apps/accounts/views.py
from rest_framework import status
from rest_framework.parsers import MultiPartParser, FormParser
from rest_framework.permissions import IsAuthenticated
from rest_framework.response import Response
from rest_framework.views import APIView
from .serializers import UserAvatarSerializer

class UserAvatarUpload(APIView):
    parser_classes = [MultiPartParser, FormParser]
    permission_classes = [IsAuthenticated]

    def post(self, request, format=None):
        serializer = UserAvatarSerializer(data=request.data, instance=request.user)
        if serializer.is_valid():
            serializer.save()
            return Response(serializer.data, status=status.HTTP_200_OK)
        else:
            return Response(serializer.errors, status=status.HTTP_400_BAD_REQUEST)

Make sure that the view uses MultiPartParser as one of the parser classes. That's necessary for the file transfers.

Prepare the URL configuration

In the URL configuration, we will need those URL rules:

  • The path for the index page. Let's make it a direct TemplateView.
  • The path for logging in by user credentials and obtaining the authentication token.
  • The path for user avatar upload.
  • The path for model administration.
  • The path for static URLs.
  • And finally, the path for media URLs.
# myroject/urls.py
from django.conf.urls.static import static
from django.contrib import admin
from django.urls import path
from django.views.generic import TemplateView
from django.conf import settings
from myproject.accounts.views import UserAvatarUpload
from rest_framework.authtoken.views import obtain_auth_token

urlpatterns = [
    path("", TemplateView.as_view(template_name="index.html")),
    path("api/auth-token/", obtain_auth_token, name="rest_auth_token"),
    path("api/user-avatar/", UserAvatarUpload.as_view(), name="rest_user_avatar_upload"),
    path("admin/", admin.site.urls),
]

urlpatterns += static(settings.STATIC_URL, document_root=settings.STATIC_ROOT)
urlpatterns += static(settings.MEDIA_URL, document_root=settings.MEDIA_ROOT)

Prepare the frontend HTML and JavaScript

I will illustrate the frontend using Bootstrap HTML and Vanilla JavaScript. Of course, you can implement the same using ReactJS, Vue, Angular, or other JavaScript framework and any other CSS framework.

The template for the index page has one login form with username and password or email and password fields (depending on your implementation), and one avatar upload form with a file selection field. Also, it includes a JavaScript file avatar.js for Ajax communication.

{# myproject/templates/index.html #}
<!doctype html>
{% load static %}
<html lang="en">
<head>
    <meta charset="utf-8">
    <meta name="viewport" content="width=device-width, initial-scale=1, shrink-to-fit=no">

    <link rel="stylesheet" href="https://stackpath.bootstrapcdn.com/bootstrap/4.4.1/css/bootstrap.min.css"
          integrity="sha384-Vkoo8x4CGsO3+Hhxv8T/Q5PaXtkKtu6ug5TOeNV6gBiFeWPGFN9MuhOf23Q9Ifjh" crossorigin="anonymous">

    <title>Hello, World!</title>
</head>
<body>
<div class="container">
    <div class="row">
        <div class="col-md-8">
            <p class="text-muted my-3"><small>Open Developer Console for information about responses.</small></p>
            <h1 class="my-3">1. Log in</h1>
            <form id="login_form">
                <div class="form-group">
                    <label for="id_email">Email address</label>
                    <input type="email" class="form-control" id="id_email" aria-describedby="emailHelp"
                           placeholder="Enter email"/>
                </div>
                <div class="form-group">
                    <label for="id_password">Password</label>
                    <input type="password" class="form-control" id="id_password" placeholder="Password"/>
                </div>
                <button type="submit" class="btn btn-primary">Log in</button>
            </form>

            <h1 class="my-3">2. Upload an avatar</h1>
            <form id="avatar_form">
                <div class="form-group">
                    <label for="id_avatar">Choose an image for your avatar</label>
                    <input type="file" class="form-control-file" id="id_avatar"/>
                </div>
                <button type="submit" class="btn btn-primary">Upload</button>
            </form>

        </div>
    </div>
</div>
<script src="{% static 'site/js/avatar.js' %}"></script>
</body>
</html>

Last but not least, create the JavaScript file avatar.js. It contains these things:

  • a global variable to store the user token. In the real-world application, you would probably save the token in a cookie or local storage.
  • a login-form submit handler which posts user credentials to the server and retrieves the authentication token.
  • an avatar-form submit handler which posts the selected file and the token to the server and retrieves the path of the saved file on the server.
// myproject/site_static/site/js/avatar.js
let userToken;

document.getElementById('login_form').addEventListener('submit', function(event) {
    event.preventDefault();
    let email = document.getElementById('id_email').value;
    let password = document.getElementById('id_password').value;

    fetch('http://127.0.0.1:8000/api/auth-token/', {
        method: 'POST',
        headers: {
            'Content-Type': 'application/json',
        },
        body: JSON.stringify({
            "username": email,
            "password": password,
        })
    }).then( response => {
        return response.json();
    }).then(data => {
        console.log(data);
        userToken = data.token;
        console.log('Logged in. Got the token.');
    }).catch((error) => {
        console.error('Error:', error);
    });
});

document.getElementById('avatar_form').addEventListener('submit', function(event) {
    event.preventDefault();
    let input = document.getElementById('id_avatar');

    let data = new FormData();
    data.append('avatar', input.files[0]);

    fetch('http://127.0.0.1:8000/api/user-avatar/', {
        method: 'POST',
        headers: {
            'Authorization': `Token ${userToken}`
        },
        body: data
    }).then(response => {
        return response.json();
    }).then(data => {
        console.log(data);
    }).catch((error) => {
        console.error('Error:', error);
    });
});

In the JavaScript file, we are using fetch API for the REST API requests. The noteworthy part there is the FormData class that we use to send the file to the server.

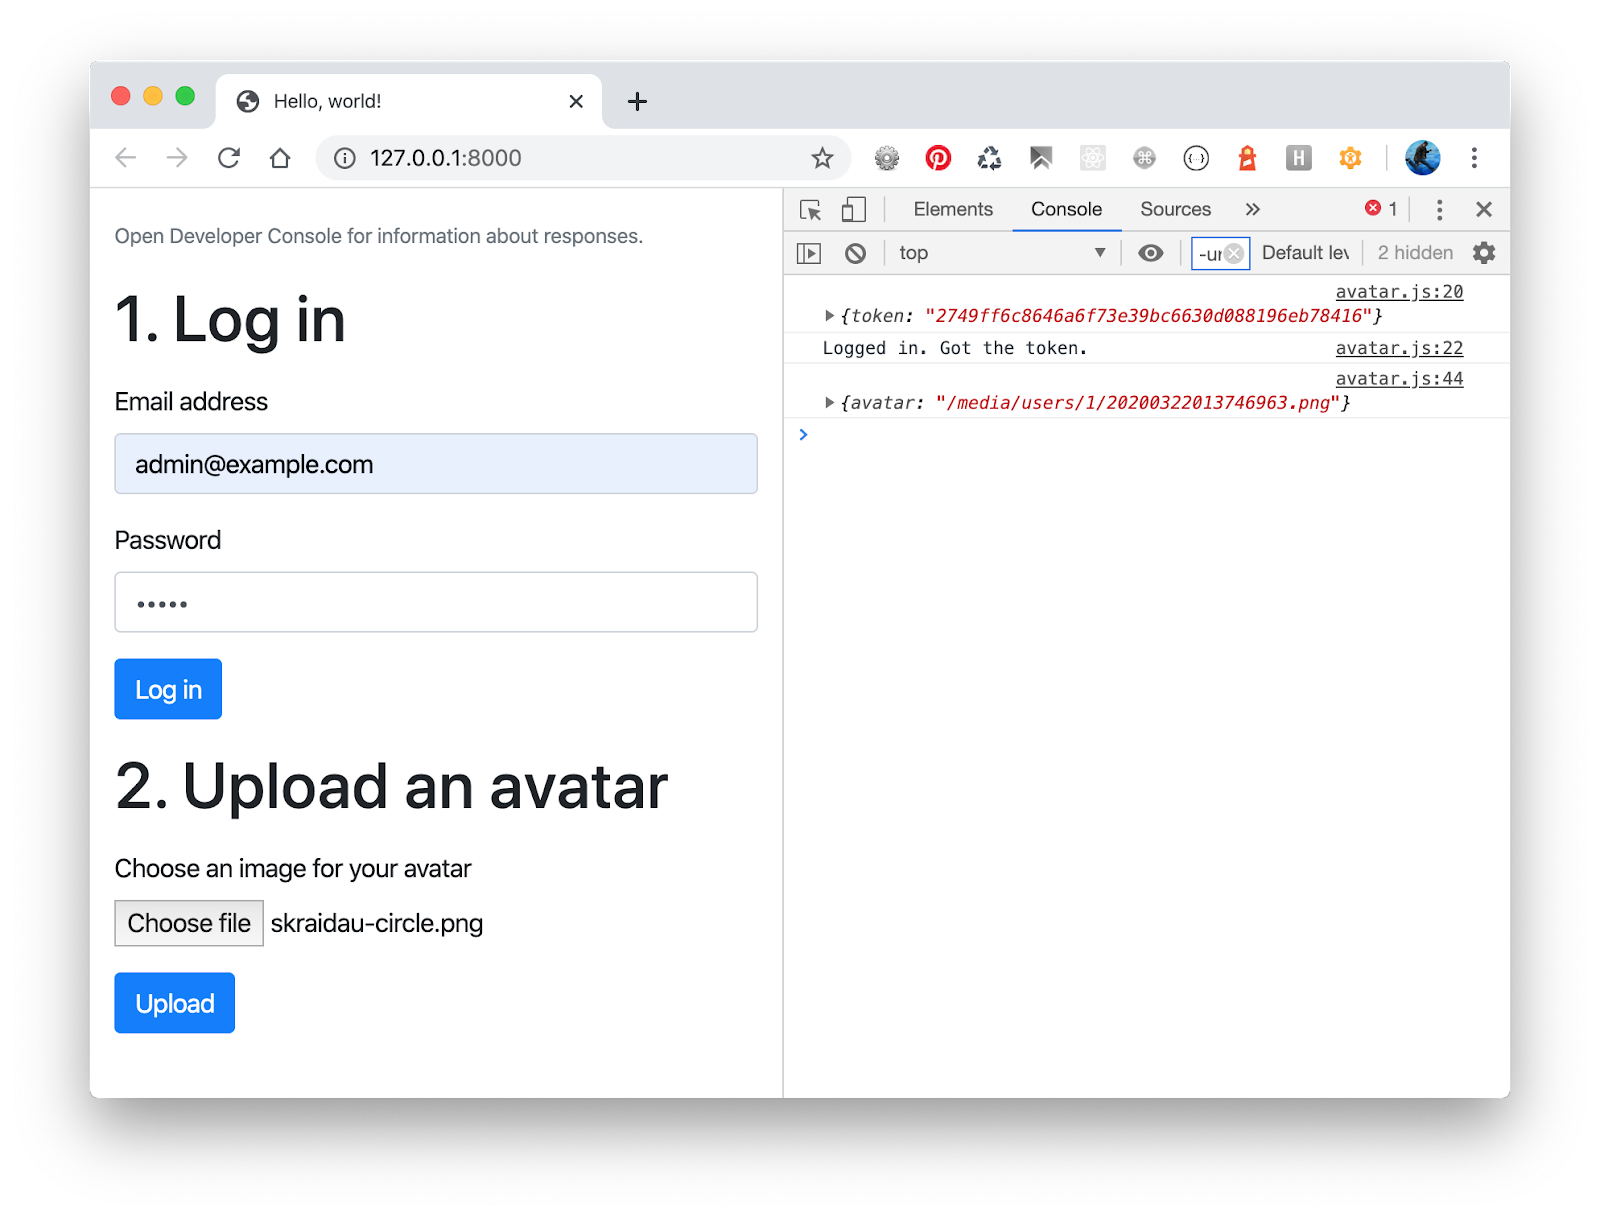
Now run the local development server and go to the http://127.0.0.1:8000. There you will have something like this:

The frontend of the experiment

Final Thoughts

As more than a half Internet usage happens on mobile devices, there is a demand to switch from usual HTML websites and platforms to mobile apps. Whether you create a native mobile app, a hybrid app, or Progressive Web App, you will likely have to communicate with the server via REST API or GraphQL. It is pretty clear how to transfer textual data from and to a remote server. But after this exercise, we can also transfer binary files like images, PDF or Word documents, music, and videos.

Happy coding!


Cover Photo by Dan Silva

2019-04-27

Improving Page Speed with Incremental Loading

Improving Page Speed with Incremental Loading

Summary: you can use django-include-by-ajax to improve the performance and usability of your website by forcing some parts of the Django website page to be loaded and shown before other parts of the page.


Web browsers load and render traditional HTML pages from top to down, from left to right and as a developer you have little control over what will be shown first, second, and last. However, sometimes you need a different loading sequence to improve user experience and usability. Let's examine a couple of cases when it is advantageous to have primary content showing up immediately and secondary content loading in a moment.

Case 1. Above the Fold vs. Below the Fold

People want speed. 47% of visitors expect the website to be loaded in less than 2 seconds. If the website takes more than 3 seconds to show up, it's a big chance, that you will lose 40% of visitors. If you sell something on your website, every one-second delay causes 7% fewer visitors becoming buyers.

One technique to improve the perception of the speed of the website is to display the visible part of the screen as soon as possible, and then load the rest of the website in another go. Usually, the website pages are long vertically scrollable areas. The part of it that fits in the screen is called "above the fold" and the part underneath is called "below the fold".

Primary content above the fold and secondary content below the fold

It is recommended to load the part above the fold in 6 requests, including all your HTML, CSS, JavaScript, images and fonts. It's only 6 requests for a reason - that's the maximal number of requests that most browsers keep to the same HTTP/1.1 server at the same time. With HTTP/2 there is no such limitation.

You can only achieve this minimal load if you bundle and minimize your CSS and JavaScript to single files, and use only a couple of images and fonts. Going one step further you can split your CSS and JavaScript into parts that are used above the fold, and the ones that are used below the fold.

Case 2. Main Content vs. Navigation

For the users to have best user experience and smooth loading, you could display the content of articles or blog post first, and then load and display the website navigation in the header, sidebars, or footer.

Content is primary and the navigation is secondary

If the visitor navigated to a specific page of your website, they most likely want to see the content of that page rather than navigate out to other pages.

If you have extensive nested navigation, you can also save some milliseconds of its loading at the first request, by skipping it there, but loading it by Ajax at the next go.

Additionally, if visitor disables JavaScript in their browser, they will still be able to read the content.

Case 3. Own Content vs. Third-party Content

Wouldn't you agree, websites that show ads before their own content are pretty annoying? One way to improve the user experience is to show the main content at first and show the ads or third-party widgets after several seconds.

Own content is primary and third-party widgets are secondary

The primary content will be correctly indexed by search engines, whereas the included widgets might be skipped, depending on implementation, which we'll examine next.

Solution 1. Iframes

One way to load the delayed secondary content is to use iframes.

Pros:

  • Works without JavaScript.

Cons:

  • For each iframed section, you need a separate HTML with custom CSS.
  • You have to predefine and hardcode all heights of each secondary section, so it wouldn't work well with increased or decreased font size or different amounts of content.
  • You cannot have interactive elements like tooltips that would go outside the boundaries of the iframe.

Solution 2. API Calls by Ajax

The page would load with empty placeholders for the secondary content and then some JavaScript function would load content for the missing sections in HTML, JSON, or XML format by Ajax, parse them, and include into the placeholders. This approach has been used by Facebook.

Pros:

  • You can use the same global CSS for everything.
  • The amount of content is flexible, so the designs would look good with different variations.

Cons:

  • For each secondary section, you need to define a separate API endpoint.
  • There are many extra requests (unless you use GraphQL for that).

Solution 3. A Second Request to the Same Page with Specific Query Parameters

The page loads with empty placeholders for the secondary content. A JavaScript function uses Ajax to load the HTML of the same page this time containing all rendered primary and secondary content. Then another JavaScript function goes through all placeholders and fills the content from the second load.

Pros:

  • You can use the same global CSS for everything.
  • The amount of content is flexible, so the designs could look good with different variations.
  • Each page uses a single data endpoint.
  • Only one extra request is necessary for the full HTML.

Cons:

  • If there is a lot of primary content and not so much of secondary content, it might take too long to load and parse the secondary content.

Implementation for a Django Website using django-include-by-ajax

You can implement the third solution in a Django website using my open-source Django app django-include-by-ajax. It is meant to be understandable and simple to use for frontend Django developers, who don't touch Python code but need to work on the layouts and styling.

The idea is that instead of including different sections of a template with the {% include template_name %} template tag, you do the same using {% include_by_ajax template_name %} template tag. This template tag renders as an empty placeholder unless you access the page from a search crawler or if you access the page with a specific query parameter. Otherwise, it works more-or-less the same as the {% include %} template tag.

By adding jQuery and one jQuery-based JavaScript file to your page template, you enable the magic that does all the loading and parsing. Since version 1.0, CSS and JavaScript files can also be included in those delayed sections.

You can see django-include-by-ajax in action at the start page of my personal project 1st things 1st. There I use the above-the-fold case with the visible content coming to the screen almost immediately and the offscreen content loading in several more seconds.

Installation

It should be trivial to convert any standard heavy website page to a page loading the secondary content dynamically. There are mainly these steps to follow:

  1. Install the app with your Python package manager:

    (venv)$ pip install django-include-by-ajax==1.0.0
  2. Put the app into the INSTALLED_APPS in your Django project settings:

    # settings.py
    INSTALLED_APPS = [
        # ...
        # Third-party apps
        'include_by_ajax',
        # ...
    ]
  3. Put these in your base.html:

    {% load staticfiles %}
    <script src="https://code.jquery.com/jquery-3.4.0.min.js" crossorigin="anonymous"></script>
    <script src="{% static 'include_by_ajax/js/include_by_ajax.min.js' %}" defer></script>

    It should also work with older or newer jQuery versions.

  4. Use the new template tag in any template where you need it:

    {% load include_by_ajax_tags %}
    {% include_by_ajax "blog/includes/latest_blog_posts.html" %}

    You can even define the content for the placeholder that will be shown while the main content is loading:

    {% load include_by_ajax_tags %}
    {% include_by_ajax "blog/includes/latest_blog_posts.html" placeholder_template_name="utils/loading.html" %}
  5. If you need some JavaScript action to be called after all content is loaded, you can use the custom include_by_ajax_all_loaded event on the document like this:

    $(document).on('include_by_ajax_all_loaded', function() {
        console.log('Now all placeholders are loaded and replaced with content. Hurray!');
    });

I would be glad if you tried it on some of your projects and see how it improved user experience and loading times. If you use it in production, please mention it in the comments of this blog post.

More Information

The app on Github: A Django App Providing the {% include_by_ajax %} Template Tag

The practical usage example: Strategic planner - Prioritizer - 1st things 1st.

An article on performance and usability: 5 Reasons Visitors Leave Your Website


Cover photo by Thomas Tucker.

Thanks to Adam Johnson for reviewing this post.

2016-02-06

Fresh Book for Django Developers

This week the post office delivered a package that made me very satisfied. It was a box with three paper versions of my "Web Development with Django Cookbook - Second Edition". The book was published at the end of January after months of hard, but fulfilling work in the late evenings and at weekends.

The first Django Cookbook was dealing with Django 1.6. Unfortunately, the support for that version is over. So it made sense to write an update for a newer Django version. The second edition was adapted for Django 1.8 which has a long-term support until April 2018 or later. This edition introduces new features added to Django 1.7 and Django 1.8, such as database migrations, QuerySet expressions, or System Check Framework. Most concepts in this new book should also be working with Django 1.9.

My top 5 favourite new recipes are these:

  • Configuring settings for development, testing, staging, and production environments
  • Using database query expressions
  • Implementing a multilingual search with Haystack
  • Testing pages with Selenium
  • Releasing a reusable Django app

The book is worth reading for any Django developer, but will be best understood by those who already know the basics of web development with Django. You can learn more about the book and buy it at the Packt website or Amazon.

I thank the Packt Publishing very much for long cooperation in the development of this book. I am especially thankful to acquisition editor Nadeem N. Bagban, content development editors Arwa Manasawala and Sumeet Sawant, and technical editor Bharat Patil. Also I am grateful for insightful feedback from the reviewer Jake Kronika.

What 5 recipes do you find the most useful?

2014-10-27

Contributing Back to the Community - Django Cookbook

In the early beginning of year 2014, the IT book publishing company "Packt Publishing" contacted me with an interesting offer: to share my Django experience in a form of a book. I thought it might be a good challenge for me and also value for the Django community, as I had been working with Django for 7 years or so, and during that time there was quite a lot of knowledge gathered and used practically. So for the next 9 months on late evenings and weekends I was adapting some of the most useful code snippets and describing them in the book. The great staff from the Packt Publishing helped me to structure the content, make everything clear and understandable, and get the grammar correct. Finally, the book was released and it's called "Web Development with Django Cookbook".

Word cloud of the Web Development with Django Cookbook

This book is written for intermediate or advanced Django web developers. When writing the book, my own purpose was not to fully cover every possible web development task, but rather to have enough useful bits of knowledge for those who seek information about web development with Django. The book was written in the format of recipes. There are over 70 recipes giving you instructions how to deal with different challenges of web development. The code mentioned in the book is optimized for Django 1.6, but most of it should also work with older Django versions as well as with Django 1.7.

The cookbook consists of 10 chapters:

  1. Getting started with Django 1.6. This chapter will guide you through the basic configuration which is necessary to start any Django project. It will cover topics like virtual environment, version control, and project settings.
  2. Database Structure. When you create a new app, the first thing to do is to define your models. In this chapter you will learn how to write reusable pieces of code to use in your models. You will learn how to deal with multilingual data in your database. Also you will be told how to manage database schema changes using South migrations.
  3. Forms and Views. To show your data or let one create it, you need views and forms. This chapter will show you some patterns for creating them.
  4. Templates and JavaScript. Information is presented to the user by rendered templates. In modern websites, JavaScript is a must for richer user experience. This chapter shows practical examples of using templates and JavaScript together.
  5. Custom Template Filters and Tags. The default Django template system is quite extensive, but there are more things to add for different cases. This chapter shows you how to create and use own template tags and filters.
  6. Model Administration. Django framework comes with a handy pre-build administration. This chapter shows how to extend the default administration with your own functionality.
  7. Django CMS. Django CMS is the most popular open source content management system made in Django. This chapter deals with best practices using Django CMS and extending it for your needs.
  8. Hierarchical Structures. When you need to create a tree-like structure in Django, django-mptt module comes to hand. This chapter shows you how to use it and how to set administration for hierarchical structures.
  9. Data Import and Export. Very often there are cases when you need to transfer data from and to different formats, retrieve it from and provide it to different sources. This chapter deals with management commands for data import and also APIs for data export.
  10. Bells and Whistles. There is more to Django. This chapter shows additional snippets and tricks useful in web development with Django. Also you will learn about deployment of Django projects.

Get a copy of this book at Packt Publishing and tell me what you think about it in the comments below. Which recipes did you find the most useful? What would you like to read more in this blog or another edition of the cookbook?

Web Development with Django Cookbook

2009-04-12

Design Pattern for Reusable Apps: Getting into Details

This article is an attempt to explain a technique for creating reusable and overridable apps that were partly mentioned in my last post.

First of all, let's remember the presentation by James Bennett about reusable apps from DjangoCon 2008:


Also the upgraded version Real World Django by Jacob Kaplan-Moss presented at PyCon 2009 should be checked.

Imagine, that you have a bunch of predefined apps somewhere under your python path. Some of them have models with relations to models from other apps. You will surely want to reuse those apps for different projects. You'll want to be able to activate the necessary set of apps. Probably sometimes you'll want to use an extended version of an existing app. As shown in the presentations given above, reusable apps should allow you easy overrides. Although all apps should be either under python path directly or under a package, nothing should be set in stone. The method get_model() should be used to import models from installed apps. But apps consist of more components than just models. There are urls, views, forms, template tags, context processors, middlewares, etc.

Let's have a look at a simple example. Two reusable apps could be events and venues where events would contain an Event model with a foreign key to Venue model from the venues app. In order to make both models overridable, I'll put the definitions in abstract base classes in the files base.py. The files models.py will import from base.py and create the leaf classes which will be the models to use further in forms and elsewhere.


  • venues

    • __init__.py

    • base.py
      from django.db import models

      class VenueBase(models.Model):
      title = models.CharField(...)
      street_address = models.CharField(...)
      postal_code = models.CharField(...)
      city = models.CharField(...)
      country = models.CharField(...)

      class Meta:
      abstract = True


    • models.py
      from venues.base import *

      class Venue(VenueBase):
      pass


  • events

    • __init__.py

    • base.py
      from django.db import models

      Venue = models.get_model("venues", "Venue")

      class EventBase(models.Model):
      title = models.CharField(...)
      venue = models.ForeignKey(Venue)
      from_date = models.DateField(...)
      to_date = models.DateField(...)

      class Meta:
      abstract = True


    • models.py
      from events.base import *

      class Event(EventBase):
      pass


Venues (as well as events) will probably have some urls, views, and forms which should be extensible too.


  • venues

    • ...

    • forms.py
      from django.db import models
      from django.forms import ModelForm
      Venue = models.get_model("venues", "Venue")

      class VenueForm(ModelForm):
      class Meta:
      model = Venue


    • views.py

      from django.db import models
      from django.utils import importlib
      from django.shortcuts import render_to_response

      # importing the form depending on the path of installed app
      venues_app = models.get_app("venues")
      venues_forms = importlib.import_module(venues_app.__name__[:-6] + "forms")
      VenueForm = venues_forms.VenueForm

      def add_venue(request):
      if request.method == "POST":
      form = VenueForm(request.POST, request.FILES)
      if form.is_valid():
      form.save()
      else:
      form = VenueForm()
      return render_to_response("venues/add_venue.html", {
      "form": form,
      })

      def change_venue(request, pk):
      ...


    • urls.py

      from django.conf.urls.defaults import *
      from django.db import models
      from django.utils import importlib

      # importing the form depending on the path of installed app
      venues_app = models.get_app("venues")
      venues_views = importlib.import_module(venues_app.__name__[:-6] + "views")

      urlpatterns = patterns('',
      ...
      url(r'^add/$', venues_views.add_venue, name='add_venue'),
      url(r'^(\d+)/$', venues_views.change_venue, name='change_venue'),
      ...
      )


You might ask why such a strange and tricky importing is done in the views and urls. If we know the path to the app, it is not going to change or something. Even James Bennett himself didn't see any advantages of importing forms and views dynamically when closing ticket #10703 for Django:
I don't really see the utility of this – a properly-written Django application is just a Python module, and is importable the same as any other Python module. It's not like that module is suddenly going to have a different path (and if it does, you're doing something wrong).


The answer hides in the overriding apps.

The combo of current events and venues might fit most of your projects. But then you might need a specific venues app with additional features for a specific project. Note, that you probably don't want to change or recreate the events app just because of the relation to the venues. The app and model names can be still the same, just put the new app under your new project and include the new app into INSTALLED_APPS instead of the original app. Project name will serve as a namespace for distinguishing the original app and the overridden app.

If you want to extend just the model, but not the other components, your specific app might look like this:


  • myproject

    • venues

      • __init__.py

      • models.py
        from venues.base import VenueBase

        class Venue(VenueBase):
        description = models.TextField(...)


      • forms.py
        from venues.forms import *


      • views.py
        from venues.views import *


      • urls.py
        from venues.urls import *


If the model is OK as is, but you need an additional behavior for the form, like saving an image for each venue, you can extend the form instead:


  • myproject

    • venues

      • __init__.py

      • models.py
        from venues.models import *


      • forms.py
        from django import forms
        from venues.forms import VenueForm as VenueFormBase

        class VenueForm(VenueFormBase):
        image = forms.ImageField(...)
        def save(self, *args, **kwargs):
        super(VenueForm, self).save(*args, **kwargs)
        ...


      • views.py
        from venues.views import *


      • urls.py
        from venues.urls import *


If models and forms are alright, but you want to add an additional view, you can do that too:


  • myproject

    • venues

      • __init__.py

      • models.py
        from venues.models import *


      • forms.py
        from venues.forms import *


      • views.py
        from venues.views import *

        def delete_venue(request, pk):
        ...


      • urls.py
        from venues.urls import *

        urlpatterns += patterns('',
        url(r'^(\d+)/delete/$', venues_views.delete_venue, name='delete_venue'),
        )


As you see from the case examples above, you don't have to duplicate any code of the original app. Still you can now enhance or overwrite just specific parts that you need very flexibly. The events could be extended in the same manner. If the original extensible apps live under a specific package, then the imports in the extending app should be changed appropriately.

Ufff.. That's about all what I wanted to explain this time. If you have any questions, suggestions or disagree with some concepts, please write a comment bellow.

If you reside in Berlin or going to be here next Wednesday by accident or so, don't miss the Django meetup at Schleusenkrug at 19:30.

Also have a nice Easter Holiday!

Django Easter Egg