2022-10-21

How to Handle Django Forms within Modal Dialogs

How to Handle Django Forms within Modal Dialogs

I like django-crispy-forms. You can use it for stylish uniform HTML forms with Bootstrap, TailwindCSS, or even your custom template pack. But when it comes to custom widgets and dynamic form handling, it was always a challenge. Recently I discovered htmx. It's a JavaScript framework that handles Ajax communication based on custom HTML attributes. In this article, I will explore how you can use django-crispy-forms with htmx to provide a form with server-side validation in a modal dialog.

The setup

For this experiment, I will be using these PyPI packages:

  • Django - my beloved Python web framework.
  • django-crispy-forms - library for stylized forms.
  • crispy-bootstrap5 - Bootstrap 5 template pack for django-crispy-forms.
  • django-htmx - some handy htmx helpers for Django projects.

Also, I will use the CDN versions of Bootstrap5 and htmx.

The form

I decided to add some crispy style to the login form by extending Django's authentication form and attaching a crispy helper to it.

from django.contrib.auth.forms import AuthenticationForm
from crispy_forms.helper import FormHelper
from crispy_forms.layout import Layout
from crispy_bootstrap5 import bootstrap5


class LoginForm(AuthenticationForm):
    def __init__(self, *args, **kwargs):
        super().__init__(*args, **kwargs)

        self.helper = FormHelper()
        self.helper.form_tag = False
        self.helper.include_media = False
        self.helper.layout = Layout(
            bootstrap5.FloatingField("username", autocomplete="username"),
            bootstrap5.FloatingField("password", autocomplete="current-password"),
        )

Here I set form_tag to False to skip the <form> tag from the rendered form elements because I want to customize it in the templates. And I set include_media to False because I want to manually handle the media inclusion, as you will see later, instead of automatically including them in the form.

The views

I will have two views:

  • The home view will have a button to open a modal dialog for login.
  • The login form view will handle the form and return the HTML markup for the dialog.
from django.shortcuts import render, redirect
from django.contrib.auth import login as auth_login, logout as auth_logout
from django_htmx.http import HttpResponseClientRefresh
from .forms import LoginForm


def home(request):
    if request.user.is_authenticated:
        return render(request, "dashboard.html")
    return render(request, "home.html", context)


def login(request):
    if request.method == "POST":
        form = LoginForm(request=request, data=request.POST, prefix="login")
        template_name = "login_form.html"
        if form.is_valid():
            user = form.get_user()
            auth_login(request, user)
            return HttpResponseClientRefresh()
    else:
        form = LoginForm(request=request, prefix="login")
        template_name = "login_dialog.html"
    context = {"form": form}
    return render(request, template_name, context)

The home view just returns different templates based on whether the user is logged in or not.

The login view handles a login form and renders different templates based on whether the view was accessed by GET or POST method. If the login succeeds, a special HttpResponseClientRefresh response is returned, which tells htmx to refresh the page from where the login form was loaded and submitted. It's an empty response with the HX-Refresh: true header.

Then I plug those two views into my urls.py rules.

The templates and javascript

At the end of the base.html template, I include htmx from CDN and my custom dialog.js:

<script src="https://unpkg.com/htmx.org@1.8.2" integrity="sha384-+8ISc/waZcRdXCLxVgbsLzay31nCdyZXQxnsUy++HJzJliTzxKWr0m1cIEMyUzQu" crossorigin="anonymous"></script>
<script src="{% static 'js/dialog.js' %}"></script>

In the home.html template, I add a button which will open the dialog:

<button
    data-hx-get="{% url 'login' %}"
    data-hx-target="main"
    data-hx-swap="beforeend"
    type="button"
    class="btn btn-primary"
>Log in</button>

Note that htmx allows either hx-* syntax or data-hx-* for its HTML attributes and I prefer the latter because data-* attributes make a valid HTML document.

In the snippet above, I tell htmx to load the login page on the button click and insert it before the end of the <main> HTML tag.

Let's have a look at my dialog.js file:

function init_widgets_for_htmx_element(target) {
    // init other widgets

    // init modal dialogs
    if (target.tagName === 'DIALOG') {
        target.showModal();
        htmx.on('.close-dialog', 'click', function(event) {
            var dialog = htmx.find('dialog[open]');
            dialog.close();
            htmx.remove(dialog);
        });
    }
}

htmx.onLoad(init_widgets_for_htmx_element);

Here, when a page loads or a htmx inserts a snippet, the init_widgets_for_htmx_element function will be called with the <body> or the inserted element as the target. One can use this function to initialize widgets, such as rich text fields, autocompletes, tabs, custom frontend validators, etc. Also, I use this function to open the loaded modal dialogs and add event handlers to close them.

Now the login_dialog.html template looks like this (I just stripped the styling markup):

<dialog id="htmx-dialog">
    <h1>Login</h1>
    <button type="button" class="close-dialog btn-close" aria-label="Close"></button>
    {% include "login_form.html" %}
    <button type="submit" form="htmx-dialog-form">Log in</button>
</dialog>

And the login_form.html looks like this:

<form
    id="htmx-dialog-form"
    novalidate
    data-hx-post="{% url 'login' %}"
    data-hx-swap="outerHTML"
>
    {% load crispy_forms_tags %}
    {% crispy form %}
</form>

The htmx attributes tell htmx to submit the form data to the login view by Ajax and replace the <form> HTML tag with the response received. That is used for form validation. If the response has the HX-Refresh: true header, as mentioned before, then the home page is refreshed.

Here is what the result looks like:
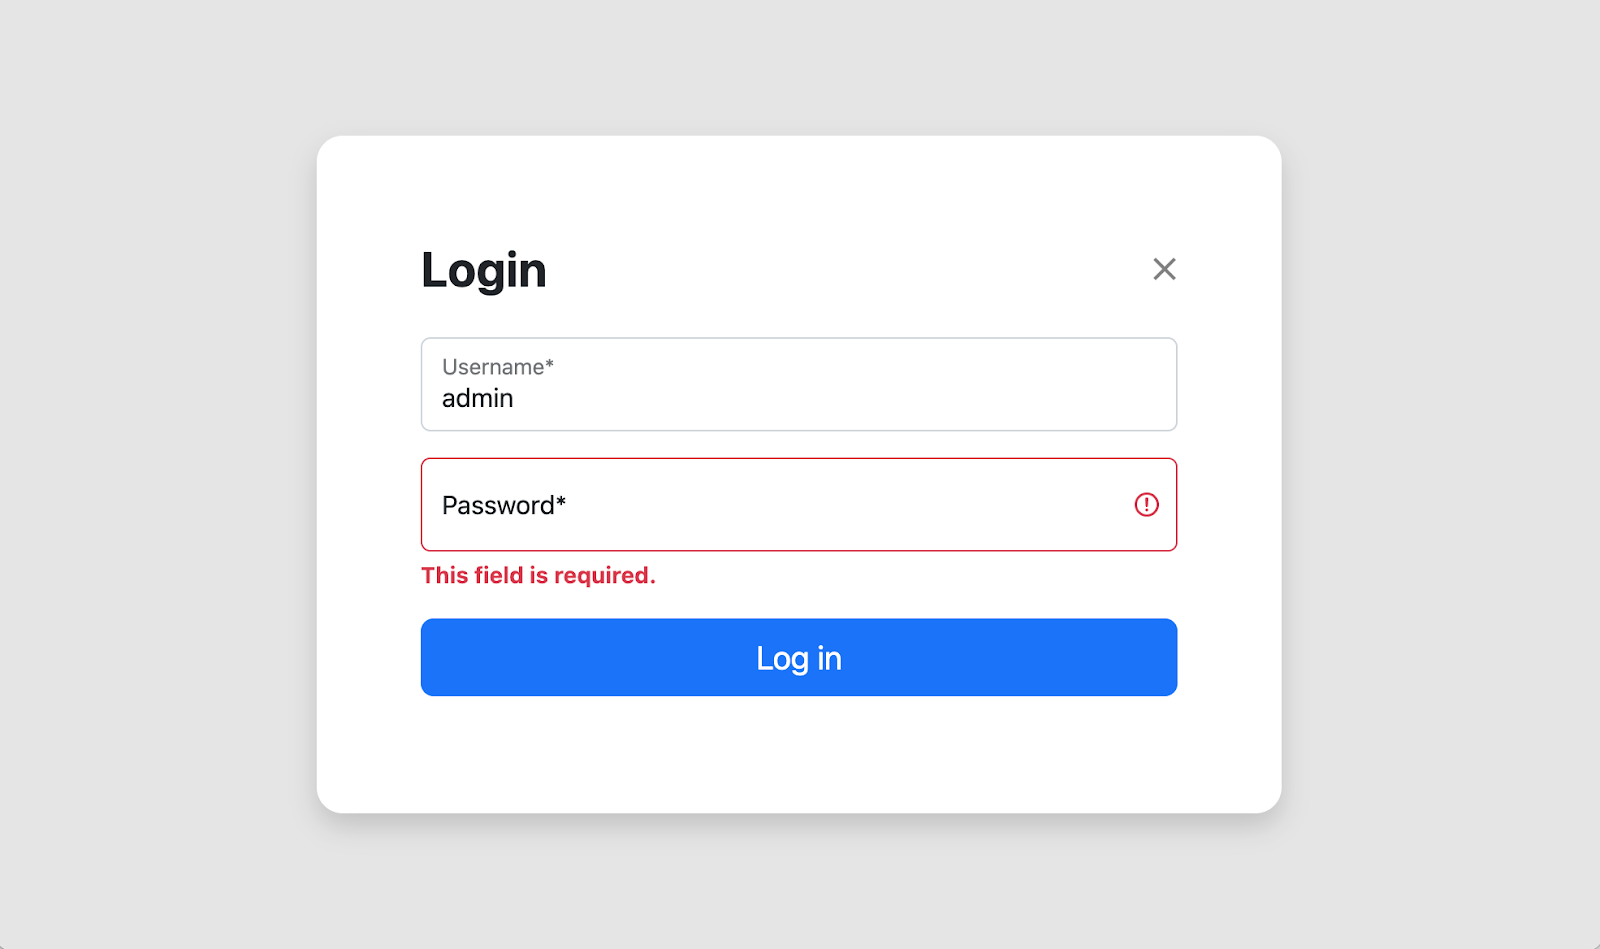
Validated form within a modal dialog

The form media

If you noticed before, we excluded the media from the form. Otherwise, the home page would load the media of its own forms (for example, a search form) and the media of the dialog forms. And that would cause double executions of shared scripts, for example, the ones for autocompletes and rich text fields.

You can nicely combine media from different forms by concatenating the media instances. This way, each CSS and Javascript file is included just once.

As the login form isn't part of the home page but instead included on demand, I need to have its media in the home view or any other view where the login button is shown.

Here comes this custom context processor for help:

def login_dialog(request):
    from .forms import LoginForm

    if not request.user.is_authenticated:
        form = LoginForm(request=request)
        if hasattr(request, "combined_media"):
            request.combined_media += form.media
        else:
            request.combined_media = form.media
    return {}

It checks for any request.combined_media and attaches the form media from the login form.

Lastly, I attach this context processor to the template settings and render the value of combined media before </body>:

{{ request.combined_media }}

The final words

Get the code to play with from Github. As you can see, htmx makes Ajax communications pretty straightforward, even when it's about dynamically loading and reloading parts of the content or initializing custom widgets.


Cover photo by Pixabay

2022-10-04

How to Rename a Django App

When I initially created my MVP (minimal viable product) for 1st things 1st, I considered the whole Django project to be about prioritization. After a few years, I realized that the Django project is about SaaS (software as a service), and prioritization is just a part of all functionalities necessary for a SaaS to function. I ended up needing to rename apps to have clean and better-organized code. Here is how I did that.

0. Get your code and database up to date

Ensure you have the latest git pull and execute all database migrations.

1. Install django-rename-app

Put django-rename-app into pip requirements and install them or just run:

(venv)$ pip install django-rename-app

Put the app into INSTALLED_APPS in your settings:

INSTALLED_APPS = [
    # …
    "django_rename_app",
]

2. Rename the app directories

Rename the oldapp as newapp in your apps and templates.

3. Rename the app name occurrences in the code

Rename the app in all your imports, relations, migrations, and template paths.

You can do a global search for oldapp and then check case by case where you need to rename that term to newapp, and where not.

4. Run the management command rename_app

Run the management command rename_app:

(env)$ python manage.py rename_app oldapp newapp

This command renames the app prefix the app tables and the records in django_content_type and django_migrations tables.

If you plan to update staging or production servers, add the rename_app command before running migrations in your deployment scripts (Ansible, Docker, etc.)

5. Update indexes and constraints

Lastly, create an empty database migration for the app with custom code to update indexes and foreign-key constraints.

(env)$ python manage.py makemigrations newapp --empty --name rename_indexes

Fill the migration with the following code:

# newapp/migrations/0002_rename_indexes.py
from django.db import migrations


def named_tuple_fetch_all(cursor):
    "Return all rows from a cursor as a namedtuple"
    from collections import namedtuple

    desc = cursor.description
    Result = namedtuple("Result", [col[0] for col in desc])
    return [Result(*row) for row in cursor.fetchall()]


def rename_indexes(apps, schema_editor):
    from django.db import connection

    with connection.cursor() as cursor:
        cursor.execute(
            """SELECT indexname FROM pg_indexes 
            WHERE tablename LIKE 'newapp%'"""
        )
        for result in named_tuple_fetch_all(cursor):
            old_index_name = result.indexname
            new_index_name = old_index_name.replace(
                "oldapp_", "newapp_", 1
            )
            cursor.execute(
                f"""ALTER INDEX IF EXISTS {old_index_name} 
                RENAME TO {new_index_name}"""
            )


def rename_foreignkeys(apps, schema_editor):
    from django.db import connection

    with connection.cursor() as cursor:
        cursor.execute(
            """SELECT table_name, constraint_name 
            FROM information_schema.key_column_usage
            WHERE constraint_catalog=CURRENT_CATALOG 
            AND table_name LIKE 'newapp%'
            AND position_in_unique_constraint notnull"""
        )
        for result in named_tuple_fetch_all(cursor):
            table_name = result.table_name
            old_foreignkey_name = result.constraint_name
            new_foreignkey_name = old_foreignkey_name.replace(
                "oldapp_", "newapp_", 1
            )
            cursor.execute(
                f"""ALTER TABLE {table_name} 
                RENAME CONSTRAINT {old_foreignkey_name} 
                TO {new_foreignkey_name}"""
            )


class Migration(migrations.Migration):

    dependencies = [
        ("newapp", "0001_initial"),
    ]

    operations = [
        migrations.RunPython(rename_indexes, migrations.RunPython.noop),
        migrations.RunPython(rename_foreignkeys, migrations.RunPython.noop),
    ]

Run the migrations:

(env)$ python manage.py migrate

If something doesn't work as wanted, migrate back, fix the code, and migrate again. You can unmigrate by migrating to one step before the last migration, for example:

(env)$ python manage.py migrate 0001

6. Cleanup

After applying the migration in all necessary environments, you can clean them up by removing django-rename-app from your pip requirements and deployment scripts.

Final words

It's rarely possible to build a system that meets all your needs from the beginning. Proper systems always require continuous improvement and refactoring. Using a combination of Django migrations and django-rename-app, you can work on your websites in an Agile, clean, and flexible way.

Happy coding!


Cover photo by freestocks.

2022-04-18

How I Integrated Zapier into my Django Project

As you might know, I have been developing, providing, and supporting the prioritization tool 1st things 1st. One of the essential features to implement was exporting calculated priorities to other productivity tools. Usually, building an export from one app to another takes 1-2 weeks for me. But this time, I decided to go a better route and use Zapier to export priorities to almost all possible apps in a similar amount of time. Whaaat!?? In this article, I will tell you how.

What is Zapier and how it works?

The no-code tool Zapier takes input from a wide variety of web apps and outputs it to many other apps. Optionally you can filter the input based on conditions. Or format the input differently (for example, convert HTML to Markdown). In addition, you can stack the output actions one after the other. Usually, people use 2-3 steps for their automation, but there are power users who create 50-step workflows.

The input is managed by Zapier's triggers. The output is controlled by Zapier's actions. These can be configured at the website UI or using a command-line tool. I used the UI as this was my first integration. Trigger events accept a JSON feed of objects with unique IDs. Each new item there is treated as a new input item. With a free tier, the triggers are checked every 15 minutes. Multiple triggers are handled in parallel, and the sorting order of execution is not guaranteed. As it is crucial to have the sorting order correct for 1st things 1st priorities, people from Zapier support suggested providing each priority with a 1-minute interval to make sure the priorities get listed in the target app sequentially.

The most challenging part of Zapier integration was setting up OAuth 2.0 provider. Even though I used a third-party Django app django-oauth-toolkit for that. Zapier accepts other authentication options too, but this one is the least demanding for the end-users.

Authentication

OAuth 2.0 allows users of one application to use specific data of another application while keeping private information private. You might have used the OAuth 2.0 client directly or via a wrapper for connecting to Twitter apps. For Zapier, one has to set OAuth 2.0 provider.

The official tutorial for setting up OAuth 2.0 provider with django-oauth-toolkit is a good start. However, one problem with it is that by default, any registered user can create OAuth 2.0 applications at your Django website, where in reality, you need just one global application.

First of all, I wanted to allow OAuth 2.0 application creation only for superusers.

For that, I created a new Django app oauth2_provider_adjustments with modified views and URLs to use instead of the ones from django-oauth-toolkit.

The views related to OAuth 2.0 app creation extended this SuperUserOnlyMixin instead of LoginRequiredMixin:

from django.contrib.auth.mixins import AccessMixin

class SuperUserOnlyMixin(AccessMixin):
    def dispatch(self, request, *args, **kwargs):
        if not request.user.is_superuser:
            return self.handle_no_permission()
        return super().dispatch(request, *args, **kwargs)

Then I replaced the default oauth2_provider URLs:

urlpatterns = [
    # …
    path("o/", include("oauth2_provider.urls", namespace="oauth2_provider")),
]

with my custom ones:

urlpatterns = [
    # …
    path("o/", include("oauth2_provider_adjustments.urls", namespace="oauth2_provider")),
]

I set the new OAuth 2.0 application by going to /o/applications/register/ and filling in this info:

Name: Zapier
Client type: Confidential
Authorization grant type: Authorization code
Redirect uris: https://zapier.com/dashboard/auth/oauth/return/1stThings1stCLIAPI/ (copied from Zapier)
Algorithm: No OIDC support

If you have some expertise in the setup choices and see any flaws, let me know.

Zapier requires creating a test view that will return anything to check if there are no errors authenticating a user with OAuth 2.0. So I made a simple JSON view like this:

from django.http.response import JsonResponse


def user_info(request, *args, **kwargs):
    if not request.user.is_authenticated:
        return JsonResponse(
            {
                "error": "User not authenticated",
            },
            status=200,
        )
    return JsonResponse(
        {
            "first_name": request.user.first_name,
            "last_name": request.user.last_name,
        },
        status=200,
    )

Also, I had to have login and registration views for those cases when the user's session was not present.

Lastly, at Zapier, I had to set these values for OAuth 2.0:

Client ID: The Client ID from registered app
Client Secret: The Client Secret from registered app

Authorization URL: https://apps.1st-things-1st.com/o/authorize/
Scope: read write
Access Token Request: https://apps.1st-things-1st.com/o/token/
Refresh Token Request: https://apps.1st-things-1st.com/o/token/
I want to automatically refresh on unauthorized error: Checked
Test: https://apps.1st-things-1st.com/user-info/
Connection Label: {{first_name}} {{last_name}}

Trigger implementation

There are two types of triggers in Zapier:

  • (A) Ones for providing new things to other apps, for example, sending priorities from 1st things 1st to other productivity apps.
  • (B) Ones for listing things in drop boxes at the former triggers, for example, letting Zapier users choose the 1st things 1st project from which to import priorities.

The feeds for triggers should (ideally) be paginated. But without meta information for the item count, page number, following page URL, etc., you would usually have with django-rest-framework or other REST frameworks. Provide only an array of objects with unique IDs for each page. The only field name that matters is "id" – others can be anything. Here is an example:

[
    {
        "id": "39T7NsgQarYf",
        "project": "5xPrQbPZNvJv",
        "title": "01. Custom landing pages for several project types (83%)",
        "plain_title": "Custom landing pages for several project types",
        "description": "",
        "score": 83,
        "priority": 1,
        "category": "Choose"
    },
    {
        "id": "4wBSgq3spS49",
        "project": "5xPrQbPZNvJv",
        "title": "02. Zapier integration (79%)",
        "plain_title": "Zapier integration",
        "description": "",
        "score": 79,
        "priority": 2,
        "category": "Choose"
    },
    {
        "id": "6WvwwB7QAnVS",
        "project": "5xPrQbPZNvJv",
        "title": "03. Electron.js desktop app for several project types (42%)",
        "plain_title": "Electron.js desktop app for several project types",
        "description": "",
        "score": 41,
        "priority": 3,
        "category": "Consider"
    }
]

The feeds should list items in reverse order for the (A) type of triggers: the newest things go at the beginning. The pagination is only used to cut the number of items: the second and further pages of the paginated list are ignored by Zapier.

In my specific case of priorities, the order matters, and no items should be lost in the void. So I listed the priorities sequentially (not newest first) and set the number of items per page unrealistically high so that you basically get all the things on the first page of the feed.

The feeds for the triggers of (B) type are normally paginated from the first page until the page returns empty results. The order should be alphabetical, chronological, or by sorting order field, whatever makes sense. There you need just two fields, the ID and the title of the item (but more fields are allowed too), for example:

[
    {
        "id": "5xPrQbPZNvJv",
        "title": "1st things 1st",
        "owner": "Aidas Bendoraitis"
    },
    {
        "id": "VEXGzThxL6Sr",
        "title": "Make Impact",
        "owner": "Aidas Bendoraitis"
    },
    {
        "id": "WoqQbuhdUHGF",
        "title": "DjangoTricks website",
        "owner": "Aidas Bendoraitis"
    },
]

I used django-rest-framework to implement the API because of the batteries included, such as browsable API, permissions, serialization, pagination, etc.

For the specific Zapier requirements, I had to write a custom pagination class, SimplePagination, to use with my API lists. It did two things: omitted the meta section and showed an empty list instead of a 404 error for pages that didn't have any results:

from django.core.paginator import InvalidPage

from rest_framework.pagination import PageNumberPagination
from rest_framework.response import Response


class SimplePagination(PageNumberPagination):
    page_size = 20

    def get_paginated_response(self, data):
        return Response(data)  # <-- Simple pagination without meta

    def get_paginated_response_schema(self, schema):
        return schema  # <-- Simple pagination without meta

    def paginate_queryset(self, queryset, request, view=None):
        """
        Paginate a queryset if required, either returning a
        page object, or `None` if pagination is not configured for this view.
        """
        page_size = self.get_page_size(request)
        if not page_size:
            return None

        paginator = self.django_paginator_class(queryset, page_size)
        page_number = self.get_page_number(request, paginator)

        try:
            self.page = paginator.page(page_number)
        except InvalidPage as exc:
            msg = self.invalid_page_message.format(
                page_number=page_number, message=str(exc)
            )
            return []  # <-- If no items found, don't raise NotFound error

        if paginator.num_pages > 1 and self.template is not None:
            # The browsable API should display pagination controls.
            self.display_page_controls = True

        self.request = request
        return list(self.page)

To preserve the order of items, I had to make the priorities appear one by one at 1-minute intervals. I did that by having a Boolean field exported_to_zapier at the priorities. The API showed priorities only if that field was set to True, which wasn't the case by default. Then, background tasks were scheduled 1 minute after each other, triggered by a button click at 1st things 1st, which set the exported_to_zapier to True for each next priority. I was using huey, but the same can be achieved with Celery, cron jobs, or other background task manager:

# zapier_api/tasks.py
from django.conf import settings
from django.utils.translation import gettext
from huey.contrib.djhuey import db_task


@db_task()
def export_next_initiative_to_zapier(project_id):
    from evaluations.models import Initiative

    next_initiatives = Initiative.objects.filter(
        project__pk=project_id,
        exported_to_zapier=False,
    ).order_by("-total_weight", "order")
    count = next_initiatives.count()
    if count > 0:
        next_initiative = next_initiatives.first()
        next_initiative.exported_to_zapier = True
        next_initiative.save(update_fields=["exported_to_zapier"])

        if count > 1:
            result = export_next_initiative_to_zapier.schedule(
                kwargs={"project_id": project_id},
                delay=settings.ZAPIER_EXPORT_DELAY,
            )
            result(blocking=False)

One gotcha: Zapier starts pagination from 0, whereas django-rest-framework starts pagination from 1. To make them work together, I had to modify the API request (written in JavaScript) at Zapier trigger configuration:

const options = {
  url: 'https://apps.1st-things-1st.com/api/v1/projects/',
  method: 'GET',
  headers: {
    'Accept': 'application/json',
    'Authorization': `Bearer ${bundle.authData.access_token}`
  },
  params: {
    'page': bundle.meta.page + 1  // <-- The custom line for pagination
  }
}

return z.request(options)
  .then((response) => {
    response.throwForStatus();
    const results = response.json;

    // You can do any parsing you need for results here before returning them

    return results;
  });

Final Words

For the v1 of Zapier integration, I didn't need any Zapier actions, so they are yet something to explore, experiment with, and learn about. But the Zapier triggers seem already pretty helpful and a big win compared to individual exports without this tool.

If you want to try the result, do this:

  • Create an account and a project at 1st things 1st
  • Prioritize something
  • Head to Zapier integrations and connect your prioritization project to a project of your favorite to-do list or project management app
  • Then click on "Export via Zapier" at 1st things 1st.

Cover photo by Anna Nekrashevich

2022-04-09

Generic Functionality without Generic Relations

When you have some generic functionality like anything commentable, likable, or upvotable, it’s common to use Generic Relations in Django. The problem with Generic Relations is that they create the relationships at the application level instead of the database level, and that requires a lot of database queries if you want to aggregate content that shares the generic functionality. There is another way that I will show you in this article.

I learned this technique at my first job in 2002 and then rediscovered it again with Django a few years ago. The trick is to have a generic Item model where every other autonomous model has a one-to-one relation to the Item. Moreover, the Item model has an item_type field, allowing you to recognize the backward one-to-one relationship.

Then whenever you need to have some generic categories, you link them to the Item. Whenever you create generic functionality like media gallery, comments, likes, or upvotes, you attach them to the Item. Whenever you need to work with permissions, publishing status, or workflows, you deal with the Item. Whenever you need to create a global search or trash bin, you work with the Item instances.

Let’s have a look at some code.

Items

First, I'll create the items app with two models: the previously mentioned Item and the abstract model ItemBase with the one-to-one relation for various models to inherit:

# items/models.py
import sys

from django.db import models
from django.apps import apps

if "makemigrations" in sys.argv:
    from django.utils.translation import gettext_noop as _
else:
    from django.utils.translation import gettext_lazy as _


class Item(models.Model):
    """
    A generic model for all autonomous models to link to.
    
    Currently these autonomous models are available:
    - content.Post
    - companies.Company
    - accounts.User
    """
    ITEM_TYPE_CHOICES = (
        ("content.Post", _("Post")),
        ("companies.Company", _("Company")),
        ("accounts.User", _("User")),
    )
    item_type = models.CharField(
        max_length=200, choices=ITEM_TYPE_CHOICES, editable=False, db_index=True
    )

    class Meta:
        verbose_name = _("Item")
        verbose_name_plural = _("Items")

    def __str__(self):
        content_object_title = (
            str(self.content_object) if self.content_object else "BROKEN REFERENCE"
        )
        return (
            f"{content_object_title} ({self.get_item_type_display()})"
        )

    @property
    def content_object(self):
        app_label, model_name = self.item_type.split(".")
        model = apps.get_model(app_label, model_name)
        return model.objects.filter(item=self).first()


class ItemBase(models.Model):
    """
    An abstract model for the autonomous models that will link to the Item.
    """
    item = models.OneToOneField(
        Item,
        verbose_name=_("Item"),
        editable=False,
        blank=True,
        null=True,
        on_delete=models.CASCADE,
        related_name="%(app_label)s_%(class)s",
    )

    class Meta:
        abstract = True

    def save(self, *args, **kwargs):
        if not self.item:
            model = type(self)
            item = Item.objects.create(
                item_type=f"{model._meta.app_label}.{model.__name__}"
            )
            self.item = item
        super().save()

    def delete(self, *args, **kwargs):
        if self.item:
            self.item.delete()
        super().delete(*args, **kwargs)

Then let's create some autonomous models that will have one-to-one relations with the Item. By "autonomous models," I mean those which are enough by themselves, such as posts, companies, or accounts. Models like types, categories, tags, or likes, wouldn't be autonomous.

Posts

Second, I create the content app with the Post model. This model extends ItemBase which will create the one-to-one relation on save, and will define the item_type as content.Post:

# content/models.py
import sys

from django.contrib.auth.base_user import BaseUserManager
from django.db import models
from django.contrib.auth.models import AbstractUser

if "makemigrations" in sys.argv:
    from django.utils.translation import gettext_noop as _
else:
    from django.utils.translation import gettext_lazy as _

from items.models import ItemBase


class Post(ItemBase):
    title = models.CharField(_("Title"), max_length=255)
    slug = models.SlugField(_("Slug"), max_length=255)
    content = models.TextField(_("Content"))

    class Meta:
        verbose_name = _("Post")
        verbose_name_plural = _("Posts")

Companies

Third, I create the companies app with the Company model. This model also extends ItemBase which will create the one-to-one relation on save, and will define the item_type as companies.Company:

# companies/models.py
import sys

from django.contrib.auth.base_user import BaseUserManager
from django.db import models
from django.contrib.auth.models import AbstractUser

if "makemigrations" in sys.argv:
    from django.utils.translation import gettext_noop as _
else:
    from django.utils.translation import gettext_lazy as _

from items.models import ItemBase


class Company(ItemBase):
    name = models.CharField(_("Name"), max_length=255)
    slug = models.SlugField(_("Slug"), max_length=255)
    description = models.TextField(_("Description"))

    class Meta:
        verbose_name = _("Company")
        verbose_name_plural = _("Companies")

Accounts

Fourth, I'll have a more extensive example with the accounts app containing the User model. This model extends AbstractUser from django.contrib.auth as well as ItemBase for the one-to-one relation. The item_type set at the Item model will be accounts.User:

# accounts/models.py
import sys

from django.db import models
from django.contrib.auth.base_user import BaseUserManager
from django.contrib.auth.models import AbstractUser

if "makemigrations" in sys.argv:
    from django.utils.translation import gettext_noop as _
else:
    from django.utils.translation import gettext_lazy as _

from items.models import ItemBase


class UserManager(BaseUserManager):
    def create_user(self, username="", email="", password="", **extra_fields):
        if not email:
            raise ValueError("Enter an email address")
        email = self.normalize_email(email)
        user = self.model(username=username, email=email, **extra_fields)
        user.set_password(password)
        user.save(using=self._db)
        return user

    def create_superuser(self, username="", email="", password=""):
        user = self.create_user(email=email, password=password, username=username)
        user.is_superuser = True
        user.is_staff = True
        user.save(using=self._db)
        return user


class User(AbstractUser, ItemBase):
    # change username to non-editable non-required field
    username = models.CharField(
        _("Username"), max_length=150, editable=False, blank=True
    )
    # change email to unique and required field
    email = models.EmailField(_("Email address"), unique=True)
    bio = models.TextField(_("Bio"))

    USERNAME_FIELD = "email"
    REQUIRED_FIELDS = []

    objects = UserManager()

Creating new items

I will use the Django shell to create several autonomous model instances and the related Items too:

>>> from content.models import Post
>>> from companies.models import Company
>>> from accounts.models import User
>>> from items.models import Item
>>> post = Post.objects.create(
...     title="Hello, World!",
...     slug="hello-world",
...     content="Lorem ipsum…",
... )
>>> company = Company.objects.create(
...     name="Aidas & Co",
...     slug="aidas-co",
...     description="Lorem ipsum…",
... )
>>> user = User.objects.create_user(
...     username="aidas",
...     email="aidas@example.com",
...     password="jdf234oha&6sfhasdfh",
... )
>>> Item.objects.count()
3

Aggregating content from all those relations

Lastly, here is an example of having posts, companies, and users in a single view. For that, we will use the Item queryset with annotations:

from django import forms
from django.db import models
from django.shortcuts import render
from django.utils.translation import gettext, gettext_lazy as _

from .models import Item


class SearchForm(forms.Form):
    q = forms.CharField(label=_("Search"), required=False)
    

def all_items(request):
    qs = Item.objects.annotate(
        title=models.Case(
            models.When(
                item_type="content.Post", 
                then="content_post__title",
            ),
            models.When(
                item_type="companies.Company", 
                then="companies_company__name",
            ),
            models.When(
                item_type="accounts.User",
                then="accounts_user__email",
            ),
            default=models.Value(gettext("<Untitled>")),
        ),
        description=models.Case(
            models.When(
                item_type="content.Post",
                then="content_post__content",
            ),
            models.When(
                item_type="companies.Company",
                then="companies_company__description",
            ),
            models.When(
                item_type="accounts.User", 
                then="accounts_user__bio",
                ),
            default=models.Value(""),
        ),
    )
    
    form = SearchForm(data=request.GET, prefix="search")
    if form.is_valid():
        query = form.cleaned_data["q"]
        if query:
            qs = qs.annotate(
                search=SearchVector(
                    "title",
                    "description",
                )
            ).filter(search=query)

    context = {
        "queryset": qs,
        "search_form": form,
    }
    return render(request, "items/all_items.html", context)

Final words

You can have generic functionality and still avoid multiple hits to the database by using the Item one-to-one approach instead of generic relations.

The name of the Item model can be different, and you can even have multiple such models for various purposes, for example, TaggedItem for tags only.

Do you use anything similar in your projects?

Do you see how this approach could be improved?

Let me know in the comments!


Cover picture by Pixabay