Showing posts with label Basics. Show all posts

2024-11-23

Creating AI-based Summaries in a Django Website

Summarizing lengthy text can be tedious, especially on platforms like PyBazaar, where concise summaries improve user experience. In this post, I'll share how I used Simplemind and Gemini to automate this process in my Django-based project.

Background Info

Recently, I launched PyBazaar.com, a website for Python developers to show their skills, find job offers, and post and find development resources. Its purpose is to have a central place where Python developers can market their services, products, or projects.

PyBazaar shows lengthy descriptions of career opportunities and resources in the detail views and short summaries in the list views. Summaries help users quickly grasp the content of resources and career opportunities without opening each detailed view, enhancing the overall browsing experience on PyBazaar. To make the editing smoother, I introduced automatic summarization based on AI.

Summarization by AI

Choosing Simplemind for Communication with LLMs

Kenneth Reitz, the author of the famous package requests, recently published his newest creation—Simplemind—which improves the developer experience with the APIs of large language models (LLMs). I thought it would be a good opportunity to try integrating his package into PyBazaar.

While I chose Google Gemini for its free tier, Simplemind's support for providers like OpenAI or Claude means developers can scale up for more advanced features or more precise results if needed.

Setting Up API Keys

At first, I had to get an API Key at Google AI Studio.

Then I installed Simplemind:

(venv)$ pip install 'simplemind[full]'

However, while waiting for one of the dependencies (grpcio) to compile on my Mac, I had time for an energy drink and enough time to scroll through half my social media feed.

Simplemind expects the LLM API keys to be defined in the environment variables. In my Django projects, I store the secrets in JSON files, which Git ignores, and I read those values with a utility function I wrote, get_secret().

So, I added these lines in the Django settings:

import os
os.environ["GEMINI_API_KEY"] = get_secret("GEMINI_API_KEY")
DEFAULT_LLM_PROVIDER = "gemini"

Django Integration

I created a straightforward view that takes posted HTML content, asks LLM to summarize it, and returns the summary to the user:

import json
import simplemind
from django.contrib.auth.decorators import login_required
from django.conf import settings
from django.http import JsonResponse
from django.utils.html import strip_tags


@login_required
def summarize(request):
    summary = ""
    try:
        if (
            request.method == "POST"
            and (data := json.loads(request.body))
            and (content := data.get("content"))
            and (text := strip_tags(content).strip())
        ):
            summary = simplemind.generate_text(
                prompt=f"Condense the following information in 2 sentences:\n\n{text}",
                llm_provider=settings.DEFAULT_LLM_PROVIDER,
            ).strip()
    except json.JSONDecodeError:
        pass
    data = {"summary": summary}
    return JsonResponse(data)

As you can see, Simplemind is as elegant as the requests app. I could easily switch to OpenAI or Claude if I needed more advanced results or smarter queries.

I used strip_tags() to reduce the token count and strip() to remove leading and trailing whitespaces.

To improve the view's performance, I could also use ASGI or a background task, but that's something to consider when there are more users at PyBazaar.

The summarization button had its template, which I included in my Django Crispy Forms layout with layout.HTML("""{% include "summarizer/includes/summarize_button.html" %}"""):

{% load i18n static %}
<button type="button" class="summarize btn btn-secondary mb-3" data-url="{% url 'summarize' %}">
    {% translate "Summarize by AI" %}
</button>
<script src="{% static 'site/js/summarize.js' %}"></script>

Javascript Handling

And finally, the summarize.js looked like this:

document.addEventListener('DOMContentLoaded', function() {
    const summarizeButtons = document.querySelectorAll('.summarize');

    summarizeButtons.forEach(button => {
        button.addEventListener('click', async function(e) {
            const btn = e.currentTarget;
            const url = btn.dataset.url;
            const originalText = btn.textContent;

            try {
                // Disable button and show loading state
                btn.disabled = true;
                btn.textContent = 'Summarizing...';

                // Get HTML content from Quill
                const contentField = document.getElementById('quill-input-id_description');
                const quillData = JSON.parse(contentField.value);
                const contentHtml = quillData.html;

                const csrfToken = document.querySelector('[name="csrfmiddlewaretoken"]').value;

                const response = await fetch(url, {
                    method: 'POST',
                    headers: {
                        'Content-Type': 'application/json',
                        'X-CSRFToken': csrfToken,
                    },
                    body: JSON.stringify({
                        content: contentHtml
                    })
                });

                if (!response.ok) {
                    throw new Error(`HTTP error! status: ${response.status}`);
                }

                const data = await response.json();

                // Get the summary field and update its value
                const summaryField = document.getElementById('id_summary');
                summaryField.value = data.summary;
                // Trigger change event in case there are any listeners
                summaryField.dispatchEvent(new Event('change'));

            } catch (error) {
                console.error('Summarization failed:', error);
                alert('Failed to generate summary. Please try again.');
            } finally {
                // Reset button state
                btn.disabled = false;
                btn.textContent = originalText;
            }
        });
    });
});

When a user clicks on the "Summarize by AI" button, the Javascript temporarily disables the button, changes its text to "Summarizing...", reads the HTML value from the QuillJS field, and posts it as {"content": "..."} to the summarize view. After receiving the summary as {"summary": "..."}, the Javascript fills in the summary textarea and makes the button clickable again.

Conclusion

Simplemind makes working with LLMs easier using smart defaults, so developers don't have to adjust complicated settings like temperature or max_tokens.

Gemini LLM can be used for free, and that seems good enough for simple features like this with a moderate number of active users.

I implemented this summarization feature at PyBazaar in just half a day, and I could easily adapt this integration to generate meta descriptions, email drafts, or personalized recommendations.

If you're a Python developer looking to showcase your skills, share resources, or find opportunities, visit PyBazaar.com today!


Cover photo by Caio

2019-10-08

Working with Dates and Times in the Forms

HTML5 comes with a bunch of new types for the input fields that are rendered as rich native widgets. Browsers even restrict invalid values and validate the input immediately. Let's explore how we could make use of them in Django forms.

We will be using an Exhibition model with models.DateField, models.TimeField, and models.DateTimeField:

# exhibitions/models.py
from django.db import models
from django.utils.translation import gettext_lazy as _

class Exhibition(models.Model):
    title = models.CharField(_("Title"), max_length=200)
    start = models.DateField(_("Start"))
    end = models.DateField(_("End"), blank=True, null=True)
    opening = models.TimeField(_("Opening every day"))
    closing = models.TimeField(_("Closing every day"))
    vernissage = models.DateTimeField(_("Vernissage"), blank=True, null=True)
    finissage = models.DateTimeField(_("Finissage"), blank=True, null=True)

    class Meta:
        verbose_name = _("Exhibition")
        verbose_name_plural = _("Exhibitions")

    def __str__(self):
        return self.title

Here is a quick model form for the Exhibition model:

# exhibitions/forms.py
from django import forms
from .models import Exhibition

class ExhibitionForm(forms.ModelForm):
    class Meta:
        model = Exhibition
        fields = "__all__"

If we now open a Django shell and create an instance of the model form with some initial values, then print the form as HTML to the console, we will notice, that all date and time fields are rendered as <input type="text" /> and the values for the dates are in a local format, not the ISO standard YYYY-MM-DD:

(venv)$ python manage.py shell
>>> from exhibitions.forms import ExhibitionForm
>>> from datetime import datetime, date, time
>>> form = ExhibitionForm(initial={
...     "start": date(2020, 1, 1),
...     "end": date(2020, 3, 31),
...     "opening": time(11, 0),
...     "closing": time(20, 0),
...     "vernissage": datetime(2019, 12, 27, 19, 0),
...     "finissage": datetime(2020, 4, 1, 19, 0),
>>> })
>>> print(form.as_p())
<p><label for="id_title">Title:</label> <input type="text" name="title" maxlength="200" required id="id_title"></p>
<p><label for="id_start">Start:</label> <input type="text" name="start" value="01.01.2020" required id="id_start"></p>
<p><label for="id_end">End:</label> <input type="text" name="end" value="31.03.2020" id="id_end"></p>
<p><label for="id_opening">Opening every day:</label> <input type="text" name="opening" value="11:00:00" required id="id_opening"></p>
<p><label for="id_closing">Closing every day:</label> <input type="text" name="closing" value="20:00:00" required id="id_closing"></p>
<p><label for="id_vernissage">Vernissage:</label> <input type="text" name="vernissage" value="27.12.2019 19:00:00" id="id_vernissage"></p>
<p><label for="id_finissage">Finissage:</label> <input type="text" name="finissage" value="01.04.2020 19:00:00" id="id_finissage"></p>

Let's modify the model form and customize the date and time inputs. We will extend and use forms.DateInput, forms.TimeInput, and forms.DateTimeInput widgets. We want to show date inputs as <input type="date" />, time inputs as <input type="time" />, and date-time inputs as <input type="datetime-local" />. In addition, the format for the dates should be based on ISO standard.

# exhibitions/forms.py
from django import forms
from .models import Exhibition


class DateInput(forms.DateInput):
    input_type = "date"

    def __init__(self, **kwargs):
        kwargs["format"] = "%Y-%m-%d"
        super().__init__(**kwargs)


class TimeInput(forms.TimeInput):
    input_type = "time"


class DateTimeInput(forms.DateTimeInput):
    input_type = "datetime-local"

    def __init__(self, **kwargs):
        kwargs["format"] = "%Y-%m-%dT%H:%M"
        super().__init__(**kwargs)


class ExhibitionForm(forms.ModelForm):
    class Meta:
        model = Exhibition
        fields = "__all__"

    def __init__(self, *args, **kwargs):
        super().__init__(*args, **kwargs)
        self.fields["start"].widget = DateInput()
        self.fields["end"].widget = DateInput()
        self.fields["opening"].widget = TimeInput()
        self.fields["closing"].widget = TimeInput()
        self.fields["vernissage"].widget = DateTimeInput()
        self.fields["vernissage"].input_formats = ["%Y-%m-%dT%H:%M", "%Y-%m-%d %H:%M"]
        self.fields["finissage"].widget = DateTimeInput()
        self.fields["finissage"].input_formats = ["%Y-%m-%dT%H:%M", "%Y-%m-%d %H:%M"]

Let's see now in the Django shell if that worked as expected:

(venv)$ python manage.py shell
>>> from exhibitions.forms import ExhibitionForm
>>> from datetime import datetime, date, time
>>> form = ExhibitionForm(initial={
...     "start": date(2020, 1, 1),
...     "end": date(2020, 3, 31),
...     "opening": time(11, 0),
...     "closing": time(20, 0),
...     "vernissage": datetime(2019, 12, 27, 19, 0),
...     "finissage": datetime(2020, 4, 1, 19, 0),
>>> })
>>> print(form.as_p())
<p><label for="id_title">Title:</label> <input type="text" name="title" maxlength="200" required id="id_title"></p>
<p><label for="id_start">Start:</label> <input type="date" name="start" value="2020-01-01" required id="id_start"></p>
<p><label for="id_end">End:</label> <input type="date" name="end" value="2020-03-31" id="id_end"></p>
<p><label for="id_opening">Opening every day:</label> <input type="time" name="opening" value="11:00:00" required id="id_opening"></p>
<p><label for="id_closing">Closing every day:</label> <input type="time" name="closing" value="20:00:00" required id="id_closing"></p>
<p><label for="id_vernissage">Vernissage:</label> <input type="datetime-local" name="vernissage" value="2019-12-27T19:00" id="id_vernissage"></p>
<p><label for="id_finissage">Finissage:</label> <input type="datetime-local" name="finissage" value="2020-04-01T19:00" id="id_finissage"></p>

The same way you can also create widgets for other HTML5 input types: color, email, month, number, range, tel, url, week, and alike.

Happy coding!


Cover photo by Eric Rothermel.

2019-04-27

Improving Page Speed with Incremental Loading

Improving Page Speed with Incremental Loading

Summary: you can use django-include-by-ajax to improve the performance and usability of your website by forcing some parts of the Django website page to be loaded and shown before other parts of the page.


Web browsers load and render traditional HTML pages from top to down, from left to right and as a developer you have little control over what will be shown first, second, and last. However, sometimes you need a different loading sequence to improve user experience and usability. Let's examine a couple of cases when it is advantageous to have primary content showing up immediately and secondary content loading in a moment.

Case 1. Above the Fold vs. Below the Fold

People want speed. 47% of visitors expect the website to be loaded in less than 2 seconds. If the website takes more than 3 seconds to show up, it's a big chance, that you will lose 40% of visitors. If you sell something on your website, every one-second delay causes 7% fewer visitors becoming buyers.

One technique to improve the perception of the speed of the website is to display the visible part of the screen as soon as possible, and then load the rest of the website in another go. Usually, the website pages are long vertically scrollable areas. The part of it that fits in the screen is called "above the fold" and the part underneath is called "below the fold".

Primary content above the fold and secondary content below the fold

It is recommended to load the part above the fold in 6 requests, including all your HTML, CSS, JavaScript, images and fonts. It's only 6 requests for a reason - that's the maximal number of requests that most browsers keep to the same HTTP/1.1 server at the same time. With HTTP/2 there is no such limitation.

You can only achieve this minimal load if you bundle and minimize your CSS and JavaScript to single files, and use only a couple of images and fonts. Going one step further you can split your CSS and JavaScript into parts that are used above the fold, and the ones that are used below the fold.

Case 2. Main Content vs. Navigation

For the users to have best user experience and smooth loading, you could display the content of articles or blog post first, and then load and display the website navigation in the header, sidebars, or footer.

Content is primary and the navigation is secondary

If the visitor navigated to a specific page of your website, they most likely want to see the content of that page rather than navigate out to other pages.

If you have extensive nested navigation, you can also save some milliseconds of its loading at the first request, by skipping it there, but loading it by Ajax at the next go.

Additionally, if visitor disables JavaScript in their browser, they will still be able to read the content.

Case 3. Own Content vs. Third-party Content

Wouldn't you agree, websites that show ads before their own content are pretty annoying? One way to improve the user experience is to show the main content at first and show the ads or third-party widgets after several seconds.

Own content is primary and third-party widgets are secondary

The primary content will be correctly indexed by search engines, whereas the included widgets might be skipped, depending on implementation, which we'll examine next.

Solution 1. Iframes

One way to load the delayed secondary content is to use iframes.

Pros:

  • Works without JavaScript.

Cons:

  • For each iframed section, you need a separate HTML with custom CSS.
  • You have to predefine and hardcode all heights of each secondary section, so it wouldn't work well with increased or decreased font size or different amounts of content.
  • You cannot have interactive elements like tooltips that would go outside the boundaries of the iframe.

Solution 2. API Calls by Ajax

The page would load with empty placeholders for the secondary content and then some JavaScript function would load content for the missing sections in HTML, JSON, or XML format by Ajax, parse them, and include into the placeholders. This approach has been used by Facebook.

Pros:

  • You can use the same global CSS for everything.
  • The amount of content is flexible, so the designs would look good with different variations.

Cons:

  • For each secondary section, you need to define a separate API endpoint.
  • There are many extra requests (unless you use GraphQL for that).

Solution 3. A Second Request to the Same Page with Specific Query Parameters

The page loads with empty placeholders for the secondary content. A JavaScript function uses Ajax to load the HTML of the same page this time containing all rendered primary and secondary content. Then another JavaScript function goes through all placeholders and fills the content from the second load.

Pros:

  • You can use the same global CSS for everything.
  • The amount of content is flexible, so the designs could look good with different variations.
  • Each page uses a single data endpoint.
  • Only one extra request is necessary for the full HTML.

Cons:

  • If there is a lot of primary content and not so much of secondary content, it might take too long to load and parse the secondary content.

Implementation for a Django Website using django-include-by-ajax

You can implement the third solution in a Django website using my open-source Django app django-include-by-ajax. It is meant to be understandable and simple to use for frontend Django developers, who don't touch Python code but need to work on the layouts and styling.

The idea is that instead of including different sections of a template with the {% include template_name %} template tag, you do the same using {% include_by_ajax template_name %} template tag. This template tag renders as an empty placeholder unless you access the page from a search crawler or if you access the page with a specific query parameter. Otherwise, it works more-or-less the same as the {% include %} template tag.

By adding jQuery and one jQuery-based JavaScript file to your page template, you enable the magic that does all the loading and parsing. Since version 1.0, CSS and JavaScript files can also be included in those delayed sections.

You can see django-include-by-ajax in action at the start page of my personal project 1st things 1st. There I use the above-the-fold case with the visible content coming to the screen almost immediately and the offscreen content loading in several more seconds.

Installation

It should be trivial to convert any standard heavy website page to a page loading the secondary content dynamically. There are mainly these steps to follow:

  1. Install the app with your Python package manager:

    (venv)$ pip install django-include-by-ajax==1.0.0
  2. Put the app into the INSTALLED_APPS in your Django project settings:

    # settings.py
    INSTALLED_APPS = [
        # ...
        # Third-party apps
        'include_by_ajax',
        # ...
    ]
  3. Put these in your base.html:

    {% load staticfiles %}
    <script src="https://code.jquery.com/jquery-3.4.0.min.js" crossorigin="anonymous"></script>
    <script src="{% static 'include_by_ajax/js/include_by_ajax.min.js' %}" defer></script>

    It should also work with older or newer jQuery versions.

  4. Use the new template tag in any template where you need it:

    {% load include_by_ajax_tags %}
    {% include_by_ajax "blog/includes/latest_blog_posts.html" %}

    You can even define the content for the placeholder that will be shown while the main content is loading:

    {% load include_by_ajax_tags %}
    {% include_by_ajax "blog/includes/latest_blog_posts.html" placeholder_template_name="utils/loading.html" %}
  5. If you need some JavaScript action to be called after all content is loaded, you can use the custom include_by_ajax_all_loaded event on the document like this:

    $(document).on('include_by_ajax_all_loaded', function() {
        console.log('Now all placeholders are loaded and replaced with content. Hurray!');
    });

I would be glad if you tried it on some of your projects and see how it improved user experience and loading times. If you use it in production, please mention it in the comments of this blog post.

More Information

The app on Github: A Django App Providing the {% include_by_ajax %} Template Tag

The practical usage example: Strategic planner - Prioritizer - 1st things 1st.

An article on performance and usability: 5 Reasons Visitors Leave Your Website


Cover photo by Thomas Tucker.

Thanks to Adam Johnson for reviewing this post.

2019-02-02

Equivalents in Python and JavaScript. Bonus

From time to time I google for the right syntax how to process lists and dictionaries in Python or arrays and objects in JavaScript. So I decided to extend my series of equivalents with those functions. After all, it's me too, who will be using the information I provide here.

All truthful elements

Sometimes we need to check from a list of conditions if all of them are true, or from a list of elements if all of them are not empty.

This can be checked with the following in Python:

items = [1, 2, 3]
all_truthy = all(items)
# True

And here is an equivalent in JavaScript:

items = [1, 2, 3];
all_truthy = items.every(Boolean);
// true

Any truthful elements

Similarly, we can check if at least one of the conditions is true, or there is at least one non-empty element in a list.

It Python we would do that with:

items = [0, 1, 2, 3]
some_truthy = any(items)
# True

And in JavaScript we would check it like this:

items = [0, 1, 2, 3];
some_truthy = items.some(Boolean);
// true

Iterate through each element and its index

Here is an example of how to iterate through a list of items and also check their indices in Python. It is useful for verbose console output when creating different command line tools that process data:

items = ['a', 'b', 'c', 'd']
for index, element in enumerate(items):
    print(f'{index}: {element};')

In JavaScript an analogous way to do the same would be using the forEach() method. The usual for loop is also an option, but I find the forEach() more elegant and clear.

items = ['a', 'b', 'c', 'd'];
items.forEach(function(element, index) {
    console.log(`${index}: ${element};`);
});

Map elements to the results of a function

To process all elements of a list, you can either iterate through them with the for loop and create a new list with modifications, or you can do that in one step by mapping the list items to a modification function. In Python this can be done with the map() function:

items = [0, 1, 2, 3]
all_doubled = list(map(lambda x: 2 * x, items))
# [0, 2, 4, 6]

In JavaScript the map() is a method of an array:

items = [0, 1, 2, 3];
all_doubled = items.map(x => 2 * x);
// [0, 2, 4, 6]

Filter elements by a function

When you need to search for some elements in a list or array and want to avoid for loops, you can use the filtering functionality. In Python that is doable with the filter() function that accepts the filtering function and the list and returns a new filtered list.

items = [0, 1, 2, 3]
only_even = list(filter(lambda x: x % 2 == 0, items))
# [0, 2]

In JavaScript there is a filter() method of the array for that.

items = [0, 1, 2, 3];
only_even = items.filter(x => x % 2 === 0);
// [0, 2]

In both cases, the filtering function checks each item if it is matching the filter criteria and returns true in that case.

Reduce elements by a function to a single value

When you want to apply some function to a list of items to get a single result in one go, you can use the reduce function. It works for summing, multiplying, ORing, ANDing, or checking maximums and minimums.

In Python there is a reduce() function for that.

from functools import reduce
items = [1, 2, 3, 4]
total = reduce(lambda total, current: total + current, items)
# 10

In JavaScript there is a reduce() method of the array.

items = [1, 2, 3, 4];
total = items.reduce((total, current) => total + current);
// 10

Merge dictionaries

There are multiple ways to merge dictionaries in Python or objects in JavaScript. But these are probably the simplest ones.

In Python it's decomposing dictionaries to tuples of keys and arrays, joining them, and creating a new dictionary.

d1 = {'a': 'A', 'b': 'B'}
d2 = {'a': 'AAA', 'c': 'CCC'}
merged = dict(list(d1.items()) + list(d2.items()))
# {'a': 'AAA', 'b': 'B', 'c': 'CCC'}

Analogously, in JavaScript it's spreading two objects into a new object:

d1 = {a: 'A', b: 'B'}
d2 = {a: 'AAA', c: 'CCC'}
merged = {...d1, ...d2};
// {a: 'AAA', b: 'B', c: 'CCC'}

The Takeaways

  • In both languages, you can traverse through lists of items without explicitly incrementing and referencing an index.
  • For processing list items, you don't necessarily need a loop. The dedicated methods or functions all() / every(), any() / some(), map(), filter(), and reduce() are there to help you.
  • In both languages, you can merge multiple dictionaries into one. If the same key appears in several dictionaries, the latest one will be used in the merged dictionary.

Of course, I also updated the cheat sheet with the full list of equivalents in Python and JavaScript that you saw here described. This cheat sheet helps me with a good overview next to my laptop, so I believe that it would be helpful to you too. The new revision 10 is with syntax highlighting, so it makes it even better to explore and understand.

Get the Ultimate Cheat Sheet of Equivalents in Python and JavaScript

Use it for good!


Cover photo by Darren Chan.

2018-07-06

Equivalents in Python and JavaScript. Part 3

This is the 3rd part of 4-article series about analogies in Python and JavaScript. In the previous parts we covered a large part of the traditional Python 2.7 and JavaScript based on the ECMAScript 5 standard. This time we will start looking into Python 3.6 and JavaScript based on the ECMAScript 6 standard. ECMAScript 6 standard is pretty new and supported only the newest versions of browsers. For older browsers you will need Babel to compile your next-generation JavaScript code to the cross-browser-compatible equivalents. It opens the door to so many interesting things to explore. We will start from string interpolation, unpacking lists, lambda functions, iterations without indexes, generators, and sets!

Variables in strings

The old and inefficient way to build strings with values from variables is this concatenation:

name = 'World'
value = 'Hello, ' + name + '!\nWelcome!'

This can get very sparse and difficult to read. Also it is very easy to miss whitespaces in the sentence around variables.

Since Python version 3.6 and JavaScript based on the ECMAScript 6 standard, you can use so called string interpolation. These are string templates which are filled in with values from variables.

In Python they are also called f-string, because their notation starts with letter "f":

name = 'World'
value = f"""Hello, {name}!
Welcome!"""

price = 14.9
value = f'Price: {price:.2f} €'  # 'Price: 14.90 €'

In JavaScript string templates start and end with backticks:

name = 'World';
value = `Hello, ${name}!
Welcome!`;

price = 14.9;
value = `Price ${price.toFixed(2)} €`;  // 'Price: 14.90 €'

Note that string templates can be of a single line as well as of multiple lines. For f-strings in Python you can pass the format for variables, but you can't call methods of a variable unless they are properties and call getter methods.

Unpacking lists

Python and now JavaScript has an interesting feature to assign items of sequences into separate variables. For example, we can read the three values of a list into variables a, b, and c with the following syntax:

[a, b, c] = [1, 2, 3]

For tuples the parenthesis can be omitted. The following is a very popular way to swap values of two variables in Python:

a = 1
b = 2
a, b = b, a  # swap values

With the next generation JavaScript this can also be achieved:

a = 1;
b = 2;
[a, b] = [b, a];  // swap values

In Python 3.6 if we have an unknown number of items in a list or tuple, we can assign them to a tuple of several values while also unpacking the rest to a list:

first, second, *the_rest = [1, 2, 3, 4]
# first == 1
# second == 2
# the_rest == [3, 4]

This can also be done with JavaScript (ECMAScript 6):

[first, second, ...the_rest] = [1, 2, 3, 4];
// first === 1
// last === 2
// the_rest === [3, 4]

Lambda functions

Python and JavaScript have a very neat functionality to create functions in a single line. These functions are called lambdas. Lambdas are very simple functions that take one or more arguments and return some calculated value. Usually lambdas are used when you need to pass a function to another function as a callback or as a function to manipulate every separate elements in a sequence.

In Python, you would define a lambda using the lambda keyword, like this:

sum = lambda x, y: x + y
square = lambda x: x ** 2

In JavaScript lambdas use the => notation. If there are more than one arguments, they have to be in parenthesis:

sum = (x, y) => x + y;
square = x => Math.pow(x, 2);

Iteration without indexes

Many programming languages allow iterating through a sequence only by using indexes and incrementing their values. Then to get an item at some position, you would read it from an array, for example:

for (i=0; i<items.length; i++) {
    console.log(items[i]);
}

This is not a nice syntax and is very technical - it doesn't read naturally. What we really want is just to grab each value from the list. And Python has a very neat possibility just to iterate through the elements:

for item in ['A', 'B', 'C']:
    print(item)

In the modern JavaScript this is also possible with the for..of operator:

for (let item of ['A', 'B', 'C']) {
    console.log(item);
}

You can also iterate through a string characters in Python:

for character in 'ABC':
    print(character)

And in the modern JavaScript:

for (let character of 'ABC') {
    console.log(character);
}

Generators

Python and modern JavaScript has a possibility to define special functions through which you can iterate. With each iteration they return the next generated value in a sequence. These functions are called generators. With generators you can get numbers in a range, lines from a file, data from different paginated API calls, fibonacci numbers, and any other dynamicly generated sequences.

Technically generators are like normal functions, but instead of returning a value, they yield a value. This value will be returned for one iteration. And this generation happens as long as the end of the function is reached.

To illustrate that, the following Python code will create a generator countdown() which will return numbers from the given one back to 1, (like 10, 9, 8, ..., 1):

def countdown(counter):
    while counter > 0:
        yield counter
        counter -= 1
        
for counter in countdown(10):
    print(counter)

Exactly the same can be achieved in modern JavaScript, but notice the asterisk at the function statement. It defines that it's a generator:

function* countdown(counter) {
    while (counter > 0) {
        yield counter;
        counter--;
    }
}
for (let counter of countdown(10)) {
    console.log(counter);
}

Sets

We already had a look at lists, tuples and arrays. But here is another type of data - sets. Sets are groups of elements that ensure that each element there exists only once. Set theory also specifies set operations like union, intersection, and difference, but we won't cover them here today.

This is how to create a set, add elements to it, check if a value exists, check the total amount of elements in a set, and iterate through its values, and remove a value using Python:

s = set(['A'])
s.add('B'); s.add('C')
'A' in s
len(s) == 3
for elem in s:
    print(elem)
s.remove('C')

Here is how to achieve the same in modern JavaScript:

s = new Set(['A']);
s.add('B').add('C');
s.has('A') === true;
s.size === 3;
for (let elem of s.values()) {
    console.log(elem);
}
s.delete('C')

The Takeaways

  • String interpolation or literal templates allows you to have much cleaner and nicer code even with a possibility to have multiple lines of text.
  • You can iterate through elements in a sequence or group without using indexes.
  • Use generators when you have a sequence of nearly unlimited elements.
  • Use sets when you want to ensure fast check if data exists in a collection.
  • Use lambdas when you need short and clear single-line functions.

As you know from the previous parts, I am offering a cheat sheet with the whole list of equivalents in Python and JavaScript, both, time honored and future proof. To have something printed in front of your eyes is much more convenient than switching among windows or scrolling up and down until you find what you exactly were searching for. So I suggest you to get the cheat sheet and use it for good!

Get the Ultimate Cheat Sheet of Equivalents in Python and JavaScript

In the next and last part of the series, we will have a look at function arguments, classes, inheritance, and properties. Stay tuned!


Cover photo by Alex Knight

2018-06-30

Equivalents in Python and JavaScript. Part 1

Although Python and JavaScript are quite different languages, there are some analogies which full stack Python developers should know when developing web projects. In this series of 4 parts, I will explore what is similar in each of those languages and what are the common ways to solve common problems. This is not meant to be a reference and I will skip the basics like primitive variable types, conditions, and loops. But I will dig into more complex structures and data operations using both, Python and JavaScript. Also, I will try to focus on the practical use cases. This series should be interesting for the developers of Django, Flask, or another Python framework who want to get a grasp of traditional and modern vanilla JavaScript. On the other hand, it will be useful for the front-enders who want to better understand how the backend is working and maybe even start their own Django website.

Parsing integers

We'll begin with integer parsing.

In Python that's straightforward:

number = int(text)

But in JavaScript you have to explain what number system you expect: decimal, octal, hexadecimal, or binary:

number = parseInt(text, 10);

To use the "normal" decimal number system we are passing number 10 as the second parameter of the parseInt() function. 8 goes for octal, 16 for hexadecimal, or 2 – for binary. If the second parameter is missing, the number in text starts with zero, and you are using a slightly older browser, the number in the text will be interpreted as octal. For example,

parseInt('012') == 10  // in some older browsers
parseInt('012', 10) == 12

And that can really mess up your calculations.

Conditional assignment

For conditional assignment, Python and JavaScript have different syntaxes, but conditional assignments are quite popular in both languages. That's popular, because it's just a single statement to have a condition checking, the true-case value, and the false-case value.

Since Python 2.7 you can write conditional assignments like this:

value = 'ADULT' if age >= 18 else 'CHILD'

In JavaScript conditional assignments are done using ternary operator ?:, similar to the ones in C, C++, C#, Java, Ruby, PHP, Perl, Swift, and ActionScript:

value = age >= 18? 'ADULT': 'CHILD';

Object attribute value by attribute name

The normal way to access an object's attribute is by the dot notation in both, Python and JavaScript:

obj.color = 'YELLOW'

But what if you want to refer to an attribute by its name saved as a string? For example, the attribute name could be coming from a list of attributes or the attribute name is combined from two strings like 'title_' + lang_code.

For that reason, in Python, there are functions getattr() and setattr(). I use them a lot.

attribute = 'color'
value = getattr(obj, attribute, 'GREEN')
setattr(obj, attribute, value)

In JavaScript you can treat an object like a dictionary and pass the attribute name in square brackets:

attribute = 'color';
value = obj[attribute] || 'GREEN';
obj[attribute] = value;

To retrieve a default value when an object has no such attribute, in Python, getattr() has the third parameter. In JavaScript, if obj attribute doesn't exist, it will return the undefined value. Then it can be OR-ed with the default value that you want to assign. That's a common practice in JavaScript that you can find in many JavaScript libraries and frameworks.

Dictionary value by key

This is similar to the previous one. The normal way to assign a dictionary's value by key in both languages is using the square brackets:

dictionary = {}
dictionary['color'] = 'YELLOW'

To read a value in Python you can use the square-bracket notation, but it will fail on non-existing keys with KeyError. The more flexible way is to use the get() method which returns None for non-existing keys. Also you can pass an optional default value as the second parameter:

key = 'color'
value = dictionary.get(key, 'GREEN')

In JavaScript you would use the same trick as with object attributes, because dictionaries and objects are the same there:

key = 'color';
value = dictionary[key] || 'GREEN';

Slicing lists and strings

Python has the slice [:] operator to get parts of lists, tuples, and similar more complex structures, for example Django QuerySets:

items = [1, 2, 3, 4, 5]
first_two = items[:2]      # [1, 2]
last_two = items[-2:]      # [4, 5]
middle_three = items[1:4]  # [2, 3, 4]

In JavaScript arrays have the slice() method with the same effect and similar usage:

items = [1, 2, 3, 4, 5];
first_two = items.slice(0, 2);     // [1, 2] 
last_two = items.slice(-2);        // [4, 5]
middle_three = items.slice(1, 4);  // [2, 3, 4]

But don't mix it up with the splice() method which modifies the original array!


The [:] slice operator in Python also works for strings:

text = 'ABCDE'
first_two = text[:2]      # 'AB'
last_two = text[-2:]      # 'DE'
middle_three = text[1:4]  # 'BCD'

In JavaScript strings just like arrays have the slice() method:

text = 'ABCDE';
first_two = text.slice(0, 2);    // 'AB'
last_two = text.slice(-2);       // 'DE'
middle_three = text.slice(1, 4); // 'BCD'

Operations with list items

In programming it is very common to collect and analyze sequences of elements. In Python that is usually done with lists and in JavaScript with arrays. They have similar syntax and operations, but different method names to add and remove values.

This is how to concatenate two lists, add one value to the end, add one value to the beginning, get and remove a value from the beginning, get and remove a value from the end, and delete a certain value by index in Python:

items1 = ['A']
items2 = ['B']
items = items1 + items2  # items == ['A', 'B']
items.append('C')        # ['A', 'B', 'C']
items.insert(0, 'D')     # ['D', 'A', 'B', 'C']
first = items.pop(0)     # ['A', 'B', 'C']
last = items.pop()       # ['A', 'B']
items.delete(0)          # ['B']

This is how to do exactly the same with arrays in JavaScript:

items1 = ['A'];
items2 = ['B'];
items = items1.concat(items2);  // items === ['A', 'B']
items.push('C');                // ['A', 'B', 'C']
items.unshift('D');             // ['D', 'A', 'B', 'C']
first = items.shift();          // ['A', 'B', 'C']
last = items.pop();             // ['A', 'B']
items.splice(0, 1);             // ['B']

Joining lists of strings

It is very common after having a list or array of strings, to combine them into one string by a separator like comma or new line.

In Python that is done by the join() method of a string where you pass the list or tuple. Although it might feel unnatural, you start with the separator there. But I can assure that you get used to it after several times of usage.

items = ['A', 'B', 'C']
text = ', '.join(items)  # 'A, B, C'

In JavaScript the array has the join() method where you pass the separator:

items = ['A', 'B', 'C'];
text = items.join(', ');  // 'A, B, C'

The Takeaways

  • List and tuples in Python are similar to arrays in JavaScript.
  • Dictionaries in Python are similar to objects in JavaScript.
  • Strings in Python are similar to strings in JavaScript.
  • Numbers in JavaScript should be parsed with care.
  • Single-line conditional assignments exist in both languages.
  • Joining sequences of strings in Python is confusing, but you can quickly get used to it.

I compiled the whole list of equivalents of Python and JavaScript to a cheat sheet that you can print out and use for good. Side by side it compares traditional Python 2.7 and JavaScript based on ECMAScript 5 standard, as well as newer Python 3.6 and JavaScript based on ECMAScript 6 standard with such goodies as string interpolation, lambdas, generators, classes, etc.

Get the Ultimate Cheat Sheet of Equivalents in Python and JavaScript

In the next part of the series, we will have a look at JSON creation and parsing, operations with regular expressions, and error handling. Stay tuned!


Cover photo by Benjamin Hung.

2016-12-16

Django Administration: Inlines for Inlines

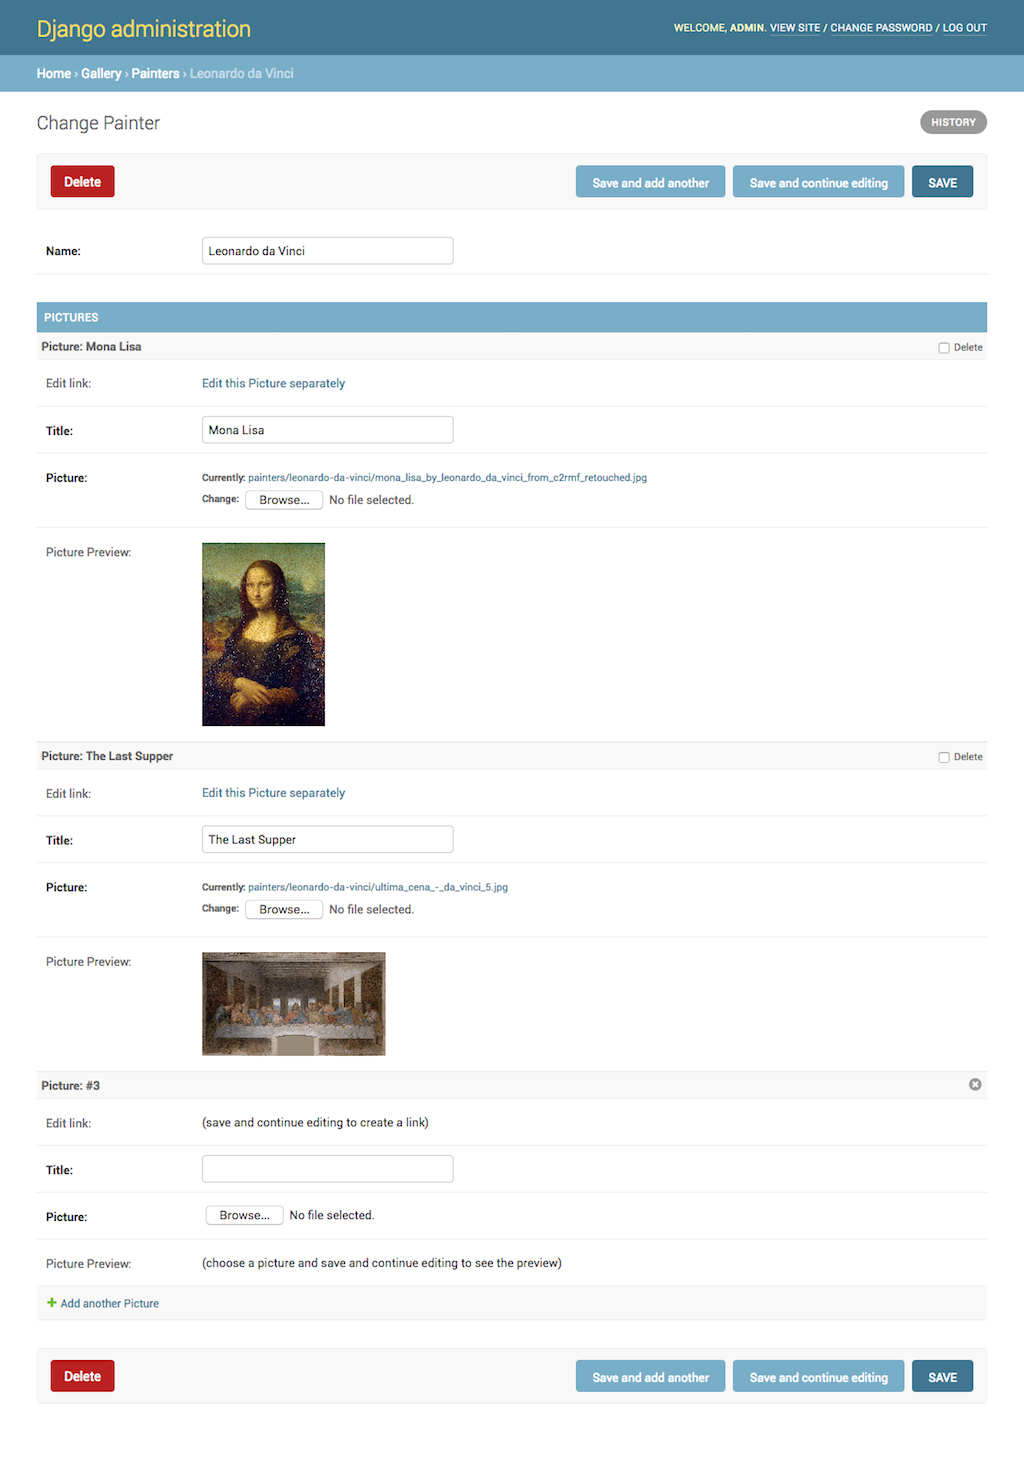
The default Django model administration comes with a concept of inlines. If you have a one-to-many relationship, you can edit the parent and its children in the same form. However, you are limited in a way that you cannot have inlines under inlines at nested one-to-many relations. For example, you can't show models Painter, Picture, and Review in the same form if one painter may have drawn multiple pictures and each picture may have several reviews.

In this article I would like to share a workaround allowing you to quickly access the inlines of an inline model. The idea is that for every inline you can provide a HTML link leading to the separate form where you can edit the related model and its own relations. It's as simple as that.

For example, in the form of Painter model, you have the instances of Picture listed with specific links "Edit this Picture separately":

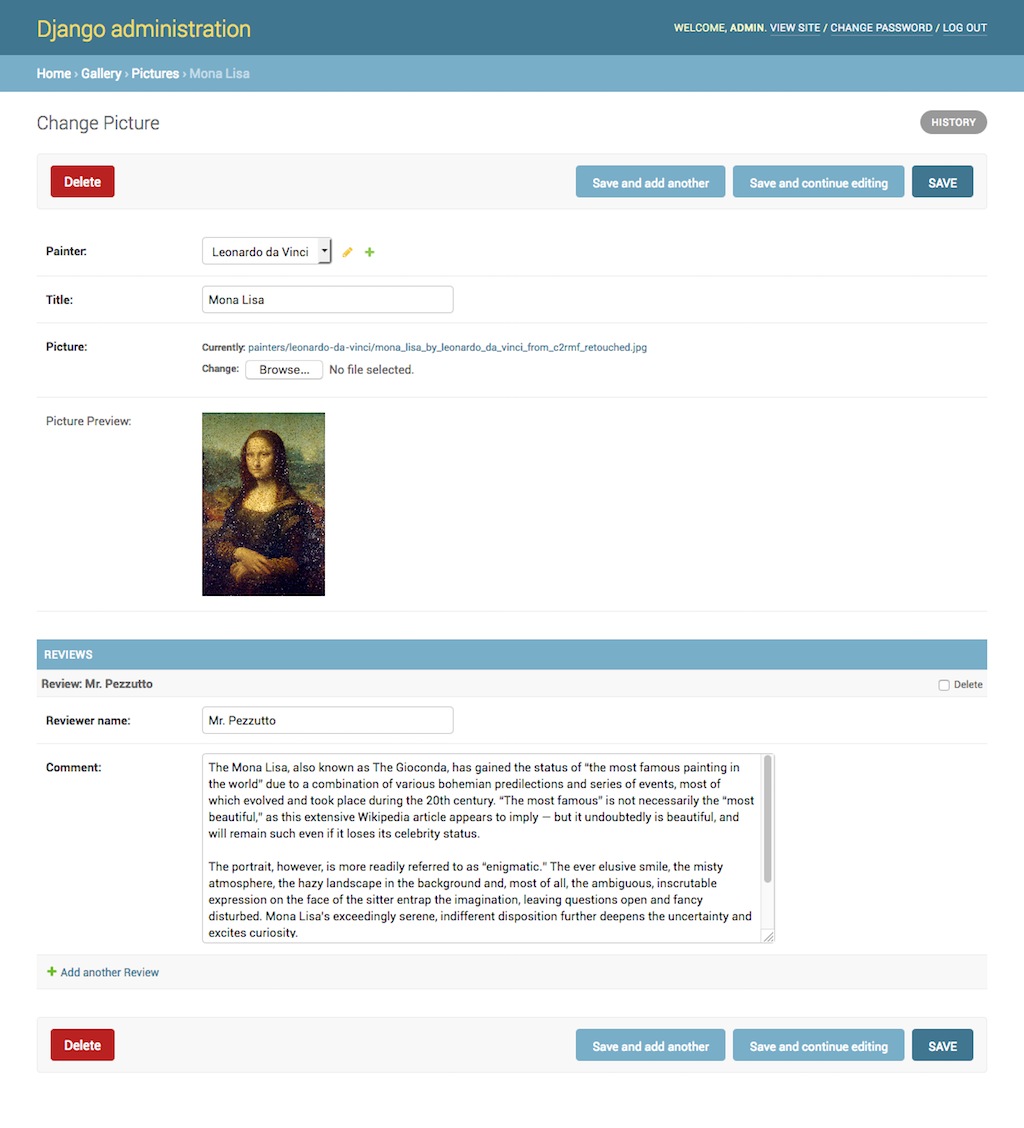
When such a link is clicked, the administrator goes to the form of the Picture model which shows the instances of Review model listed underneath:

Let's have a look, how to implement this.

First of all, I will create a gallery app and define the three models there. Nothing fancy here. The important part there is just that the Picture model has a foreign key to the Painter model and the Review model has a foreign key to the Picture model.

# gallery/models.py
# -*- coding: UTF-8 -*-
from __future__ import unicode_literals

import os

from django.db import models
from django.utils.encoding import python_2_unicode_compatible
from django.utils.translation import ugettext_lazy as _
from django.utils.text import slugify


@python_2_unicode_compatible
class Painter(models.Model):
    name = models.CharField(_("Name"), max_length=255)

    class Meta:
        verbose_name = _("Painter")
        verbose_name_plural = _("Painters")

    def __str__(self):
        return self.name


def upload_to(instance, filename):
    filename_base, filename_ext = os.path.splitext(filename)
    return "painters/{painter}/{filename}{extension}".format(
        painter=slugify(instance.painter.name),
        filename=slugify(filename_base),
        extension=filename_ext.lower(),
    )

@python_2_unicode_compatible
class Picture(models.Model):
    painter = models.ForeignKey(Painter, verbose_name=_("Painter"), on_delete=models.CASCADE)
    title = models.CharField(_("Title"), max_length=255)
    picture = models.ImageField(_("Picture"), upload_to=upload_to)

    class Meta:
        verbose_name = _("Picture")
        verbose_name_plural = _("Pictures")

    def __str__(self):
        return self.title


@python_2_unicode_compatible
class Review(models.Model):
    picture = models.ForeignKey(Picture, verbose_name=_("Picture"), on_delete=models.CASCADE)
    reviewer = models.CharField(_("Reviewer name"), max_length=255)
    comment = models.TextField(_("Comment"))

    class Meta:
        verbose_name = _("Review")
        verbose_name_plural = _("Reviews")

    def __str__(self):
        return self.reviewer

Then I will create the administration definition for the models of the gallery app. Here I will set two types of administration for the Picture model:

  • By extending admin.StackedInline I will create administration stacked as inline.
  • By extending admin.ModelAdmin I will create administration in a separate form.

In Django model administration besides usual form fields, you can also include some computed values. This can be done by your fields (or fieldsets) and readonly_fields attributes referring to a callable or a method name.

You can set a translatable label for those computed values by defining short_description attribute for the callable or method. If you want to render some HTML, you can also set the allow_tags attribute to True (otherwise your HTML string will be escaped).

# gallery/admin.py
# -*- coding: UTF-8 -*-
from django.contrib import admin
from django.core.urlresolvers import reverse
from django.utils.translation import ugettext_lazy as _
from django.utils.text import force_text

from .models import Painter, Picture, Review

def get_picture_preview(obj):
    if obj.pk:  # if object has already been saved and has a primary key, show picture preview
        return """<a href="{src}" target="_blank"><img src="{src}" alt="{title}" style="max-width: 200px; max-height: 200px;" /></a>""".format(
            src=obj.picture.url,
            title=obj.title,
        )
    return _("(choose a picture and save and continue editing to see the preview)")
get_picture_preview.allow_tags = True
get_picture_preview.short_description = _("Picture Preview")


class PictureInline(admin.StackedInline):
    model = Picture
    extra = 0
    fields = ["get_edit_link", "title", "picture", get_picture_preview]
    readonly_fields = ["get_edit_link", get_picture_preview]

    def get_edit_link(self, obj=None):
        if obj.pk:  # if object has already been saved and has a primary key, show link to it
            url = reverse('admin:%s_%s_change' % (obj._meta.app_label, obj._meta.model_name), args=[force_text(obj.pk)])
            return """<a href="{url}">{text}</a>""".format(
                url=url,
                text=_("Edit this %s separately") % obj._meta.verbose_name,
            )
        return _("(save and continue editing to create a link)")
    get_edit_link.short_description = _("Edit link")
    get_edit_link.allow_tags = True


@admin.register(Painter)
class PainterAdmin(admin.ModelAdmin):
    save_on_top = True
    fields = ["name"]
    inlines = [PictureInline]


class ReviewInline(admin.StackedInline):
    model = Review
    extra = 0
    fields = ["reviewer", "comment"]


@admin.register(Picture)
class PictureAdmin(admin.ModelAdmin):
    save_on_top = True
    fields = ["painter", "title", "picture", get_picture_preview]
    readonly_fields = [get_picture_preview]
    inlines = [ReviewInline]

UPDATE! Since Django 2.0, the get_picture_preview() function should use mark_safe() instead of allow_tags=True:

from django.utils.safestring import mark_safe
# ...
    def get_edit_link(self, obj=None):
        if obj.pk:  # if object has already been saved and has a primary key, show link to it
            url = reverse(
                'admin:%s_%s_change' % (obj._meta.app_label, obj._meta.model_name), 
                args=[force_text(obj.pk)]
            )
            return mark_safe("""<a href="{url}">{text}</a>""".format(
                url=url,
                text=_("Edit this %s separately") % obj._meta.verbose_name,
            ))
        return _("(save and continue editing to create a link)")
    get_edit_link.short_description = _("Edit link")

In this administration setup, the get_edit_link() method creates a HTML link between the inline and the separate administration form for the Picture model. As you can see, I also added the get_picture_preview() function as a bonus. It is included in both administration definitions for the Picture model and its purpose is to show a preview of the uploaded picture after saving it.

To recap, nested inlines are not supported by Django out of the box. However, you can have your inlines edited in a separate page with the forms linked to each other. For the linking you would use some magic of the readonly_fields attribute.

What if you really need to have inlines under inlines in your project? In that case you might check django-nested-admin and don't hesitate to share your experience with it in the comments.


Cover photo by Denys Nevozhai

2016-05-26

Debugging Django Management Commands in PyCharm

My favorite editor for Python projects is PyCharm. Besides editing code, it allows you to inspect the database, work with Git repositories, run management commands, execute bash commands and Python scripts, and debug code just in the same window. In this article, I will show you how to set breakpoints and debug Django management commands visually in PyCharm.

Django management commands are scripts that can be executed on your Django project to do something with the project database, media files, or code. Django itself comes with a bunch of commands like: migrate, runserver, collectstatic, makemessages, and clearsessions. Management commands can be executed like this:

(myproject_env)$ python manage.py clearsessions

If you want to create a custom management command in your project, you can find how to do that in the official Django documentation. Also you can find some practical examples in the Chapter 9, Data Import and Export of the Web Development with Django Cookbook - Second Edition.

In this example, I won't create any new management command, but will debug the clearsessions command that is coming from Django and is located at django/contrib/sessions/management/commands/clearsessions.py.

First of all, let's click on "Edit Configurations..." in the top toolbar just before the Run button (with the Play icon). In the opened dialog box "Run/Debug Configurations" click on the "Add New Configuration" button (with the Plus icon) and choose "Python".

Let's fill in the configuration with these values:

Name: Clear Outdated Sessions
Script: /Users/me/DjangoProjects/myproject_env/project/myproject/manage.py
Script paramethers: clearsessions --traceback --verbosity=2
Python interpreter: Python 2.7.6 virtualenv at ~/DjangoProjects/myproject_env
Working directory: /Users/me/DjangoProjects/myproject_env/project/myproject/

Then open the file with the definition of the management command django/contrib/sessions/management/commands/clearsessions.py. Click on the left padding of the editor to add a breakpoint (marked with a red circle) where the script should stop executing for inspection.

Normally to run this script, you could click on the Run button (with the Play icon). But as we want to debug the script, we will click on the Debug button (with the Bug icon) in the toolbar.

The script will start executing and will stop temporarily at the breakpoint you made. You will be able to inspect all local variables in the debug panel that is opened at the bottom of your window by default.

You can navigate through code execution with the arrow buttons "Step Over", "Step Into", etc. To evaluate local or global variables or values, click on the "Evaluate Expression" button (with the Calculator icon) and enter some Python code.

Click on the "Resume Program" button (with the Fast Play icon) to continue execution of the script, when you are ready.

Analogously, you can debug your models, views, forms, or middlewares by running a development server ("Django server") in debug mode.


Cover photo by Jill Heyer

2013-09-05

7 Powerful Features of PyCharm Editor I Enjoy Using Daily

Not long ago I noticed PyCharm editor's advertisement at Stack Overflow. As it was targeted to Python and Django developers, I got very curious. I tried the 30-day trial and after years of using jEdit, I finally switched to this new editor. Here is a list of features I am using every day and enjoy very much.

1. Separation by project

Every project can be opened in a different window. PyCharm supports and recognizes virtual environments and python paths. In addition, you can mark some directories as source roots to put them under python path. This is useful when you have some dynamical modifications of python paths. When you open a file of a project, it will be shown in a tab. You can split the window vertically or horizontally to organize tabs in groups. It is especially useful, when you need one file for reference (like models.py) when you are editing another file (like detail template). You can open additional files which don't belong to the project for reference too; their tabs will be marked in different color.

2. Syntax highlighting

This is the core feature of any coder's text editor. PyCharm supports syntax highlighting for all different formats that might be used in Django development: Python, HTML templates, CSS, JavaScript, SQL, and many more. As expected, Django template comments are grayed out. Anywhere in the comments "TODO:" and "FIXME:" lines are marked in different color. At the bottom of the editor you can browse through different files with those TODO lines. PyCharm also marks unused imports and undefined variables with the different color. This editor also encourages PEP 8 standard which makes the coding style uniform and easier to understand and modify for different developers.

3. Browsing

Like many other IDEs, PyCharm has a side-bar file browser in a tree structure. For the clear list view, the *.pyc files are not shown. Edited files are marked in different color. You can drag and drop files to different directories there. You can create new files or new python packages (directories with __init__.py files) quickly. Version control systems like Git, Subversion, Mercurial and CVS are supported (although for this purpose, I am using SourceTree). Also one feature I like is "Scroll from Source" which scrolls and activates the file of the active tab. This is very useful when you need to open another file of the same Django app. By middle-clicking on a variable/class/function, you get to the definition/implementation of it. By ⌘⇧O you can search for specific file. Analogously by ⌘O you can go to specific class implementation. When you have simple views, you can go from the view to the template by clicking on an icon and back (unfortunately, this didn't work in a more complex situation, where I used wrapping view functions).

4. Autocompletion

PyCharm tracks python paths and autocompletes almost everywhere: variables, classes, or functions defined or imported in the current file, imports themselves, Django templates, Django shell, Django management commands. Just don't forget to fire Ctrl + Space for autocompletion.

5. Editing shortcuts

Different shortcuts make the coding faster. Press ⌥→ to move the cursor right by one word. Press ⌥⇧→ to select one word from the right. Press ⌥↑ to select one block of code (multiple times to select containing blocks, e.g. from method declaration to class). Press ⇥ to indent the block of code or ⇧⇥ to unindent it. Press ⌘/ to comment out or uncomment a block of code. Press ⌘R to activate the replace dialog. (These where examples of keyboard shortcuts on Mac OS X. Shortcuts on Windows and Linux will/may differ).

6. Code refactoring.

PyCharm has a powerful feature of renaming classes, functions, variables, or modules. I tried it a couple of times in straightforward situations, but I am still a little bit suspicious about its accuracy for large projects. Although it is worth mentioning that in complex situations it shows you the occurrences of classes, functions, variables, or modules in a list for you to confirm.

7. Django management commands

Running schema migration previously required a lot of typing in the Terminal, i.e. changing the directory to the specific virtual environment, activating the virtual environment, changing directory to Django project, running

python manage.py schemamigration appname modificationdone --auto
Now it is as fast as pressing ⌥R, typing "sc", pressing ⇧⏎, typing "appname modificationdone --auto", pressing ⏎ just in the PyCharm IDE. Running development server or restarting can now be done just with one click. Django shell can also be used from within the IDE. So you don't get distracted by different windows and user interfaces while developing.

I am still quite new to PyCharm and I am discovering new useful features every day. In my opinion, the price of PyCharm is worth every Euro, because my coding, I would say, is now 30 to 40% more effective. Finally, there is some official video introduction to the editor from the developers "JetBrains":

2012-10-05

Quick Tip on Setuptools

You are probably used to the default usage of Setuptools, for example the following command installs the latest Django version into your python installation or currently active virtual environment:

easy_install django

Sometimes you might need to install a specific version of a module. This is an example of installing Django 1.3.3:

easy_install django==1.3.3
If you want to upgrade the existing installation to the latest version, you can do that with:
easy_install -U django

2012-09-27

Initial Data Using South Migrations

Usually when starting a new project with commonly used apps, you will need some default data for the database, for example, default categories. Django provides fixtures for that. A fixture is a collection of data that Django knows how to import into a database.

They say:

If you create a fixture named initial_data.[xml/yaml/json], that fixture will be loaded every time you run syncdb.

There is one problem with this approach. It is very likely that you will need to run syncdb in the future when adding new apps (without south migrations). In such cases the modified data will be overwritten with the initial data from fixtures.

But there is a solution for that problem. You need to name your fixtures differently and then import them by south migrations. If you don't use south, you should start doing that, because it is a very handy way to modify database schema and data automatically. :)

So this is how you can prepare south migration with the default fixture:

1. Create a fixture from existing models.

python manage.py dumpdata --format=json --indent=4 myapp.Category > /path/to/myapp/fixtures/myapp_categories.json

2. Create data migration

python manage.py datamigration myapp load_default_data

3. Edit data migration

class Migration(DataMigration):
    
    def forwards(self, orm):
        from django.core.management import call_command
        call_command("loaddata", "myapp_categories.json")
    
    def backwards(self, orm):
        pass

4. Migrate

python manage.py migrate myapp

2011-12-16

The Usage of the only() Method

Recently I found the only() method of a queryset which can significantly improve the loading speed of forms with ModelChoiceField or ModelMultipleChoiceField. Let's say we have a big Event model with thousands of instances:

class Event(models.Model):
    title = models.CharField(_("Title"), max_length=200)
    # ... lots of other fields ...
    def __unicode__(self):
        return self.title
Then we have a form with ModelMultipleChoiceField:

class EventForm(forms.Form):
    related_events = forms.ModelMultipleChoiceField(
        queryset=Event.objects.all().only("id", "title"),
        label=_("Related Events"),
        required=False,
        )
    # ... other fields of the form ...
The used only() method loads only the primary key and the title for the selection widget.

2009-10-20

Weather App on Github

As promised, I put the code of the climate_change app online. For that reason, I created an account on github trying to use Git for the first time. This is also the first time I am using a distributed version control system, i.e. you can create branches of the project, develop the forks separately on different computers, and merge them in any order. There is no main centralized repository. The code on github that I uploaded is just one initial copy.

I am still new to Git commands and workflows. You can share your knowledge with me. For example, maybe you know some good cheat sheet or writings about Git. Or you can try to fork the project I committed, change it somehow and then push for merging (not sure if I'm using correct jargon). I will share with you what I find interesting and useful about Git while learning it.

2009-10-15

Weather App Tutorial. Part 2 of 5. Models

This is the second part of my tutorial how to make a weather app. This time I will show you how to create the models and set up the admin.

Open the models.py file in the climate_change directory and enter the following:


# -*- coding: UTF-8 -*-
from django.db import models
from django.utils.translation import ugettext_lazy as _
from django.conf import settings

class Location(models.Model):
    name = models.CharField(_("name"), max_length=200)
    location_id = models.CharField(
        _("location ID"),
        max_length=20,
        help_text=_("Location IDs can be retrieved from URLs of weather "
            "at specific cities at Yahoo! Weather, e.g. GMXX0008 from "
            "http://weather.yahoo.com/forecast/GMXX0008.html"),
        )
    
    class Meta:
        verbose_name=_("location")
        verbose_name_plural=_("locations")
    
    def __unicode__(self):
        return self.name

class WeatherLog(models.Model):
    location = models.ForeignKey(Location, verbose_name=_("location"))
    timestamp = models.DateTimeField(_("timestamp"))
    temperature = models.IntegerField(_("temperature (C°)"))
    humidity = models.IntegerField(_("humidity (%)"))
    wind_speed = models.DecimalField(
         _("wind speed (km/h)"),
         max_digits=5,
         decimal_places=2,
         )
    visibility = models.DecimalField(
         _("visibility (km)"),
         max_digits=5,
         decimal_places=2,
         )
    
    class Meta:
        verbose_name=_("weather log")
        verbose_name_plural=_("weather logs")
        ordering = ("-timestamp",)
    
    def __unicode__(self):
        return "%s @ %s" % (
            self.location.name,
            self.timestamp.strftime("%Y-%m-%dT%H:%M"),
            )

The models are created. Now let's create the database schema for them.


python manage.py syncdb

Also in this step when asked, I created a superuser called "demo" to be able to access django-contributed administration. Let's try it out. We'll need to add a file admin.py to climate_change with this content:


# -*- coding: utf-8 -*-
from django.db import models
from django.contrib import admin

Location = models.get_model("climate_change", "Location")
WeatherLog = models.get_model("climate_change", "WeatherLog")

admin.site.register(Location)
admin.site.register(WeatherLog)

Then uncomment admin related lines in urls.py of the project:


# -*- coding: utf-8 -*-
from django.conf.urls.defaults import *
from django.contrib import admin
admin.autodiscover()

urlpatterns = patterns("",
    (r"^admin/", include(admin.site.urls)),
    )

Finally, run the development server and check if the models really work.


python shell runserver
# now you can go to http://127.0.0.1:8000/admin/ in a browser


Yes! Everything works as expected for now. I will add my current location and its ID in Yahoo! Weather to the database. For me it's Berlin, Germany and the ID is GMXX0008. I found the ID in the URL of the page showing the weather for Berlin.


Tomorrow I will show you how to import weather details from Yahoo!

2009-10-14

Weather App Tutorial. Part 1 of 5. Preparation

It is Blog Action Day tomorrow so I decided to participate in it as a blogger again. The theme for this year is "Climate Change". After a little brainstorm, I came up with an idea to write a tutorial how to build an app which regularly checks local weather and lets you compare different weather features for months of different years.

I'll use Yahoo! Weather to check the current weather. From all information that it provides, we'll be mostly interested in temperature, humidity, wind speed, and visibility in the current location. The app will check the weather regularly, will allow you to show the current weather, and also provide a graph comparing average monthly weathers throughout years.

So let's start with the new project. I have quite a clean computer and want to do the app the nice way. So first of all, I will install virtualenv to be able to install third-party python libraries in a closed environment which will only be used for this project (I have already installed setuptools and django).


# install virtualenv
sudo easy_install virtualenv


I created a directory Projects in my home directory and cd to it.

Let's create a virtual environment and start the new project and app.


# create virtual environment "climate_change_env"
virtualenv climate_change_env
cd climate_change_env/
# activate the environment
source bin/activate


Since now I see (climate_change_env) as a prefix to each command line. I'll type deactivate at some point later to get out of this virtual environment.


# create django project "blog_action_day_2009"
django-admin.py startproject blog_action_day_2009
cd blog_action_day_2009/
# create django app "climate_change"
django-admin.py startapp climate_change
# create folders for templates and media
mkdir templates media


To get started quickly, I will use sqlite3 database now. As I am using python 2.5, I don't need to install sqlite3 module, because it's already there. So I open the settings.py and define those settings:

import os
PROJECT_DIR = os.path.dirname(__file__)
# ...
DATABASE_ENGINE = "sqlite3"
DATABASE_NAME = "blog_action_day_2009.sqlite3"
# ...
MEDIA_ROOT = os.path.join(PROJECT_DIR, "media")
MEDIA_URL = "/media/"
ADMIN_MEDIA_PREFIX = "/admin/media/"
# ...
TEMPLATE_DIRS = [
os.path.join(PROJECT_DIR, "templates"),
]
# ...
INSTALLED_APPS = (
"django.contrib.auth",
"django.contrib.contenttypes",
"django.contrib.sessions",
"django.contrib.sites",
"django.contrib.admin",
"climate_change",
)


Now we'll need those parts:
  • Models for locations and imported weather information.
  • Management command for importing data from Yahoo! Weather.
  • Template tag for displaying latest weather.
  • View for displaying a graph.

But I'll continue about that tomorrow.

To end today's post, let's watch a video about a regular guy who talks about weather when he has nothing to say:

2008-09-03

A Note on Python Paths

This time I decided to share some knowledge about Python paths which seemed a little bit confusing to me in the beginning of diving into Python. I am working with Django in different platforms like Mac OS X, Windows, and Linux, therefore the common patterns how to activate new python modules in all of those environments should be familiar to me.

Python modules are either *.py files or directories containing __init__.py. When defining paths to python modules, you will usually need to deal with the latter ones. A module is meant to be under python path if you can run python and import that module.

For example, if you can run the following, then django is under your python path.
python
>>> import django


Stay tuned to get deeper into python paths.

Installing modules


If a module is installable, usually all you need to do is to extract its setup directory, cd to it, and run
python setup.py install

This will copy the module into the site-packages directory of the current python installation. It might be that you have multiple Python versions on your computer. According to django documentation, you can find the currently used site-packages by
python -c "from distutils.sysconfig import get_python_lib; print get_python_lib()"

Or you can use PEAK EasyInstall for installing python modules even faster.

But sometimes you will need the latest and greatest versions of your modules directly from version control system. To make them accessible from python you should either check them out directly to site-packages (very messy and inflexible) or keep them somewhere else and do some additional magic.

Sym-linking


You can create symbolic links (symlinks) in unix-based systems like Linux or Mac OS X. A symlink is like a shortcut to a file or directory. If you create a symlink in site-packages which points to a python module which is located somewhere else, it will work as if the module was copied into site-packages.

To create a symlink, type the following in a console/terminal:
ln -s <source> <target>

For example, if you want python to access django which is under /Library/Subversion/django_src/trunk/django, you need to write something like this (considering that your site-packages are at /Library/Frameworks/Python.framework/Versions/2.4/lib/python2.4/site-packages/)
ln -s /Library/Subversion/django_src/trunk/django /Library/Frameworks/Python.framework/Versions/2.4/lib/python2.4/site-packages/django

To delete the symlink, simply remove it (this won't delete the original module):
rm /Library/Frameworks/Python.framework/Versions/2.4/lib/python2.4/site-packages/django


But as I've already mentioned, this works only in unix-based environments and you can't use shortcuts in Windows for the same purpose.

*.pth files


Python supports *.pth files which contain the paths to the parent directories of your python modules one per line. Those files should be placed in site-packages and can be called whatever you want them to call. For example, you can create a file my-project.pth and write
/Library/Subversion/django_src/trunk
/Library/Subversion/myproject_src/trunk

or
C:\Subversion\django_src\trunk
C:\Subversion\myproject\trunk

into it. Then django and your project files will be importable in python.

However, you might have no permissions to create files under site-packages or you might need to activate different locations of python modules for different projects.

PYTHONPATH variable


The other way is to set additional paths for python just before running the externally kept modules. This is done by setting the python paths to the environment variable PYTHONPATH. Note again that python paths point not to the modules themselves, but to their parent directories!

The syntax slightly differs among different platforms.

Linux and Mac OS X:
# checking value
echo $PYTHONPATH
# setting value
export PYTHONPATH="/Library/Subversion/django_src/trunk"
# appending to the existing value
export PYTHONPATH="$PYTHONPATH;/Library/Subversion/django_src/trunk"

Windows:
# checking value
echo %PYTHONPATH%
# setting value
set PYTHONPATH="C:\\Subversion\\django_src\\trunk"
# appending to the existing value
set PYTHONPATH="%PYTHONPATH%;C:\\Subversion\\django_src\\trunk"


Multiple paths can be separated by a colon (";").

PYTHONPATH can be used in scripts and webserver configuration files, but it is not very comfortable in daily use.

Adding paths to sys.path


For the projects that you develop and which should run as standalone applications, you can set the required python paths relatively inside your python code.

Note that all python paths which you set in the PYTHONPATH variable or *.pth files as well as the path of default python libraries and the path of site-packages get listed in python variable sys.path. When you import a module, it is loaded from the first location which contains the required module. So if you have two paths to different django versions in your python paths and you import django, the django version from the first location will be used.

You can read the list of loaded python paths like this:
>>> import sys
>>> sys.path


You can also freely modify it, for example:
>>> import sys
>>> sys.path.append("/Library/Subversion/django_src/trunk")
>>> import django


And this is an example, how to get and use paths relative to the currently loaded file:
import os, sys

SVN_PATH = os.path.abspath(os.path.join(os.path.dirname(__file__), "..", ".."))
DJANGO_PATH = os.path.join(SVN_PATH, "django_src", "trunk")
PROJECT_PATH = os.path.join(SVN_PATH, "myproject", "trunk")

sys.path += [DJANGO_PATH, PROJECT_PATH]


I hope this introduction was useful for developers and made the big picture about the paths clearer.

Some more related information can be found at the official python documentation.