2020-04-10

How I Tested ReactJS-based Webapp with Selenium

How I Tested ReactJS-based Webapp with Selenium

For quite some time, I have been building a SaaS product - strategic prioritizer 1st things 1st. It's using Django in the backend and ReactJS in the frontend and communicating between those ends by REST API. Every week I try to make progress with this project, be it a more prominent feature, some content changes, or small styling tweaks. In the past week, I implemented frontend testing with Selenium, and I want to share my journey with you.

What can you do with 1st things 1st

1st things 1st allows you to evaluate a list of items by multiple criteria and calculates priorities for you to follow and take action. The service has 4 main steps:

  1. Defining criteria.
  2. Listing out things.
  3. Evaluating things by each criterion.
  4. Exploring the priorities.

Selenium is a testing tool that mimics user interaction in the browser: you can fill in fields, trigger events, or read out information from the HTML tags. To test the frontend of 1st things 1st with Selenium, I had to

  1. enter the user credentials and login,
  2. create a project from a blank project template,
  3. add some criteria,
  4. add some things to do,
  5. evaluate each thing by each criterion, and
  6. see if the generated list of priorities was correct.

Let's see how I did it.

Preparation

In 2020, Chrome is the most popular browser, and it's my default browser, so I decided to develop tests using it.

I had to install Selenium with pip into my virtual environment:

(venv)$ pip install selenium

Also, I needed a binary chromedriver, which makes Selenium talk to your Chrome browser. I downloaded it and placed it under myproject/drivers/chromedriver.

In the Django project configuration, I needed a couple of settings. I usually have separate settings-file for each of the environments, such as:

  • myproject.settings.local for the local development,
  • myproject.settings.staging for the staging server,
  • myproject.settings.test for testing, and
  • myproject.settings.production for production.

All of them import defaults from a common base, and I have to set only the differences for each environment.

In the myproject.settings.test I added these settings:

WEBSITE_URL = 'http://my.1st-things-1st.127.0.0.1.xip.io:8080'  # no trailing slash

TESTS_SHOW_BROWSER = True

Here for the WEBSITE_URL, I was using the xip.io service. It allows you to create domains dynamically pointing to the localhost or any other IP. The Selenium tests will use this URL.

The TEST_SHOW_BROWSER was my custom setting, telling whether to show a browser while testing the frontend or just to run the tests in the background.

The test case

In one of my apps, myproject.apps.evaluations, I created a tests package, and there I placed a test case test_evaluations_frontend.py with the following content:

import os
from time import sleep
from datetime import timedelta

from django.conf import settings
from django.test import LiveServerTestCase
from django.test import override_settings
from django.contrib.auth import get_user_model
from django.utils import timezone

from selenium import webdriver
from selenium.webdriver.chrome.options import Options
from selenium.webdriver.support.ui import WebDriverWait


User = get_user_model()

SHOW_BROWSER = getattr(settings, "TESTS_SHOW_BROWSER", False)


@override_settings(DEBUG=True)
class EvaluationTest(LiveServerTestCase):
    host = settings.WEBSITE_URL.rsplit(":", 1)[0].replace(
        "http://", ""
    )  # domain before port
    port = int(settings.WEBSITE_URL.rsplit(":", 1)[1])  # port
    USER1_USERNAME = "user1"
    USER1_FIRST_NAME = "user1"
    USER1_LAST_NAME = "user1"
    USER1_EMAIL = "user1@example.com"
    USER1_PASSWORD = "change-me"

    @classmethod
    def setUpClass(cls):
        # …

    @classmethod
    def tearDownClass(cls):
        # …

    def wait_until_element_found(self, xpath):
        # …

    def wait_a_little(self, seconds=2):
        # …

    def test_evaluations(self):
        # …

It's a live-server test case, which runs a Django development server under the specified IP and port and then runs the Chrome browser via Selenium and navigates through the DOM and fills in forms.

By default, the LiveServerTestCase runs in non-debug mode, but I want to have the debug mode on so that I could see any causes of server errors. With the @override_settings decorator, I could change the DEBUG setting to True.

The host and port attributes define on which host and port the test server will be running (instead of a 127.0.0.1 and a random port). I extracted those values from the WEBSITE_URL setting.

The test case also had some attributes for the user who will be navigating through the web app.

Let's dig deeper into the code for each method.

Test-case setup and teardown

Django test cases can have class-level setup and teardown, which run before and after all methods whose names start with test_:

    @classmethod
    def setUpClass(cls):
        super().setUpClass()
        cls.user1 = User.objects.create_user(
            cls.USER1_USERNAME, cls.USER1_EMAIL, cls.USER1_PASSWORD
        )
        # … add subscription for this new user …

        driver_path = os.path.join(settings.BASE_DIR, "drivers", "chromedriver")
        chrome_options = Options()
        if not SHOW_BROWSER:
            chrome_options.add_argument("--headless")
        chrome_options.add_argument("--window-size=1200,800")

        cls.browser = webdriver.Chrome(
            executable_path=driver_path, options=chrome_options
        )
        cls.browser.delete_all_cookies()

    @classmethod
    def tearDownClass(cls):
        super().tearDownClass()
        cls.browser.quit()
        # … delete subscription for the user …
        cls.user1.delete()

In the setup, I created a new user, added a subscription to them, and prepared the Chrome browser to use.

If the TEST_SHOW_BROWSER setting was False, Chrome was running headless, that is, in the background without displaying a browser window.

When the tests were over, the browser closed, and the subscription, as well as the user, were deleted.

Utility methods

I created two utility methods for my Selenium test: wait_until_element_found() and wait_a_little():

    def wait_until_element_found(self, xpath):
        WebDriverWait(self.browser, timeout=10).until(
            lambda x: self.browser.find_element_by_xpath(xpath)
        )

    def wait_a_little(self, seconds=2):
        if SHOW_BROWSER:
            sleep(seconds)

I used the wait_until_element_found(xpath) method to keep the test running while pages switched.

I used the wait_a_little(seconds) method to stop the execution for 2 or more seconds so that I could follow what's on the screen, make some screenshots, or even inspect the DOM in the Web Developer Inspector.

XPath

Selenium allows to select DOM elements by ID, name, CSS class, tag name, and other ways, but the most flexible approach, in my opinion, is selecting elements by XPath (XML Path Language).

Contrary to jQuery, ReactJS doesn't use IDs or CSS classes in the markup to update the contents of specific widgets. So the straightforward Selenium's methods for finding elements by IDs or classes won't always work.

XPath is a very flexible and powerful tool. For example, you can:

  • Select elements by ID: "//input[@id='id_title']"
  • Select elements by any other attribute: "//div[@aria-label='Blank']"
  • Select elements by innerText: "//button[.='Save']"
  • Select elements by CSS class and innerText: "//button[contains(@class,'btn-primary')][.='Save']"
  • Select the first element by innerText: "(//button[.='yes'])[1]"

You can try out XPath syntax and capabilities in Web Developer Console in Chrome and Firefox, using the $x() function, for example:

»  $x("//h1[.='Projects']")
←  Array [ h1.display-4.mb-4 ]

Login and adding a project

I started with opening a login page, dismissing cookie consent notification, filling in user credentials into the login form, creating a new project from a blank template, setting title and description, etc.

    def test_evaluations(self):
        self.browser.get(f"{self.live_server_url}/")
        self.wait_until_element_found("//h1[.='Log in or Sign up']")
        # Accept Cookie Consent
        self.wait_until_element_found("//a[.='Got it!']")
        self.browser.find_element_by_xpath("//a[.='Got it!']").click()
        # Log in
        self.browser.find_element_by_id("id_email").send_keys(self.USER1_EMAIL)
        self.browser.find_element_by_id("id_password").send_keys(self.USER1_PASSWORD)
        self.browser.find_element_by_xpath('//button[text()="Log in"]').send_keys(
            "\n"
        )  # submit the form

        self.wait_until_element_found("//h1[.='Projects']")

        # Click on "Add new project"
        self.wait_until_element_found("//a[.='Add new project']")

        self.wait_a_little()
        self.browser.find_element_by_xpath("//a[.='Add new project']").send_keys("\n")

        self.wait_until_element_found("//div[@aria-label='Blank']")

        # Create a project from the project template "Blank"
        self.wait_a_little()
        self.browser.find_element_by_xpath("//div[@aria-label='Blank']").send_keys("\n")

        # Enter project title and description
        self.wait_until_element_found("//input[@id='id_title']")
        self.browser.find_element_by_xpath("//input[@id='id_title']").send_keys(
            "Urgent and Important Activities"
        )
        self.browser.find_element_by_xpath(
            "//textarea[@id='id_description']"
        ).send_keys("I want to find which things to do and which to skip.")
        self.browser.find_element_by_xpath("//button[.='Next']").send_keys("\n")

        # Keep the default verbose names for the criteria and initiatives
        self.wait_until_element_found("//input[@id='id_initiative_verbose_name_plural']")
        self.wait_a_little()
        self.browser.find_element_by_xpath("//button[.='Next']").send_keys("\n")

If TESTS_SHOW_BROWSER was set to True, we would see all this workflow in an opened browser window.

I was creating the test by carefully inspecting the markup in Web Developer Inspector and creating appropriate DOM navigation with XPath. For most of the navigation, I was using send_keys() method, which triggers keyboard events. During the testing, I also noticed that my cookie consent only worked with a mouse click, and I couldn't approve it by the keyboard. That's some room for improving accessibility.

I ran the test with the following command each time I added some more lines:

(venv)$ python manage.py test myproject.apps.evaluations --settings=myproject.settings.test

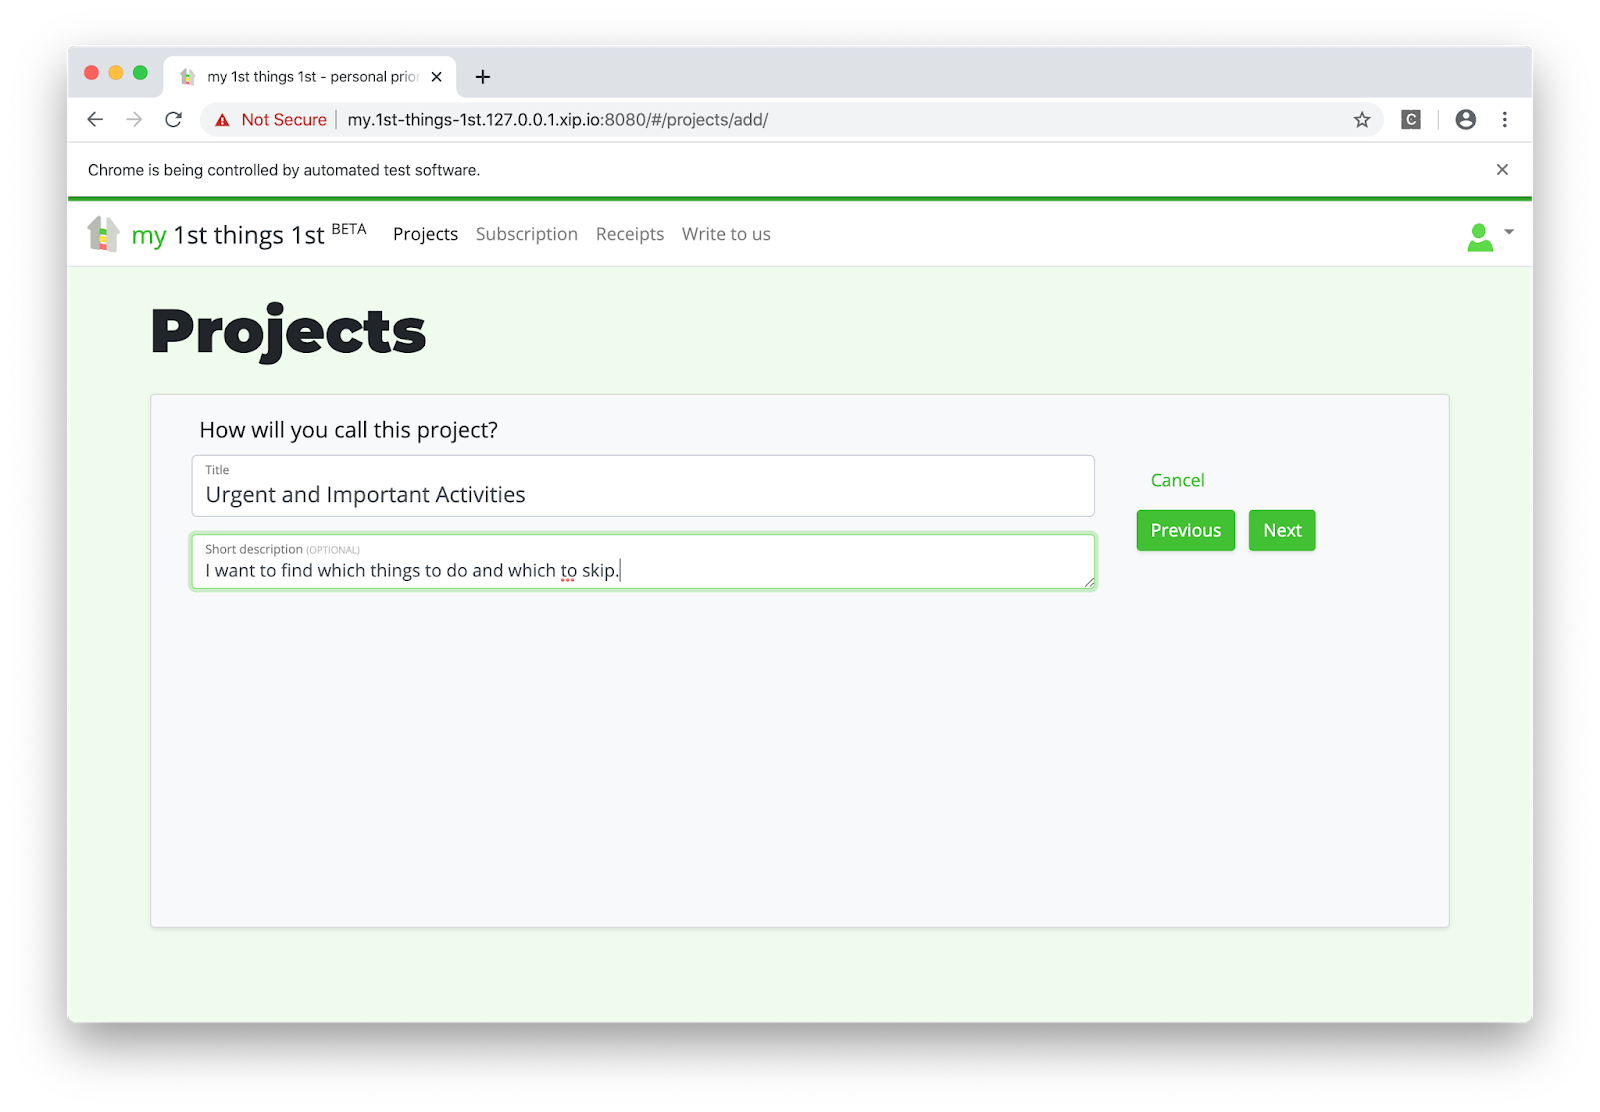
The test case failed if any command in the test failed. I didn't even need asserts.

Adding criteria

Now it was time to add some criteria:

        self.wait_until_element_found("//h2[.='Criteria']")

        # Add new criterion "Urgent" with the evaluation type Yes/No/Maybe
        self.wait_until_element_found("//a[.='Add new criterion']")
        self.browser.find_element_by_xpath("//a[.='Add new criterion']").send_keys("\n")
        self.wait_until_element_found("//input[@id='id_title']")
        self.browser.find_element_by_xpath("//input[@id='id_title']").send_keys(
            "Urgent"
        )
        self.browser.find_element_by_xpath("//input[@id='widget_y']").send_keys(" ")
        self.browser.find_element_by_xpath("//button[.='Save']").send_keys("\n")

        # Add new criterion "Important" with the evaluation type Yes/No/Maybe
        self.wait_until_element_found("//a[.='Add new criterion']")
        self.browser.find_element_by_xpath("//a[.='Add new criterion']").send_keys("\n")
        self.wait_until_element_found("//input[@id='id_title']")
        self.browser.find_element_by_xpath("//input[@id='id_title']").send_keys(
            "Important"
        )
        self.browser.find_element_by_xpath("//input[@id='widget_y']").send_keys(" ")
        self.browser.find_element_by_xpath("//button[.='Save']").send_keys("\n")

        # Click on the button "Done"
        self.wait_until_element_found("//a[.='Done']")
        self.browser.find_element_by_xpath("//a[.='Done']").send_keys("\n")

I added two criteria, "Urgent" and "Important", with evaluation type "Yes/No/Maybe".

Defining criteria

Adding things

Then I created some activities to evaluate:

        self.wait_until_element_found("//h2[.='Things']")

        # Add new thing "Write a blog post"
        self.wait_until_element_found("//a[.='Add new thing']")
        self.browser.find_element_by_xpath("//a[.='Add new thing']").send_keys("\n")
        self.wait_until_element_found("//input[@id='id_title']")
        self.browser.find_element_by_xpath("//input[@id='id_title']").send_keys(
            "Write a blog post"
        )
        self.browser.find_element_by_xpath("//textarea[@id='id_description']").send_keys(
            "I have an idea of a blog post that I want to write."
        )
        self.browser.find_element_by_xpath("//button[.='Save']").send_keys("\n")

        # Add new thing "Fix a bug"
        self.wait_until_element_found("//a[.='Add new thing']")
        self.browser.find_element_by_xpath("//a[.='Add new thing']").send_keys("\n")
        self.wait_until_element_found("//input[@id='id_title']")
        self.browser.find_element_by_xpath("//input[@id='id_title']").send_keys(
            "Fix a bug"
        )
        self.browser.find_element_by_xpath("//textarea[@id='id_description']").send_keys(
            "There is a critical bug that bothers our clients."
        )
        self.browser.find_element_by_xpath("//button[.='Save']").send_keys("\n")

        # Add new thing "Binge-watch a series"
        self.wait_until_element_found("//a[.='Add new thing']")
        self.browser.find_element_by_xpath("//a[.='Add new thing']").send_keys("\n")
        self.wait_until_element_found("//input[@id='id_title']")
        self.browser.find_element_by_xpath("//input[@id='id_title']").send_keys(
            "Binge-watch a series"
        )
        self.browser.find_element_by_xpath("//textarea[@id='id_description']").send_keys(
            "There is an exciting series that I would like to watch."
        )
        self.browser.find_element_by_xpath("//button[.='Save']").send_keys("\n")

        # Click on the button "Done"
        self.wait_until_element_found("//a[.='Done']")
        self.browser.find_element_by_xpath("//a[.='Done']").send_keys("\n")

These were three activities: "Write a blog post", "Fix a bug", and "Binge-watch a series" with their descriptions:

Listing out things

Evaluating things

In this step, there was a list of widgets to evaluate each thing by each criterion with answers "No", "Maybe", or "Yes". The buttons for those answers had no specific id or CSS class, but I could target them by the text on the button using XPath like "//button[.='maybe']":

        self.wait_until_element_found("//h2[.='Evaluations']")
        self.wait_until_element_found("//button[.='maybe']")

        # Evaluate all things by Urgency
        self.browser.find_element_by_xpath("(//button[.='no'])[1]").send_keys("\n")
        self.wait_until_element_found("//footer[.='Evaluation saved.']")
        self.browser.find_element_by_xpath("(//button[.='yes'])[2]").send_keys("\n")
        self.wait_until_element_found("//footer[.='Evaluation saved.']")
        self.browser.find_element_by_xpath("(//button[.='no'])[3]").send_keys("\n")
        self.wait_until_element_found("//footer[.='Evaluation saved.']")

        # Evaluate all things by Importance
        self.browser.find_element_by_xpath("(//button[.='yes'])[4]").send_keys("\n")
        self.wait_until_element_found("//footer[.='Evaluation saved.']")
        self.browser.find_element_by_xpath("(//button[.='yes'])[5]").send_keys("\n")
        self.wait_until_element_found("//footer[.='Evaluation saved.']")
        self.browser.find_element_by_xpath("(//button[.='maybe'])[6]").send_keys("\n")
        self.wait_until_element_found("//footer[.='Evaluation saved.']")

        # Click on the button "Done"
        self.browser.find_element_by_xpath("//a[.='Done']").send_keys("\n")

Evaluating things

These were my evaluations:

  • "Write a blog post" was not urgent, but important.
  • "Fix a bug" was urgent and important.
  • "Binge-watch a series" was not urgent and maybe important (because one has to have rest and feed imagination too).

Checking priorities

So in the last step, I got the calculated priorities:

        self.wait_until_element_found("//h2[.='Priorities']")

        self.wait_until_element_found("//h5[.='1. Fix a bug (100%)']")
        self.wait_until_element_found("//h5[.='2. Write a blog post (50%)']")
        self.wait_until_element_found("//h5[.='3. Binge-watch a series (25%)']")
        self.wait_a_little()

Exploring priorities

The results looked correct:

  • "Fix a bug" was of the 100% priority.
  • "Write a blog post" was of the 50% priority.
  • "Binge-watch a series was of the 25% priority.

Final words

  • Selenium needs a binary browser driver that lets you manipulate DOM in the browser from Python.
  • You can set a specific host and port for a LiveServerTestCase.
  • The Chrome browser can be displayed or executed in the background, depending on your settings.
  • XPath is a flexible and powerful tool to address DOM elements by any attributes or even inner text.
  • Selenium can trigger keyboard or mouse events that are handled by JavaScript functions.

I hope that my journey was useful to you too.

Happy coding!


Thanks a lot to Adam Johnson for the review.
Cover photo by Science in HD.

2020-03-22

How to Upload a File Using Django REST Framework

How to Upload a File Using Django REST Framework

When you develop a web app or a mobile app with Django, it is common to use the Django REST Framework for communication with the server-side. The client-side makes GET, POST, PUT, and DELETE requests to the REST API to read, create, update, or delete data there. The communication by Ajax is pretty uncomplicated, but how would you upload an image or another file to the server? I will show you that in this article by creating user avatar upload via REST API. Find the full code for this feature on Github.

Extend Django User model

We will start by installing Pillow for image handling to the virtual environment using the standard pip command:

(venv)$ pip install Pillow

Create accounts app with a custom User model:

# myproject/apps/accounts/models.py
import os
import sys
from django.db import models
from django.contrib.auth.models import AbstractUser
from django.utils import timezone
from django.utils.translation import gettext_lazy as _

def upload_to(instance, filename):
    now = timezone.now()
    base, extension = os.path.splitext(filename.lower())
    milliseconds = now.microsecond // 1000
    return f"users/{instance.pk}/{now:%Y%m%d%H%M%S}{milliseconds}{extension}"

class User(AbstractUser):
    # …
    avatar = models.ImageField(_("Avatar"), upload_to=upload_to, blank=True)

You can add there as many fields as you need, but the noteworthy part there is the avatar field.

Update the settings and add the accounts app to INSTALLED_APPS, set the AUTH_USER_MODEL, and the configuration for the static and media directories:

# myproject/settings.py
INSTALLED_APPS = [
    # …
    "myproject.apps.accounts",
]

AUTH_USER_MODEL = "accounts.User"

STATICFILES_DIRS = [os.path.join(BASE_DIR, "myproject", "site_static")]
STATIC_ROOT = os.path.join(BASE_DIR, "myproject", "static")
STATIC_URL = "/static/"
MEDIA_ROOT = os.path.join(BASE_DIR, "myproject", "media")
MEDIA_URL = "/media/"

Next small steps:

  • Create and run migrations with the makemigrations and migrate management commands.
  • Set up the custom model administration for the new User model.
  • Create the superuser with the createsuperuser management command.

Install and configure Django REST Framework

Install Django REST Framework for the REST APIs to your virtual environment, as always, using pip:

(venv)$ pip install djangorestframework

We'll be using authentication by tokens in this example. So add Django REST Framework to INSTALLED_APPS in the settings and set TokenAuthentication as the default authentication in the REST_FRAMEWORK configuration:

# myproject/settings.py
INSTALLED_APPS = [
    # …
    "rest_framework",
    "rest_framework.authtoken",
    # …
]

REST_FRAMEWORK = {
    'DEFAULT_AUTHENTICATION_CLASSES': [
        'rest_framework.authentication.TokenAuthentication',
    ]
}

Prepare the serializer and the view

In Django REST Framework, serializers are used for data validation, rendering, and saving. They are similar to Django forms. Prepare UserAvatarSerializer for avatar uploads:

# myproject/apps/accounts/serializers.py
from django.contrib.auth import get_user_model
from rest_framework.serializers import ModelSerializer
User = get_user_model()

class UserAvatarSerializer(ModelSerializer):
    class Meta:
        model = User
        fields = ["avatar"]

    def save(self, *args, **kwargs):
        if self.instance.avatar:
            self.instance.avatar.delete()
        return super().save(*args, **kwargs)

Now create an API view UserAvatarUpload for avatar uploads.

# myproject/apps/accounts/views.py
from rest_framework import status
from rest_framework.parsers import MultiPartParser, FormParser
from rest_framework.permissions import IsAuthenticated
from rest_framework.response import Response
from rest_framework.views import APIView
from .serializers import UserAvatarSerializer

class UserAvatarUpload(APIView):
    parser_classes = [MultiPartParser, FormParser]
    permission_classes = [IsAuthenticated]

    def post(self, request, format=None):
        serializer = UserAvatarSerializer(data=request.data, instance=request.user)
        if serializer.is_valid():
            serializer.save()
            return Response(serializer.data, status=status.HTTP_200_OK)
        else:
            return Response(serializer.errors, status=status.HTTP_400_BAD_REQUEST)

Make sure that the view uses MultiPartParser as one of the parser classes. That's necessary for the file transfers.

Prepare the URL configuration

In the URL configuration, we will need those URL rules:

  • The path for the index page. Let's make it a direct TemplateView.
  • The path for logging in by user credentials and obtaining the authentication token.
  • The path for user avatar upload.
  • The path for model administration.
  • The path for static URLs.
  • And finally, the path for media URLs.
# myroject/urls.py
from django.conf.urls.static import static
from django.contrib import admin
from django.urls import path
from django.views.generic import TemplateView
from django.conf import settings
from myproject.accounts.views import UserAvatarUpload
from rest_framework.authtoken.views import obtain_auth_token

urlpatterns = [
    path("", TemplateView.as_view(template_name="index.html")),
    path("api/auth-token/", obtain_auth_token, name="rest_auth_token"),
    path("api/user-avatar/", UserAvatarUpload.as_view(), name="rest_user_avatar_upload"),
    path("admin/", admin.site.urls),
]

urlpatterns += static(settings.STATIC_URL, document_root=settings.STATIC_ROOT)
urlpatterns += static(settings.MEDIA_URL, document_root=settings.MEDIA_ROOT)

Prepare the frontend HTML and JavaScript

I will illustrate the frontend using Bootstrap HTML and Vanilla JavaScript. Of course, you can implement the same using ReactJS, Vue, Angular, or other JavaScript framework and any other CSS framework.

The template for the index page has one login form with username and password or email and password fields (depending on your implementation), and one avatar upload form with a file selection field. Also, it includes a JavaScript file avatar.js for Ajax communication.

{# myproject/templates/index.html #}
<!doctype html>
{% load static %}
<html lang="en">
<head>
    <meta charset="utf-8">
    <meta name="viewport" content="width=device-width, initial-scale=1, shrink-to-fit=no">

    <link rel="stylesheet" href="https://stackpath.bootstrapcdn.com/bootstrap/4.4.1/css/bootstrap.min.css"
          integrity="sha384-Vkoo8x4CGsO3+Hhxv8T/Q5PaXtkKtu6ug5TOeNV6gBiFeWPGFN9MuhOf23Q9Ifjh" crossorigin="anonymous">

    <title>Hello, World!</title>
</head>
<body>
<div class="container">
    <div class="row">
        <div class="col-md-8">
            <p class="text-muted my-3"><small>Open Developer Console for information about responses.</small></p>
            <h1 class="my-3">1. Log in</h1>
            <form id="login_form">
                <div class="form-group">
                    <label for="id_email">Email address</label>
                    <input type="email" class="form-control" id="id_email" aria-describedby="emailHelp"
                           placeholder="Enter email"/>
                </div>
                <div class="form-group">
                    <label for="id_password">Password</label>
                    <input type="password" class="form-control" id="id_password" placeholder="Password"/>
                </div>
                <button type="submit" class="btn btn-primary">Log in</button>
            </form>

            <h1 class="my-3">2. Upload an avatar</h1>
            <form id="avatar_form">
                <div class="form-group">
                    <label for="id_avatar">Choose an image for your avatar</label>
                    <input type="file" class="form-control-file" id="id_avatar"/>
                </div>
                <button type="submit" class="btn btn-primary">Upload</button>
            </form>

        </div>
    </div>
</div>
<script src="{% static 'site/js/avatar.js' %}"></script>
</body>
</html>

Last but not least, create the JavaScript file avatar.js. It contains these things:

  • a global variable to store the user token. In the real-world application, you would probably save the token in a cookie or local storage.
  • a login-form submit handler which posts user credentials to the server and retrieves the authentication token.
  • an avatar-form submit handler which posts the selected file and the token to the server and retrieves the path of the saved file on the server.
// myproject/site_static/site/js/avatar.js
let userToken;

document.getElementById('login_form').addEventListener('submit', function(event) {
    event.preventDefault();
    let email = document.getElementById('id_email').value;
    let password = document.getElementById('id_password').value;

    fetch('http://127.0.0.1:8000/api/auth-token/', {
        method: 'POST',
        headers: {
            'Content-Type': 'application/json',
        },
        body: JSON.stringify({
            "username": email,
            "password": password,
        })
    }).then( response => {
        return response.json();
    }).then(data => {
        console.log(data);
        userToken = data.token;
        console.log('Logged in. Got the token.');
    }).catch((error) => {
        console.error('Error:', error);
    });
});

document.getElementById('avatar_form').addEventListener('submit', function(event) {
    event.preventDefault();
    let input = document.getElementById('id_avatar');

    let data = new FormData();
    data.append('avatar', input.files[0]);

    fetch('http://127.0.0.1:8000/api/user-avatar/', {
        method: 'POST',
        headers: {
            'Authorization': `Token ${userToken}`
        },
        body: data
    }).then(response => {
        return response.json();
    }).then(data => {
        console.log(data);
    }).catch((error) => {
        console.error('Error:', error);
    });
});

In the JavaScript file, we are using fetch API for the REST API requests. The noteworthy part there is the FormData class that we use to send the file to the server.

Now run the local development server and go to the http://127.0.0.1:8000. There you will have something like this:

The frontend of the experiment

Final Thoughts

As more than a half Internet usage happens on mobile devices, there is a demand to switch from usual HTML websites and platforms to mobile apps. Whether you create a native mobile app, a hybrid app, or Progressive Web App, you will likely have to communicate with the server via REST API or GraphQL. It is pretty clear how to transfer textual data from and to a remote server. But after this exercise, we can also transfer binary files like images, PDF or Word documents, music, and videos.

Happy coding!


Cover Photo by Dan Silva

2020-01-24

Guest Post: Sending Emails with Django

This is a guest post by Mailtrap.io team. The original post on Sending emails with Django was published at Mailtrap's blog.

Some time ago, we discovered how to send an email with Python using smtplib, a built-in email module. Back then, the focus was made on the delivery of different types of messages via SMTP server. Today, we prepared a similar tutorial but for Django. This popular Python web framework allows you to accelerate email delivery and make it much easier. And these code samples of sending emails with Django are going to prove that.

A simple code example of how to send an email

Let's start our tutorial with a few lines of code that show you how simple it is to send an email in Django. 

Import send_mail at the beginning of the file

from django.core.mail import send_mail

And call the code below in the necessary place.

send_mail(
    "That's your subject",
    "That's your message body",
    "from@yourdjangoapp.com",
    ["to@yourbestuser.com"],
    fail_silently=False,
)

These lines are enclosed in the django.core.mail module that is based on smtplib. The message delivery is carried out via SMTP host, and all the settings are set by default:

  • EMAIL_HOST: "localhost"
  • EMAIL_PORT: 25
  • EMAIL_HOST_USER: (Empty string)
  • EMAIL_HOST_PASSWORD: (Empty string)
  • EMAIL_USE_TLS: False
  • EMAIL_USE_SSL: False

You can learn other default values here. Most likely you will need to adjust them. Therefore, let's tweak the settings.py file.

Setting up

Before actually sending your email, you need to set up for it. So, let's add some lines to the settings.py file of your Django app.

EMAIL_BACKEND = "django.core.mail.backends.smtp.EmailBackend"
EMAIL_HOST = "smtp.yourserver.com"
EMAIL_PORT = "<your-server-port>"
EMAIL_HOST_USER = "your@djangoapp.com"
EMAIL_HOST_PASSWORD = "your-email account-password"
EMAIL_USE_TLS = True
EMAIL_USE_SSL = False

EMAIL_HOST is different for each email provider you use. For example, if you use Gmail SMTP server, you'll have EMAIL_HOST = "smtp.gmail.com". Also, validate other values that are relevant to your email server. Eventually, you need to choose the way to encrypt the mail and protect your user account by setting the variable EMAIL_USE_TLS or EMAIL_USE_SSL. If you have an email provider that explicitly tells you which option to use, then it is clear. Otherwise, you may try different combinations using True and False operators. Mind that only one of these options can be set to True.

EMAIL_BACKEND tells Django which custom or predefined email backend will work with EMAIL_HOST. You can set up this parameter as well. 

SMTP email backend 

In the example above, EMAIL_BACKEND is specified as django.core.mail.backends.smtp.EmailBackend. It is the default configuration that uses SMTP server for email delivery. Defined email settings will be passed as matching arguments to EmailBackend. 

Unspecified arguments default to None

Besides django.core.mail.backends.smtp.EmailBackend, you can use:

  • django.core.mail.backends.console.EmailBackend - the console backend that composes the emails that will be sent to the standard output. Not intended for production use.
  • django.core.mail.backends.filebased.EmailBackend - the file backend that creates emails in the form of a new file per each new session opened on the backend. Not intended for production use.
  • django.core.mail.backends.locmem.EmailBackend - the in-memory backend that stores messages in the local memory cache of django.core.mail.outbox. Not intended for production use.
  • django.core.mail.backends.dummy.EmailBackend - the dummy cache backend that implements the cache interface and does nothing with your emails. Not intended for production use.
  • Any out-of-the-box backend for Amazon SES, Mailgun, SendGrid, and other services. 

How to send emails via SMTP 

Once you have that configured, all you need to do to send an email is to import the send_mail or send_mass_mail function from django.core.mail. These functions differ in the connection they use for messages. The send_mail uses a separate connection for each message. The send_mass_mail opens a single connection to the mail server and is mostly intended to handle mass emailing. 

Sending email with send_mail

This is the most basic function for email delivery in Django. It comprises four obligatory parameters to be specified: subject, message, from_email, and recipient_list

In addition to them, you can adjust the following:

  • auth_user: If EMAIL_HOST_USER has not been specified, or you want to override it, this username will be used to authenticate to the SMTP server. 
  • auth_password: If EMAIL_HOST_PASSWORD has not been specified, this password will be used to authenticate to the SMTP server.
  • connection: The optional email backend you can use without tweaking EMAIL_BACKEND.
  • html_message: Lets you send multipart emails.
  • fail_silently: A boolean that controls how the backend should handle errors. If True - exceptions will be silently ignored. If False - smtplib.SMTPException will be raised. 

For example, it may look like this:

from django.core.mail import send_mail

send_mail(
    subject="That's your subject",
    message="That's your message body",
    from_email="from@yourdjangoapp.com",
    recipient_list=["to@yourbestuser.com"],
    auth_user="Login",
    auth_password="Password",
    fail_silently=False,
)

Other functions for email delivery include mailadmins and mailmanagers. Both are shortcuts to send emails to the recipients predefined in ADMINS and MANAGERS settings, respectively. For them, you can specify such arguments as subject, message, fail_silently, connection, and html_message. The from_email argument is defined by the SERVER_EMAIL setting.

What is EmailMessage for? 

If the email backend handles the email sending, the EmailMessage class answers for the message creation. You'll need it when some advanced features like BCC or an attachment are desirable. That's how an initialized EmailMessage may look:

from django.core.mail import EmailMessage

email = EmailMessage(
    subject="That's your subject",
    body="That's your message body",
    from_email="from@yourdjangoapp.com",
    to=["to@yourbestuser.com"],
    bcc=["bcc@anotherbestuser.com"],
    reply_to=["whoever@itmaybe.com"],
)

In addition to the EmailMessage objects you can see in the example, there are also other optional parameters:

  • connection: defines an email backend instance for multiple messages. 
  • attachments: specifies the attachment for the message.
  • headers: specifies extra headers like Message-ID or CC for the message. 
  • cc: specifies email addresses used in the "CC" header.

The methods you can use with the EmailMessage class are the following:

  • send: get the message sent.
  • message: composes a MIME object (django.core.mail.SafeMIMEText or django.core.mail.SafeMIMEMultipart).
  • recipients: returns a list of the recipients specified in all the attributes including to, cc, and bcc.
  • attach: creates and adds a file attachment. It can be called with a MIMEBase instance or a triple of arguments consisting of filename, content, and mime type.
  • attach_file: creates an attachment using a file from a filesystem. We'll talk about adding attachments a bit later.

How to send multiple emails

To deliver a message via SMTP, you need to open a connection and close it afterward. This approach is quite awkward when you need to send multiple transactional emails. Instead, it is better to create one connection and reuse it for all messages. This can be done with the send_messages method. Check out the following example:

from django.core import mail

connection = mail.get_connection()
connection.open()

email1 = mail.EmailMessage(
    "That's your subject",
    "That's your message body",
    "from@yourdjangoapp.com",
    ["to@yourbestuser1.com"],
    connection=connection,
)
email1.send()

email2 = mail.EmailMessage(
    "That's your subject #2",
    "That's your message body #2",
    "from@yourdjangoapp.com",
    ["to@yourbestuser2.com"],
)
email3 = mail.EmailMessage(
    "That's your subject #3",
    "That's your message body #3",
    "from@yourdjangoapp.com",
    ["to@yourbestuser3.com"],
)
connection.send_messages([email2, email3])
connection.close()

What you can see here is that the connection was opened for email1, and send_messages uses it to send emails #2 and #3. After that, you close the connection manually.

How to send multiple emails with sendmassmail

send_mass_mail is another option to use only one connection for sending different messages.

message1 = (
    "That's your subject #1", 
    "That's your message body #1",
    "from@yourdjangoapp.com",
    ["to@yourbestuser1.com", "to@yourbestuser2.com"]
)

message2 = (
    "That's your subject #2",
    "That's your message body #2",
    "from@yourdjangoapp.com",
    ["to@yourbestuser2.com"],
)

message3 = (
    "That's your subject #3",
    "That's your message body #3",
    "from@yourdjangoapp.com",
    ["to@yourbestuser3.com"],
)

send_mass_mail((message1, message2, message3), fail_silently=False)

Each email message contains a datatuple made of subject, message, from_email, and recipient_list. Optionally, you can add other arguments that are the same as for send_mail.

How to send an HTML email

When the article was published, the latest Django official version was 2.2.4. All versions starting from 1.7 let you send an email with HTML content using send_mail like this:

from django.core.mail import send_mail

subject = "That's your subject" 
html_message = render_to_string("mail_template.html", {"context": "values"})
plain_message = strip_tags(html_message)
from_email = "from@yourdjangoapp.com>"
to = "to@yourbestuser.com"

mail.send_mail(subject, plain_message, from_email, [to], html_message=html_message)

Older versions users will have to mess about with EmailMessage and its subclass EmailMultiAlternatives. It lets you include different versions of the message body using the attach_alternative method. For example:

from django.core.mail import EmailMultiAlternatives

subject = "That's your subject"
from_email = "from@yourdjangoapp.com>" 
to = "to@yourbestuser.com"
text_content = "That's your plain text."
html_content = """<p>That's <strong>the HTML part</strong></p>"""
message = EmailMultiAlternatives(subject, text_content, from_email, [to])
message.attach_alternative(html_content, "text/html")
message.send()

How to send an email with attachments 

In the EmailMessage section, we've already mentioned sending emails with attachments. This can be implemented using attach or attach_file methods. The first one creates and adds a file attachment through a triple of arguments - filename, content, and mime type. The second method uses a file from a filesystem as an attachment. That's how each method would look like in practice:

message.attach("Attachment.pdf", file_to_be_sent, "file/pdf")

or

message.attach_file("/documents/Attachment.pdf")

Custom email backend

Obviously, you're not limited to the abovementioned email backend options and are able to tailor your own. For this, you can use standard backends as a reference. Let's say you need to create a custom email backend with the SMTP_SSL connection support required to interact with Amazon SES. The default SMTP backend will be the reference. First, add a new email option to settings.py.

AWS_ACCESS_KEY_ID = "your-aws-access-key-id"
AWS_SECRET_ACCESS_KEY = "your-aws-secret-access-key"
AWS_REGION = "your-aws-region"
EMAIL_BACKEND = "your_project_name.email_backend.SesEmailBackend"

Make sure that you are allowed to send emails with Amazon SES using these AWS_ACCESS_KEY_ID and AWS_SECRET_ACCESS_KEY (or an error message will tell you about it :D)

Then create a file your_project_name/email_backend.py with the following content:

import boto3

from django.core.mail.backends.smtp import EmailBackend
from django.conf import settings

class SesEmailBackend(EmailBackend):
    def __init__(
        self,
        fail_silently=False,
        **kwargs
    ):
        super().__init__(fail_silently=fail_silently)
        self.connection = boto3.client(
            "ses",
            aws_access_key_id=settings.AWS_ACCESS_KEY_ID,
            aws_secret_access_key=settings.AWS_SECRET_ACCESS_KEY,
            region_name=settings.AWS_REGION,
        )

    def send_messages(self, email_messages):
        for email_message in email_messages:
            self.connection.send_raw_email(
                Source=email_message.from_email,
                Destinations=email_message.recipients(),
                RawMessage={"Data": email_message.message().as_bytes(linesep="\r\n")}
            )

This is the minimum needed to send an email using SES. Surely you will need to add some error handling, input sanitization, retries, etc. but this is out of our topic. 

You might see that we have imported boto3 at the beginning of the file. Don't forget to install it using a command

pip install boto3

It's not necessary to reinvent the wheel every time you need a custom email backend. You can find already existing libraries, or just receive SMTP credentials in your Amazon console and use default email backend. 

Sending emails using SES from Amazon

So far, you can benefit from several services that allow you to send transactional emails at ease. If you can't choose one, check out our blogpost about Sendgrid vs. Mandrill vs. Mailgun. It will help a lot. But today, we'll discover how to make your Django app send emails via Amazon SES. It is one of the most popular services so far. Besides, you can take advantage of a ready-to-use Django email backend for this service - django-ses.

Set up the library

You need to execute pip install django-ses to install django-ses. Once it's done, tweak your settings.py with the following line:

EMAIL_BACKEND = "django_ses.SESBackend"

AWS credentials

Don't forget to set up your AWS account to get the required credentials - AWS access keys that consist of access key ID and secret access key. For this, add a user in Identity and Access Management (IAM) service. Then, choose a user name and Programmatic access type. Attach AmazonSESFullAccess permission and create a user. Once you've done this, you should see AWS access keys. Update your settings.py:

AWS_ACCESS_KEY_ID = "********"
AWS_SECRET_ACCESS_KEY = "********"

Email sending

Now, you can send your emails using django.core.mail.send_mail:

from django.core.mail import send_mail

send_mail(
    "That's your subject",
    "That's your message body",
    "from@yourdjangoapp.com",
    ["to@yourbestuser.com"]
)

django-ses is not the only preset email backend you can leverage. At the end of our article, you'll find more useful libraries to optimize email delivery of your Django app. But first, a step you should never send emails without.

Testing email sending in Django 

Once you've got everything prepared for sending email messages, it is necessary to do some initial testing of your mail server. In Python, this can be done with one command:

python -m smtpd -n -c DebuggingServer localhost:1025

It allows you to send emails to your local SMTP server. The DebuggingServer feature won't actually send the email but will let you see the content of your message in the shell window. That's an option you can use off-hand.

Django's TestCase

TestCase is a solution to test a few aspects of your email delivery. It uses django.core.mail.backends.locmem.EmailBackend, which, as you remember, stores messages in the local memory cache - django.core.mail.outbox. So, this test runner does not actually send emails. Once you've selected this email backend

EMAIL_BACKEND = "django.core.mail.backends.locmem.EmailBackend"

you can use the following unit test sample to test your email sending capability.

from django.core import mail
from django.test import TestCase

class EmailTest(TestCase):
    def test_send_email(self):
        mail.send_mail(
            "That's your subject", "That's your message body",
            "from@yourdjangoapp.com", ["to@yourbestuser.com"],
            fail_silently=False,
        )

        self.assertEqual(len(mail.outbox), 1)        
        self.assertEqual(mail.outbox[0].subject, "That's your subject")
        self.assertEqual(mail.outbox[0].body, "That's your message body")

This code will test not only your email sending but also the correctness of the subject and message body. 

Testing with Mailtrap

Mailtrap can be a rich solution for testing. First, it lets you test not only the SMTP server but also the email content and do other essential checks from the email testing checklist. Second, it is a rather easy-to-use tool.

All you need to do is to copy the SMTP credentials from your demo inbox and tweak your settings.py. Or you can just copy/paste these four lines from the Integrations section by choosing Django in the pop-up menu.

EMAIL_HOST = "smtp.mailtrap.io"
EMAIL_HOST_USER = "********"
EMAIL_HOST_PASSWORD = "*******"
EMAIL_PORT = "2525"

After that, feel free to send your HTML email with an attachment to check how it goes.

from django.core.mail import EmailMultiAlternatives
from django.template.loader import render_to_string

subject = "That's your subject" 
html_message = render_to_string("mail_template.html", {"context": "values"})
plain_message = strip_tags(html_message)
from_email = "from@yourdjangoapp.com"
to_email = "to@yourbestuser.com"
message = EmailMultiAlternatives(subject, plain_message, from_email, [to_email])
message.attach_alternative(html_message, "text/html")
message.attach_file("/documents/Attachment.pdf")
message.send()

If there is no message in the Mailtrap Demo inbox or there are some issues with HTML content, you need to polish your code. 

Django email libraries to simplify your life

As a conclusion to this blog post about sending emails with Django, we've included a brief introduction of a few libraries that will facilitate your email workflow. 

django-anymail 

This is a collection of email backends and webhooks for numerous famous email services, including SendGrid, Mailgun, and others. django-anymail works with django.core.mail module and normalizes the functionality of transactional email service providers.

django-mailer

django-mailer is a Django app you can use to queue the email sending. With it, scheduling your emails is much easier.

django-post_office

With this app, you can send and manage your emails. django-post_office offers many cool features like asynchronous email sending, built-in scheduling, multiprocessing, etc.

django-templated-email

This app is about sending templated emails. In addition to its own functionalities, django-templated-email can be used in tow with django-anymail to integrate transactional email service providers.

django-mailbox

You might use django-mailbox if you need to import messages from local mailboxes, POP3, IMAP, or directly receive messages from Postfix or Exim4.

We hope that this small list of packages will facilitate your email workflow. You can always find more apps at Django Packages.


Cover Photo by Chris Ried