Showing posts with label Admin. Show all posts

2016-12-16

Django Administration: Inlines for Inlines

The default Django model administration comes with a concept of inlines. If you have a one-to-many relationship, you can edit the parent and its children in the same form. However, you are limited in a way that you cannot have inlines under inlines at nested one-to-many relations. For example, you can't show models Painter, Picture, and Review in the same form if one painter may have drawn multiple pictures and each picture may have several reviews.

In this article I would like to share a workaround allowing you to quickly access the inlines of an inline model. The idea is that for every inline you can provide a HTML link leading to the separate form where you can edit the related model and its own relations. It's as simple as that.

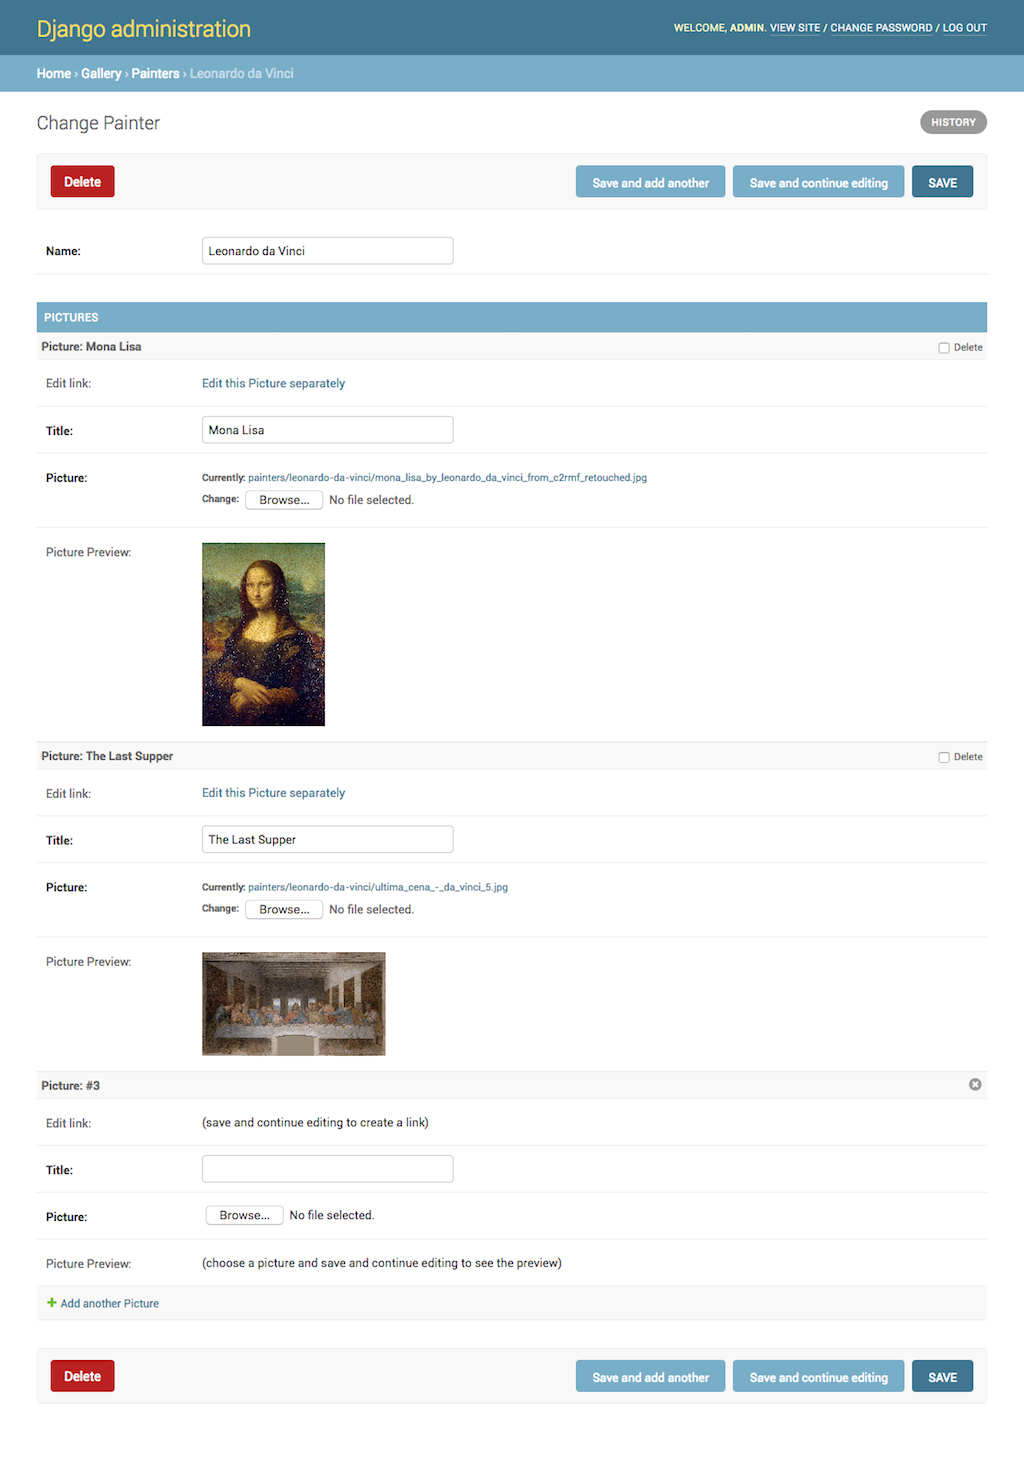
For example, in the form of Painter model, you have the instances of Picture listed with specific links "Edit this Picture separately":

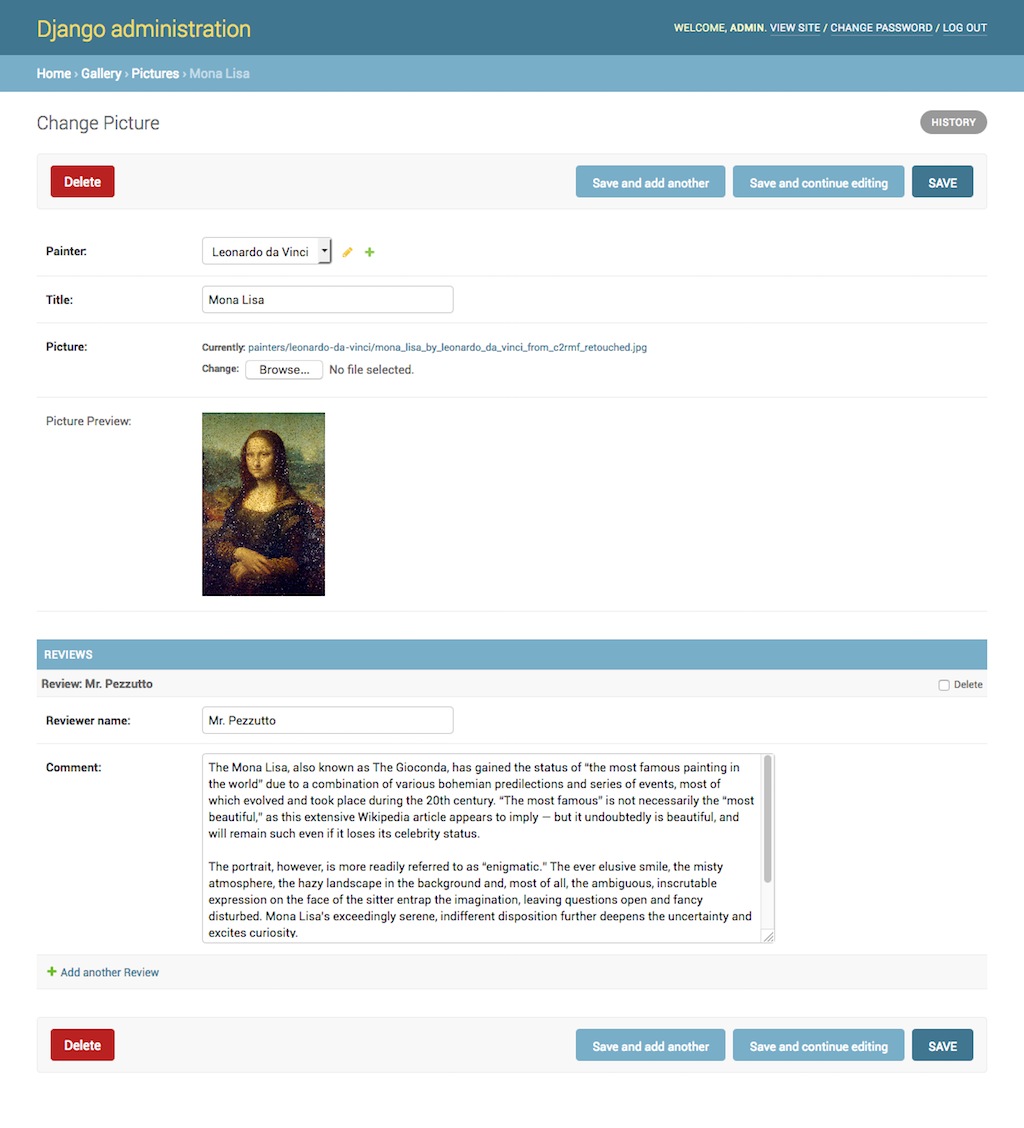
When such a link is clicked, the administrator goes to the form of the Picture model which shows the instances of Review model listed underneath:

Let's have a look, how to implement this.

First of all, I will create a gallery app and define the three models there. Nothing fancy here. The important part there is just that the Picture model has a foreign key to the Painter model and the Review model has a foreign key to the Picture model.

# gallery/models.py
# -*- coding: UTF-8 -*-
from __future__ import unicode_literals

import os

from django.db import models
from django.utils.encoding import python_2_unicode_compatible
from django.utils.translation import ugettext_lazy as _
from django.utils.text import slugify


@python_2_unicode_compatible
class Painter(models.Model):
    name = models.CharField(_("Name"), max_length=255)

    class Meta:
        verbose_name = _("Painter")
        verbose_name_plural = _("Painters")

    def __str__(self):
        return self.name


def upload_to(instance, filename):
    filename_base, filename_ext = os.path.splitext(filename)
    return "painters/{painter}/{filename}{extension}".format(
        painter=slugify(instance.painter.name),
        filename=slugify(filename_base),
        extension=filename_ext.lower(),
    )

@python_2_unicode_compatible
class Picture(models.Model):
    painter = models.ForeignKey(Painter, verbose_name=_("Painter"), on_delete=models.CASCADE)
    title = models.CharField(_("Title"), max_length=255)
    picture = models.ImageField(_("Picture"), upload_to=upload_to)

    class Meta:
        verbose_name = _("Picture")
        verbose_name_plural = _("Pictures")

    def __str__(self):
        return self.title


@python_2_unicode_compatible
class Review(models.Model):
    picture = models.ForeignKey(Picture, verbose_name=_("Picture"), on_delete=models.CASCADE)
    reviewer = models.CharField(_("Reviewer name"), max_length=255)
    comment = models.TextField(_("Comment"))

    class Meta:
        verbose_name = _("Review")
        verbose_name_plural = _("Reviews")

    def __str__(self):
        return self.reviewer

Then I will create the administration definition for the models of the gallery app. Here I will set two types of administration for the Picture model:

  • By extending admin.StackedInline I will create administration stacked as inline.
  • By extending admin.ModelAdmin I will create administration in a separate form.

In Django model administration besides usual form fields, you can also include some computed values. This can be done by your fields (or fieldsets) and readonly_fields attributes referring to a callable or a method name.

You can set a translatable label for those computed values by defining short_description attribute for the callable or method. If you want to render some HTML, you can also set the allow_tags attribute to True (otherwise your HTML string will be escaped).

# gallery/admin.py
# -*- coding: UTF-8 -*-
from django.contrib import admin
from django.core.urlresolvers import reverse
from django.utils.translation import ugettext_lazy as _
from django.utils.text import force_text

from .models import Painter, Picture, Review

def get_picture_preview(obj):
    if obj.pk:  # if object has already been saved and has a primary key, show picture preview
        return """<a href="{src}" target="_blank"><img src="{src}" alt="{title}" style="max-width: 200px; max-height: 200px;" /></a>""".format(
            src=obj.picture.url,
            title=obj.title,
        )
    return _("(choose a picture and save and continue editing to see the preview)")
get_picture_preview.allow_tags = True
get_picture_preview.short_description = _("Picture Preview")


class PictureInline(admin.StackedInline):
    model = Picture
    extra = 0
    fields = ["get_edit_link", "title", "picture", get_picture_preview]
    readonly_fields = ["get_edit_link", get_picture_preview]

    def get_edit_link(self, obj=None):
        if obj.pk:  # if object has already been saved and has a primary key, show link to it
            url = reverse('admin:%s_%s_change' % (obj._meta.app_label, obj._meta.model_name), args=[force_text(obj.pk)])
            return """<a href="{url}">{text}</a>""".format(
                url=url,
                text=_("Edit this %s separately") % obj._meta.verbose_name,
            )
        return _("(save and continue editing to create a link)")
    get_edit_link.short_description = _("Edit link")
    get_edit_link.allow_tags = True


@admin.register(Painter)
class PainterAdmin(admin.ModelAdmin):
    save_on_top = True
    fields = ["name"]
    inlines = [PictureInline]


class ReviewInline(admin.StackedInline):
    model = Review
    extra = 0
    fields = ["reviewer", "comment"]


@admin.register(Picture)
class PictureAdmin(admin.ModelAdmin):
    save_on_top = True
    fields = ["painter", "title", "picture", get_picture_preview]
    readonly_fields = [get_picture_preview]
    inlines = [ReviewInline]

UPDATE! Since Django 2.0, the get_picture_preview() function should use mark_safe() instead of allow_tags=True:

from django.utils.safestring import mark_safe
# ...
    def get_edit_link(self, obj=None):
        if obj.pk:  # if object has already been saved and has a primary key, show link to it
            url = reverse(
                'admin:%s_%s_change' % (obj._meta.app_label, obj._meta.model_name), 
                args=[force_text(obj.pk)]
            )
            return mark_safe("""<a href="{url}">{text}</a>""".format(
                url=url,
                text=_("Edit this %s separately") % obj._meta.verbose_name,
            ))
        return _("(save and continue editing to create a link)")
    get_edit_link.short_description = _("Edit link")

In this administration setup, the get_edit_link() method creates a HTML link between the inline and the separate administration form for the Picture model. As you can see, I also added the get_picture_preview() function as a bonus. It is included in both administration definitions for the Picture model and its purpose is to show a preview of the uploaded picture after saving it.

To recap, nested inlines are not supported by Django out of the box. However, you can have your inlines edited in a separate page with the forms linked to each other. For the linking you would use some magic of the readonly_fields attribute.

What if you really need to have inlines under inlines in your project? In that case you might check django-nested-admin and don't hesitate to share your experience with it in the comments.


Cover photo by Denys Nevozhai

2013-12-18

How to Export Your Data as CSV, XLS, or XLSX

There are times, when you need to export the data from your database to different formats. For example, you want to create some diagrams in Office program for a presentation. In this post I will show you how to create admin actions which export selected items as files for a spreadsheet application (like MS Excel, OpenOffice Calc, LibreOffice Calc, Gnumeric, or Numbers). I will cover the mostly used formats: Comma Separated Values (CSV), Binary Excel (XLS), and Office Open XML (XLSX).

First of all, have a look at the model we will be dealing with. It's a simple model with title, description, and - of course - the id.

# models.py
from django.db import models
class MyModel(models.Model):
    title = models.CharField(max_length=100)
    description = models.TextField(blank=True)

In the admininstration options, we'll define three admin actions: export_csv, export_xls, and export_xlsx.

# admin.py
from django.contrib import admin
from models import MyModel

# ... export functions will go here ...

class MyModelAdmin(admin.ModelAdmin):
    actions = [export_csv, export_xls, export_xlsx]

admin.site.register(MyModel, MyModelAdmin)

Now let's create functions for each of those actions!

Comma-Separated Values Format

CSV is the most common import and export format for spreadsheets and databases. It's a textual format which one could easily create or parse himself, but there is also a python built-in library csv for handy data manipulation.

def export_csv(modeladmin, request, queryset):
    import csv
    from django.utils.encoding import smart_str
    response = HttpResponse(content_type='text/csv')
    response['Content-Disposition'] = 'attachment; filename=mymodel.csv'
    writer = csv.writer(response, csv.excel)
    response.write(u'\ufeff'.encode('utf8')) # BOM (optional...Excel needs it to open UTF-8 file properly)
    writer.writerow([
        smart_str(u"ID"),
        smart_str(u"Title"),
        smart_str(u"Description"),
    ])
    for obj in queryset:
        writer.writerow([
            smart_str(obj.pk),
            smart_str(obj.title),
            smart_str(obj.description),
        ])
    return response
export_csv.short_description = u"Export CSV"

As you can see, HttpResponse is a file-like object and we used it to write data to.

Excel Binary File Format

XLS is the main spreadsheet format which holds data in worksheets, charts, and macros. We are going to use xlwt library to create a spreadsheet. There is analogous library xlrd to read XLS files. Note, that this format allows to have only 256 columns.

def export_xls(modeladmin, request, queryset):
    import xlwt
    response = HttpResponse(content_type='application/ms-excel')
    response['Content-Disposition'] = 'attachment; filename=mymodel.xls'
    wb = xlwt.Workbook(encoding='utf-8')
    ws = wb.add_sheet("MyModel")
    
    row_num = 0
    
    columns = [
        (u"ID", 2000),
        (u"Title", 6000),
        (u"Description", 8000),
    ]

    font_style = xlwt.XFStyle()
    font_style.font.bold = True

    for col_num in xrange(len(columns)):
        ws.write(row_num, col_num, columns[col_num][0], font_style)
        # set column width
        ws.col(col_num).width = columns[col_num][1]

    font_style = xlwt.XFStyle()
    font_style.alignment.wrap = 1
    
    for obj in queryset:
        row_num += 1
        row = [
            obj.pk,
            obj.title,
            obj.description,
        ]
        for col_num in xrange(len(row)):
            ws.write(row_num, col_num, row[col_num], font_style)
            
    wb.save(response)
    return response
    
export_xls.short_description = u"Export XLS"

Here we created one worksheet, filled it with data, marked the first row in bold, and made the lines in the other cells wrapped. Also we set the width for each column. We'll do the same in the next format too.

Office Open XML Format

XLSX (a.k.a. OOXML or OpenXML) is a zipped, XML-based file format developed by Microsoft. It is fully supported by Microsoft Office 2007 and newer versions. OpenOffice 4.0, for example, can only read it. There is a python library openpyxl for reading and writing those files. This format is great when you need more than 256 columns and text formatting options.

def export_xlsx(modeladmin, request, queryset):
    import openpyxl
    from openpyxl.cell import get_column_letter
    response = HttpResponse(content_type='application/vnd.openxmlformats-officedocument.spreadsheetml.sheet')
    response['Content-Disposition'] = 'attachment; filename=mymodel.xlsx'
    wb = openpyxl.Workbook()
    ws = wb.get_active_sheet()
    ws.title = "MyModel"

    row_num = 0

    columns = [
        (u"ID", 15),
        (u"Title", 70),
        (u"Description", 70),
    ]

    for col_num in xrange(len(columns)):
        c = ws.cell(row=row_num + 1, column=col_num + 1)
        c.value = columns[col_num][0]
        c.style.font.bold = True
        # set column width
        ws.column_dimensions[get_column_letter(col_num+1)].width = columns[col_num][1]

    for obj in queryset:
        row_num += 1
        row = [
            obj.pk,
            obj.title,
            obj.description,
        ]
        for col_num in xrange(len(row)):
            c = ws.cell(row=row_num + 1, column=col_num + 1)
            c.value = row[col_num]
            c.style.alignment.wrap_text = True

    wb.save(response)
    return response

export_xlsx.short_description = u"Export XLSX"

Conclusion

So whenever you need to get your Django project data to some spreadsheet application, there are several ways to do that. If you are planning to import the data to some other database, CSV is probably the best, as it is simple, straightforward, and requires no third-party libraries. However, if you need your data with nice formatting and maybe some statistical formulas, you should export XLS or XLSX format. The maximum amount of columns in XLS format is limited to 256, whereas XLSX format allows more columns, but is not fully supported by all spreadsheet applications.

2011-11-21

Custom Admin Filter Specification

Let's say we have a model Project with age groups as boolean fields:

class Project(models.Model):
    # ...
    age_group_0_5 = models.BooleanField(u"From 0 to 5 years")
    age_group_6_12 = models.BooleanField(u"From 6 to 12 years")
    age_group_13_18 = models.BooleanField(u"From 13 to 18 years")
    age_group_19_27 = models.BooleanField(u"Fron 19 to 27 years")
    # ...

In order to list them as one selection in the admin list filter, we need a specific filter specification. Let's create it in the admin.py:

from django.contrib.admin.filterspecs import FilterSpec

class AgeChoicesFilterSpec(FilterSpec):
    def title(self):
        return u"Age group"
        
    def __init__(self, f, request, params, model, model_admin,
                 field_path=None):
        super(AgeChoicesFilterSpec, self).__init__(f, request, params, model,
                                                model_admin,
                                                field_path=field_path)
        self.request = request
        
    def choices(self, cl):
        yield {'selected': not(
                    self.request.GET.get('age_group_0_5', None) or 
                    self.request.GET.get('age_group_6_12', None) or 
                    self.request.GET.get('age_group_13_18', None) or 
                    self.request.GET.get('age_group_19_27', None) 
                    ),
               'query_string': cl.get_query_string(
                               {},
                               ['age_group_0_5', 'age_group_6_12', 'age_group_13_18', 'age_group_19_27']),
               'display': u'All'}
        yield {'selected': self.request.GET.get('age_group_0_5', None) == 'True',
               'query_string': cl.get_query_string(
                               {'age_group_0_5': 'True'},
                               ['age_group_6_12', 'age_group_13_18', 'age_group_19_27']),
               'display': u"From 0 to 5 years"}
        yield {'selected': self.request.GET.get('age_group_6_12', None) == 'True',
               'query_string': cl.get_query_string(
                               {'age_group_6_12': 'True'},
                               ['age_group_0_5', 'age_group_13_18', 'age_group_19_27']),
               'display': u"From 6 to 12 years"}
        yield {'selected': self.request.GET.get('age_group_13_18', None) == 'True',
               'query_string': cl.get_query_string(
                               {'age_group_13_18': 'True'},
                               ['age_group_0_5', 'age_group_6_12', 'age_group_19_27']),
               'display': u"From 13 to 18 years"}
        yield {'selected': self.request.GET.get('age_group_19_27', None) == 'True',
               'query_string': cl.get_query_string(
                               {'age_group_19_27': 'True'},
                               ['age_group_0_5', 'age_group_6_12', 'age_group_13_18']),
               'display': u"From 19 to 27 years"}

FilterSpec.filter_specs.insert(0, (lambda f: f.name == 'age_group_0_5',
                               AgeChoicesFilterSpec))

Here the most important method of FilterSpec is choices. It defines the choices for the filter by dictionary with three keys:

  • selected is the condition when this choice should be selected.
  • query_string is the URL query string that will be formed to filter the list by. The query string is formed by get_query_string method of ChangeList instance. It takes two parameters: a dictionary of new parameters to add to the current query, and a list of parameters to remove from the current query.
  • display is the human-readable string which will be shown for this choice in the filter.

The new filter specification should be attached to a field. Here it will be applied to all fields with the name "age_group_0_5" and we have just one such field.

The last thing to do is to define admin options for the Project model:

from django.contrib import admin
from models import Project

class ProjectAdmin(admin.ModelAdmin):
    # ...
    list_filter = ("age_group_0_5", )
    # ...
    
admin.site.register(Project, ProjectAdmin)
Now you know how to create a custom admin filter specification for your model. :)

2009-10-15

Weather App Tutorial. Part 2 of 5. Models

This is the second part of my tutorial how to make a weather app. This time I will show you how to create the models and set up the admin.

Open the models.py file in the climate_change directory and enter the following:


# -*- coding: UTF-8 -*-
from django.db import models
from django.utils.translation import ugettext_lazy as _
from django.conf import settings

class Location(models.Model):
    name = models.CharField(_("name"), max_length=200)
    location_id = models.CharField(
        _("location ID"),
        max_length=20,
        help_text=_("Location IDs can be retrieved from URLs of weather "
            "at specific cities at Yahoo! Weather, e.g. GMXX0008 from "
            "http://weather.yahoo.com/forecast/GMXX0008.html"),
        )
    
    class Meta:
        verbose_name=_("location")
        verbose_name_plural=_("locations")
    
    def __unicode__(self):
        return self.name

class WeatherLog(models.Model):
    location = models.ForeignKey(Location, verbose_name=_("location"))
    timestamp = models.DateTimeField(_("timestamp"))
    temperature = models.IntegerField(_("temperature (C°)"))
    humidity = models.IntegerField(_("humidity (%)"))
    wind_speed = models.DecimalField(
         _("wind speed (km/h)"),
         max_digits=5,
         decimal_places=2,
         )
    visibility = models.DecimalField(
         _("visibility (km)"),
         max_digits=5,
         decimal_places=2,
         )
    
    class Meta:
        verbose_name=_("weather log")
        verbose_name_plural=_("weather logs")
        ordering = ("-timestamp",)
    
    def __unicode__(self):
        return "%s @ %s" % (
            self.location.name,
            self.timestamp.strftime("%Y-%m-%dT%H:%M"),
            )

The models are created. Now let's create the database schema for them.


python manage.py syncdb

Also in this step when asked, I created a superuser called "demo" to be able to access django-contributed administration. Let's try it out. We'll need to add a file admin.py to climate_change with this content:


# -*- coding: utf-8 -*-
from django.db import models
from django.contrib import admin

Location = models.get_model("climate_change", "Location")
WeatherLog = models.get_model("climate_change", "WeatherLog")

admin.site.register(Location)
admin.site.register(WeatherLog)

Then uncomment admin related lines in urls.py of the project:


# -*- coding: utf-8 -*-
from django.conf.urls.defaults import *
from django.contrib import admin
admin.autodiscover()

urlpatterns = patterns("",
    (r"^admin/", include(admin.site.urls)),
    )

Finally, run the development server and check if the models really work.


python shell runserver
# now you can go to http://127.0.0.1:8000/admin/ in a browser


Yes! Everything works as expected for now. I will add my current location and its ID in Yahoo! Weather to the database. For me it's Berlin, Germany and the ID is GMXX0008. I found the ID in the URL of the page showing the weather for Berlin.


Tomorrow I will show you how to import weather details from Yahoo!