2016-12-16

Django Administration: Inlines for Inlines

The default Django model administration comes with a concept of inlines. If you have a one-to-many relationship, you can edit the parent and its children in the same form. However, you are limited in a way that you cannot have inlines under inlines at nested one-to-many relations. For example, you can't show models Painter, Picture, and Review in the same form if one painter may have drawn multiple pictures and each picture may have several reviews.

In this article I would like to share a workaround allowing you to quickly access the inlines of an inline model. The idea is that for every inline you can provide a HTML link leading to the separate form where you can edit the related model and its own relations. It's as simple as that.

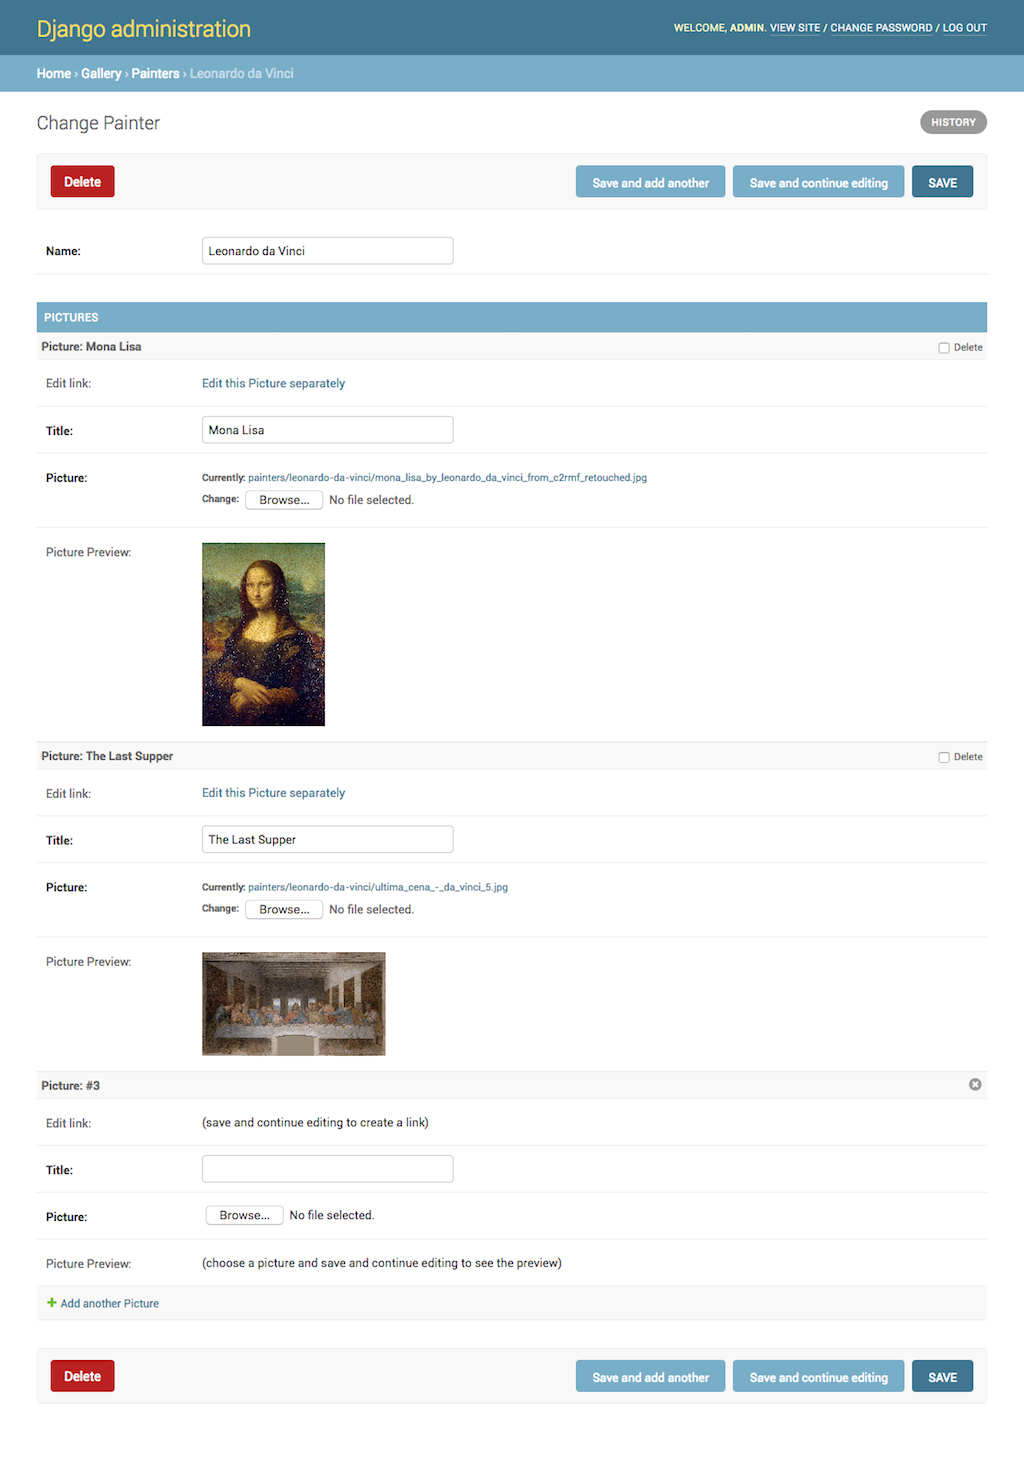
For example, in the form of Painter model, you have the instances of Picture listed with specific links "Edit this Picture separately":
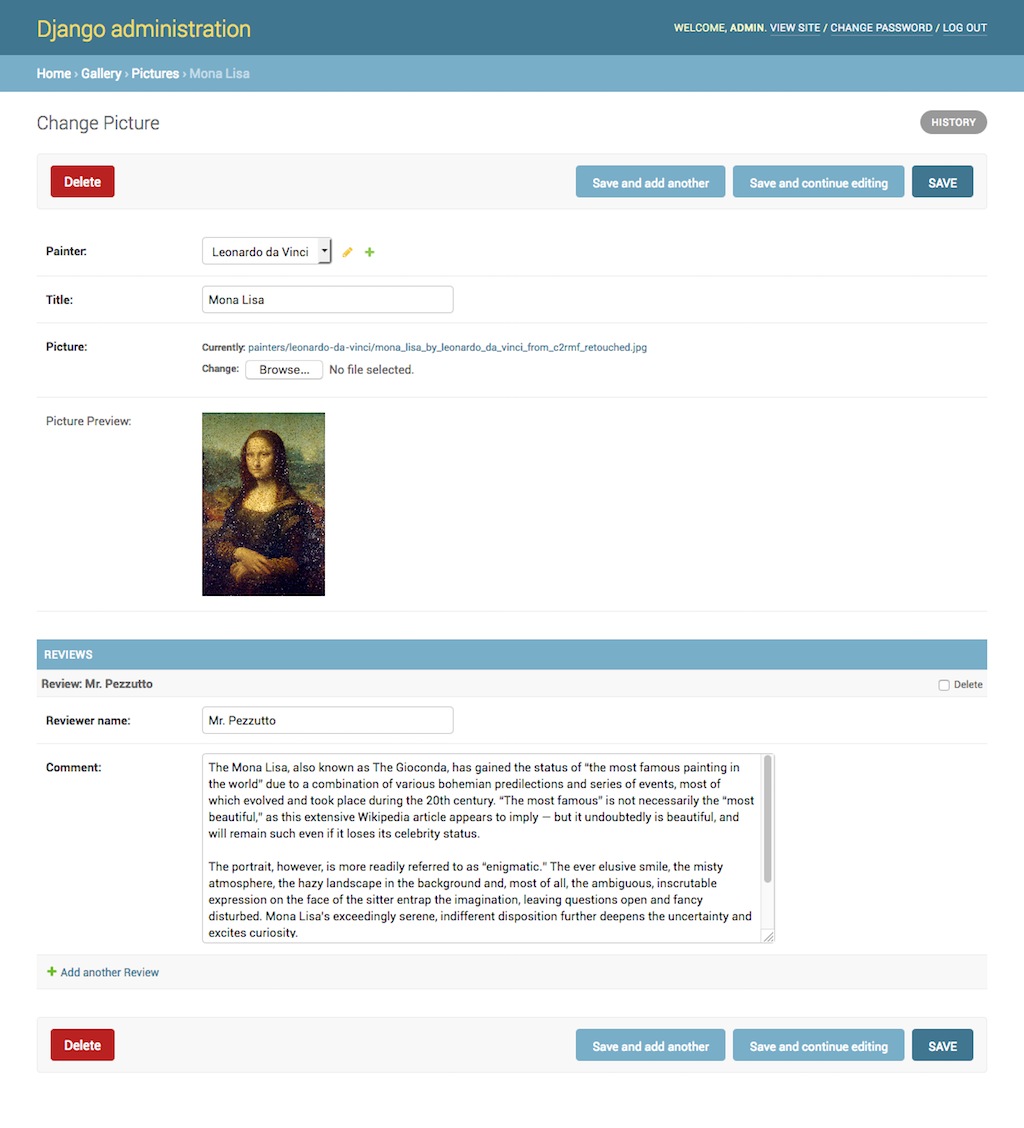
When such a link is clicked, the administrator goes to the form of the Picture model which shows the instances of Review model listed underneath:
Let's have a look, how to implement this.

First of all, I will create a gallery app and define the three models there. Nothing fancy here. The important part there is just that the Picture model has a foreign key to the Painter model and the Review model has a foreign key to the Picture model.

# gallery/models.py
# -*- coding: UTF-8 -*-
from __future__ import unicode_literals

import os

from django.db import models
from django.utils.encoding import python_2_unicode_compatible
from django.utils.translation import ugettext_lazy as _
from django.utils.text import slugify


@python_2_unicode_compatible
class Painter(models.Model):
    name = models.CharField(_("Name"), max_length=255)

    class Meta:
        verbose_name = _("Painter")
        verbose_name_plural = _("Painters")

    def __str__(self):
        return self.name


def upload_to(instance, filename):
    filename_base, filename_ext = os.path.splitext(filename)
    return "painters/{painter}/{filename}{extension}".format(
        painter=slugify(instance.painter.name),
        filename=slugify(filename_base),
        extension=filename_ext.lower(),
    )

@python_2_unicode_compatible
class Picture(models.Model):
    painter = models.ForeignKey(Painter, verbose_name=_("Painter"), on_delete=models.CASCADE)
    title = models.CharField(_("Title"), max_length=255)
    picture = models.ImageField(_("Picture"), upload_to=upload_to)

    class Meta:
        verbose_name = _("Picture")
        verbose_name_plural = _("Pictures")

    def __str__(self):
        return self.title


@python_2_unicode_compatible
class Review(models.Model):
    picture = models.ForeignKey(Picture, verbose_name=_("Picture"), on_delete=models.CASCADE)
    reviewer = models.CharField(_("Reviewer name"), max_length=255)
    comment = models.TextField(_("Comment"))

    class Meta:
        verbose_name = _("Review")
        verbose_name_plural = _("Reviews")

    def __str__(self):
        return self.reviewer

Then I will create the administration definition for the models of the gallery app. Here I will set two types of administration for the Picture model:

  • By extending admin.StackedInline I will create administration stacked as inline.
  • By extending admin.ModelAdmin I will create administration in a separate form.

In Django model administration besides usual form fields, you can also include some computed values. This can be done by your fields (or fieldsets) and readonly_fields attributes referring to a callable or a method name.

You can set a translatable label for those computed values by defining short_description attribute for the callable or method. If you want to render some HTML, you can also set the allow_tags attribute to True (otherwise your HTML string will be escaped).

# gallery/admin.py
# -*- coding: UTF-8 -*-
from django.contrib import admin
from django.core.urlresolvers import reverse
from django.utils.translation import ugettext_lazy as _
from django.utils.text import force_text

from .models import Painter, Picture, Review

def get_picture_preview(obj):
    if obj.pk:  # if object has already been saved and has a primary key, show picture preview
        return """<a href="{src}" target="_blank"><img src="{src}" alt="{title}" style="max-width: 200px; max-height: 200px;" /></a>""".format(
            src=obj.picture.url,
            title=obj.title,
        )
    return _("(choose a picture and save and continue editing to see the preview)")
get_picture_preview.allow_tags = True
get_picture_preview.short_description = _("Picture Preview")


class PictureInline(admin.StackedInline):
    model = Picture
    extra = 0
    fields = ["get_edit_link", "title", "picture", get_picture_preview]
    readonly_fields = ["get_edit_link", get_picture_preview]

    def get_edit_link(self, obj=None):
        if obj.pk:  # if object has already been saved and has a primary key, show link to it
            url = reverse('admin:%s_%s_change' % (obj._meta.app_label, obj._meta.model_name), args=[force_text(obj.pk)])
            return """<a href="{url}">{text}</a>""".format(
                url=url,
                text=_("Edit this %s separately") % obj._meta.verbose_name,
            )
        return _("(save and continue editing to create a link)")
    get_edit_link.short_description = _("Edit link")
    get_edit_link.allow_tags = True


@admin.register(Painter)
class PainterAdmin(admin.ModelAdmin):
    save_on_top = True
    fields = ["name"]
    inlines = [PictureInline]


class ReviewInline(admin.StackedInline):
    model = Review
    extra = 0
    fields = ["reviewer", "comment"]


@admin.register(Picture)
class PictureAdmin(admin.ModelAdmin):
    save_on_top = True
    fields = ["painter", "title", "picture", get_picture_preview]
    readonly_fields = [get_picture_preview]
    inlines = [ReviewInline]

UPDATE! Since Django 2.0, the get_picture_preview() function should use mark_safe() instead of allow_tags=True:

from django.utils.safestring import mark_safe
# ...
    def get_edit_link(self, obj=None):
        if obj.pk:  # if object has already been saved and has a primary key, show link to it
            url = reverse(
                'admin:%s_%s_change' % (obj._meta.app_label, obj._meta.model_name), 
                args=[force_text(obj.pk)]
            )
            return mark_safe("""<a href="{url}">{text}</a>""".format(
                url=url,
                text=_("Edit this %s separately") % obj._meta.verbose_name,
            ))
        return _("(save and continue editing to create a link)")
    get_edit_link.short_description = _("Edit link")

In this administration setup, the get_edit_link() method creates a HTML link between the inline and the separate administration form for the Picture model. As you can see, I also added the get_picture_preview() function as a bonus. It is included in both administration definitions for the Picture model and its purpose is to show a preview of the uploaded picture after saving it.

To recap, nested inlines are not supported by Django out of the box. However, you can have your inlines edited in a separate page with the forms linked to each other. For the linking you would use some magic of the readonly_fields attribute.

What if you really need to have inlines under inlines in your project? In that case you might check django-nested-admin and don't hesitate to share your experience with it in the comments.


Cover photo by Denys Nevozhai

2016-05-26

Debugging Django Management Commands in PyCharm

My favorite editor for Python projects is PyCharm. Besides editing code, it allows you to inspect the database, work with Git repositories, run management commands, execute bash commands and Python scripts, and debug code just in the same window. In this article, I will show you how to set breakpoints and debug Django management commands visually in PyCharm.

Django management commands are scripts that can be executed on your Django project to do something with the project database, media files, or code. Django itself comes with a bunch of commands like: migrate, runserver, collectstatic, makemessages, and clearsessions. Management commands can be executed like this:

(myproject_env)$ python manage.py clearsessions

If you want to create a custom management command in your project, you can find how to do that in the official Django documentation. Also you can find some practical examples in the Chapter 9, Data Import and Export of the Web Development with Django Cookbook - Second Edition.

In this example, I won't create any new management command, but will debug the clearsessions command that is coming from Django and is located at django/contrib/sessions/management/commands/clearsessions.py.

First of all, let's click on "Edit Configurations..." in the top toolbar just before the Run button (with the Play icon). In the opened dialog box "Run/Debug Configurations" click on the "Add New Configuration" button (with the Plus icon) and choose "Python".

Let's fill in the configuration with these values:

Name: Clear Outdated Sessions
Script: /Users/me/DjangoProjects/myproject_env/project/myproject/manage.py
Script paramethers: clearsessions --traceback --verbosity=2
Python interpreter: Python 2.7.6 virtualenv at ~/DjangoProjects/myproject_env
Working directory: /Users/me/DjangoProjects/myproject_env/project/myproject/

Then open the file with the definition of the management command django/contrib/sessions/management/commands/clearsessions.py. Click on the left padding of the editor to add a breakpoint (marked with a red circle) where the script should stop executing for inspection.

Normally to run this script, you could click on the Run button (with the Play icon). But as we want to debug the script, we will click on the Debug button (with the Bug icon) in the toolbar.

The script will start executing and will stop temporarily at the breakpoint you made. You will be able to inspect all local variables in the debug panel that is opened at the bottom of your window by default.

You can navigate through code execution with the arrow buttons "Step Over", "Step Into", etc. To evaluate local or global variables or values, click on the "Evaluate Expression" button (with the Calculator icon) and enter some Python code.

Click on the "Resume Program" button (with the Fast Play icon) to continue execution of the script, when you are ready.

Analogously, you can debug your models, views, forms, or middlewares by running a development server ("Django server") in debug mode.


Cover photo by Jill Heyer

2016-05-21

Deploying a Django Website on Heroku

Once you have a working project, you have to host it somewhere. One of the most popular deployment platforms nowadays is Heroku. Heroku belongs to a Platform as a Service (PaaS) category of cloud computing services. Every Django project you host on Heroku is running inside a smart container in a fully managed runtime environment. Your project can scale horizontally (adding more computing machines) and you pay for what you use starting with a free tier. Moreover, you won't need much of system administrator's skills to do the deployment - once you do the initial setup, the further deployment is as simple as pushing Git repository to a special heroku remote.

However, there are some gotchas to know before choosing Heroku for your Django project:

  • One uses PostgreSQL database with your project. MySQL is not an option.
  • You cannot store your static and media files on Heroku. One should use Amazon S3 or some other storage for that.
  • There is no mailing server associated with Heroku. One can use third-party SendGrid plugin with additional costs, GMail SMTP server with sent email amount limitations, or some other SMTP server.
  • The Django project must be version-controlled under Git.
  • Heroku works with Python 2.7. Python 3 is not yet supported.

Recently I deployed a small Django project on Heroku. To have a quick reference for the future, I summed up the process here providing instructions how to do that for future reference.

1. Install Heroku Toolbelt

Sign up for a Heroku account. Then install Heroku tools for doing all the deployment work in the shell.

To connect your shell with Heroku, type:

$ heroku login

When asked, enter your Heroku account's email and password.

2. Prepare Pip Requirements

Activate your project's virtual environment and install Python packages required for Heroku:

(myproject_env)$ pip install django-toolbelt

This will install django, psycopg2, gunicorn, dj-database-url, static3, and dj-static to your virtual environment.

Install boto and Django Storages to be able to store static and media files on an S3 bucket:

(myproject_env)$ pip install boto
(myproject_env)$ pip install django-storages

Go to your project's directory and create the pip requirements that Heroku will use in the cloud for your project:

(myproject_env)$ pip freeze -l > requirements.txt

3. Create Heroku-specific Files

You will need two files to tell Heroku what Python version to use and how to start a webserver.

In your project's root directory create a file named runtime.txt with the following content:

python-2.7.11

Then at the same location create a file named Procfile with the following content:

web: gunicorn myproject.wsgi --log-file -

4. Configure the Settings

As mentioned in the "Web Development with Django Cookbook - Second Edition", we keep the developmnent and production settings in separate files both importing the common settings from a base file.

Basically we have myproject/conf/base.py with the settings common for all environments.

Then myproject/conf/dev.py contains the local database and dummy email configuration as follows:

# -*- coding: UTF-8 -*-
from __future__ import unicode_literals
from .base import *

DATABASES = {
    "default": {
        "CONN_MAX_AGE": 0,
        "ENGINE": "django.db.backends.postgresql",
        "HOST": "localhost",
        "NAME": "myproject",
        "PASSWORD": "",
        "PORT": "",
        "USER": "postgres"
    }
}

EMAIL_BACKEND = "django.core.mail.backends.console.EmailBackend"

Lastly for the production settings we need myproject/conf/prod.py with special database configuration, non-debug mode, and unrestrictive allowed hosts as follows:

# -*- coding: UTF-8 -*-
from __future__ import unicode_literals
from .base import *
import dj_database_url

DATABASES = {
    "default": dj_database_url.config()
}

ALLOWED_HOSTS = ["*"]

DEBUG = False

Now let's open myproject/settings.py and add the following content:

# -*- coding: UTF-8 -*-
from __future__ import unicode_literals
from .conf.dev import *

Finally, open the myproject/wsgi.py and change the location of the DJANGO_SETTINGS_MODULE there:

os.environ.setdefault("DJANGO_SETTINGS_MODULE", "myproject.conf.prod")

5. Set Up Amazon S3 for Static and Media Files

Create an Amazon S3 bucket myproject.media at the AWS Console (web interface for Amazon Web Services). Go to the properties of the bucket, expand "Permissions" section, click on the "add bucket policy" button and enter the following:

{
    "Version": "2008-10-17",
    "Statement": [
        {
            "Sid": "AllowPublicRead",
            "Effect": "Allow",
            "Principal": {
                "AWS": "*"
            },
            "Action": "s3:GetObject",
            "Resource": "arn:aws:s3:::myproject.media/*"
        }
    ]
}

This ensures that files on the S3 bucket will be accessible publicly without any API keys.

Go back to your Django project and add storages to the INSTALLED_APPS in myproject/conf/base.py:

INSTALLED_APPS = [
    # ...
    "storages",
]

Media files and static files will be stored on different paths under S3 bucket. To implement that, we need to create two Python classes under a new file myproject/s3utils.py as follows:

# -*- coding: UTF-8 -*-
from __future__ import unicode_literals
from storages.backends.s3boto import S3BotoStorage

class StaticS3BotoStorage(S3BotoStorage):
    """
    Storage for static files.
    """

    def __init__(self, *args, **kwargs):
        kwargs['location'] = 'static'
        super(StaticS3BotoStorage, self).__init__(*args, **kwargs)


class MediaS3BotoStorage(S3BotoStorage):
    """
    Storage for uploaded media files.
    """

    def __init__(self, *args, **kwargs):
        kwargs['location'] = 'media'
        super(MediaS3BotoStorage, self).__init__(*args, **kwargs)

Finally, let's edit the myproject/conf/base.py and add AWS settings:

AWS_S3_SECURE_URLS = False       # use http instead of https
AWS_QUERYSTRING_AUTH = False                # don't add complex authentication-related query parameters for requests
AWS_S3_ACCESS_KEY_ID = "..."                # Your S3 Access Key
AWS_S3_SECRET_ACCESS_KEY = "..."            # Your S3 Secret
AWS_STORAGE_BUCKET_NAME = "myproject.media"
AWS_S3_HOST = "s3-eu-west-1.amazonaws.com"  # Change to the media center you chose when creating the bucket

STATICFILES_STORAGE = "myproject.s3utils.StaticS3BotoStorage"
DEFAULT_FILE_STORAGE = "myproject.s3utils.MediaS3BotoStorage"

# the next monkey patch is necessary to allow dots in the bucket names
import ssl
if hasattr(ssl, '_create_unverified_context'):
   ssl._create_default_https_context = ssl._create_unverified_context

Collect static files to the S3 bucket:

(myproject_env)$ python manage.py collectstatic --noinput

6. Set Up Gmail to Send Emails

Open myproject/conf/prod.py and add the following settings:

EMAIL_USE_TLS = True
EMAIL_HOST = "smtp.gmail.com"
EMAIL_HOST_USER = "myproject@gmail.com"
EMAIL_HOST_PASSWORD = "mygmailpassword"
EMAIL_PORT = 587

7. Push to Heroku

Commit and push all the changes to your Git origin remote. Personally I prefer using SourceTree to do that, but you can also do that in the command line, PyCharm, or another software.

In your project directory type the following:

(myproject_env)$ heroku create my-unique-project

This will create a Git remote called "heroku", and a new Heroku project "my-unique-project" which can be later accessed at http://my-unique-project.herokuapp.com.

Push the changes to heroku remote:

(myproject_env)$ git push heroku master

8. Transfer Your Local Postgres Database To Heroku

Create local database dump:

(myproject_env)$ PGPASSWORD=mypassword pg_dump -Fc --no-acl --no-owner -h localhost -U myuser mydb > mydb.dump

Upload the database dump temporarily to some server, for example, S3 bucket: http://myproject.media.s3-eu-west-1.amazonaws.com/mydb.dump. Then import that dump into the Heroku database:

(myproject_env)$ heroku pg:backups restore 'http://myproject.media.s3-eu-west-1.amazonaws.com/mydb.dump' DATABASE_URL

Remove the database dump from S3 server.

9. Set Environment Variables

If your Git repository is not private, put your secret values in environment variables rather than in the Git repository directly.

(myproject_env)$ heroku config:set AWS_S3_ACCESS_KEY_ID=ABCDEFG123
$ heroku config:set AWS_S3_SECRET_ACCESS_KEY=aBcDeFg123

To read out the environment variables you can type:

(myproject_env)$ heroku config

To read out the environment variables in the Python code open myproject/conf/base.py and type:

import os
AWS_S3_ACCESS_KEY_ID = os.environ.get("AWS_S3_ACCESS_KEY_ID", "")
AWS_S3_SECRET_ACCESS_KEY = os.environ.get("AWS_S3_SECRET_ACCESS_KEY", "")

10. Set DNS Settings

Open your domain settings and set CNAME to "my-unique-project.herokuapp.com".

At last, you are done! Drop in the comments if I missed some part. For the new updates, see the next section.

*. Update Production

Push the changes to heroku remote:

(myproject_env)$ git push heroku master

If you have changed something in the static files, collect them again:

(myproject_env)$ python manage.py collectstatic --noinput

Collecting static files to S3 bucket takes quite a long time, so I do not recommend to do that automatically every time when you want to deploy to Heroku.

Further Reading

You can read more about Django on Heroku in the following resources:


Cover photo by Frances Gunn

2016-02-10

Special Offer for the Readers of DjangoTricks Blog

Packt Publishing, the company that published my Django book, has a special offer for enthusiast and professional developers reading this blog. For two weeks you can get the eBook "Web Development with Django Cookbook - Second Edition" for half price. The eBook is available in PDF, ePub, Mobi, and Kindle formats. Also you will get access to download the related code files.

Use the discount code DJGTRK50 at the Packt Publishing bookstore.
The discount is valid until the 24th of February, 2016.

2016-02-06

Fresh Book for Django Developers

This week the post office delivered a package that made me very satisfied. It was a box with three paper versions of my "Web Development with Django Cookbook - Second Edition". The book was published at the end of January after months of hard, but fulfilling work in the late evenings and at weekends.

The first Django Cookbook was dealing with Django 1.6. Unfortunately, the support for that version is over. So it made sense to write an update for a newer Django version. The second edition was adapted for Django 1.8 which has a long-term support until April 2018 or later. This edition introduces new features added to Django 1.7 and Django 1.8, such as database migrations, QuerySet expressions, or System Check Framework. Most concepts in this new book should also be working with Django 1.9.

My top 5 favourite new recipes are these:

  • Configuring settings for development, testing, staging, and production environments
  • Using database query expressions
  • Implementing a multilingual search with Haystack
  • Testing pages with Selenium
  • Releasing a reusable Django app

The book is worth reading for any Django developer, but will be best understood by those who already know the basics of web development with Django. You can learn more about the book and buy it at the Packt website or Amazon.

I thank the Packt Publishing very much for long cooperation in the development of this book. I am especially thankful to acquisition editor Nadeem N. Bagban, content development editors Arwa Manasawala and Sumeet Sawant, and technical editor Bharat Patil. Also I am grateful for insightful feedback from the reviewer Jake Kronika.

What 5 recipes do you find the most useful?